- New Sailboats
- Sailboats 21-30ft
- Sailboats 31-35ft
- Sailboats 36-40ft
- Sailboats Over 40ft
- Sailboats Under 21feet
- used_sailboats
- Apps and Computer Programs
- Communications
- Fishfinders
- Handheld Electronics
- Plotters MFDS Rradar
- Wind, Speed & Depth Instruments
- Anchoring Mooring
- Running Rigging
- Sails Canvas
- Standing Rigging
- Diesel Engines
- Off Grid Energy
- Cleaning Waxing
- DIY Projects
- Repair, Tools & Materials
- Spare Parts
- Tools & Gadgets
- Cabin Comfort
- Ventilation
- Footwear Apparel
- Foul Weather Gear
- Mailport & PS Advisor
- Inside Practical Sailor Blog
- Activate My Web Access
- Reset Password
- Customer Service

- Free Newsletter

Catalina 270 vs. The Beneteau First 265 Used Boat Match-Up

Ericson 41 Used Boat Review

Mason 33 Used Boat Review

Beneteau 311, Catalina 310 and Hunter 326 Used Boat Comparison

Tips From A First “Sail” on the ICW

Tillerpilot Tips and Safety Cautions

Best Crimpers and Strippers for Fixing Marine Electrical Connectors

Thinking Through a Solar Power Installation

Polyester vs. Nylon Rode

Getting the Most Out of Older Sails

How (Not) to Tie Your Boat to a Dock

Stopping Mainsheet Twist
Fuel Lift Pump: Easy DIY Diesel Fuel System Diagnostic and Repair

Ensuring Safe Shorepower

Sinking? Check Your Stuffing Box

The Rain Catcher’s Guide

What Do You Do With Old Fiberglass Boats?

Boat Repairs for the Technically Illiterate

Boat Maintenance for the Technically Illiterate: Part 1

Whats the Best Way to Restore Clear Plastic Windows?

Giving Bugs the Big Goodbye

Galley Gadgets for the Cruising Sailor

Those Extras you Don’t Need But Love to Have

What’s the Best Sunscreen?

UV Clothing: Is It Worth the Hype?

Preparing Yourself for Solo Sailing

How to Select Crew for a Passage or Delivery

R. Tucker Thompson Tall Ship Youth Voyage

On Watch: This 60-Year-Old Hinckley Pilot 35 is Also a Working…

On Watch: America’s Cup

On Watch: All Eyes on Europe Sail Racing

Dear Readers
- Boat Maintenance
- Systems & Propulsion
- Marine Electronics
- Safety & Seamanship
Getting the Charge Out of Lightning
No matter how well protected the boat may be, few manage to escape unscathed..
Miraculously, relatively few people are injured in lightning strikes. Frequently, of course, no one is aboard the boat when it is struck, and it is only by after-the-fact detective work that the extent of damage is discovered.
There are, however, two attendant bits of unpleasantness water, and contaminates like dirt, dust, rust, scale, bugs, and bones.
Most boat owners have only the vaguest idea of what is involved in protecting their boats from lightning damage. Many believe that their boats are already protected by the boat’s grounding system. Most are wrong.
Just because your boat may be bonded with heavy cop-per conductors connecting the masses of metal in the boat doesn’t mean that it is protected against lightning. A bon-ding system may be a part of a lightning protection system, but bonding itself offers no protection to the boat unless a good, direct path to ground is part of the system.
The purpose of bonding is to tie underwater metal masses in the boat together to reduce the possibility of galvanic corrosion caused by dissimilar metals immersed in an electrolyte. The purpose of lightning grounding is to get the massive electrical charge of a lightning strikethrough the boat to ground with the least possible amount of resistance.
Most lightning never reaches the earth: it is dispersed between clouds of different electrical potential. The lightning that concerns sailors is the discharge of electricity between a cloud and the surface of the earth, or an object on the surface of the earth, namely, your boat. The amount of electricity involved in lightning can be, well, astronomical. We’re talking about millions of volts.
Granted, the duration of a lightning strike is extremely short. But in the fraction of a second it takes for lightning to pass through your boat to ground, a great deal of damage can be done. And here’s the kicker. No matter how elaborate your lightning protection system, there is no guarantee that a lightning strike will not damage your boat.
Certainly you can reduce the potential damage from a lightning strike. That’s what protection is all about. But to think you can eliminate the possibility of damage is folly. There are too many recorded instances of so-called properly lightning-protected boats suffering damage to believe in the infallibility of lightning protection systems.
The goal of lightning protection is to offer a low resistance path to ground, in this case, the water. On a sailboat equipped with an aluminum mast and stainless steel standing rigging, the basic components of the lightning protection system are in place.
While neither aluminum nor stainless steel is an outstanding electrical conductor, the large cross-sectional area of both the mast and the rigging provide adequate conductivity for lightning protection. The trick, however, is get-ting the electricity from the mast and rigging to the water.
The straighter the path is from conductor (mast and rigging) to ground, the less likely are potentially dangerous side flashes. Put simply, side flashes are miniature lightning bolts which leap from the surface of the conductor to adjacent metal masses due to the difference in electrical potential between the charged conductor and the near by mass of metal. Ideally, therefore, the path from the bottom of the mast and rigging to ground would be absolutely vertical. In practice, this is rarely achieved.
If the boat has an external metal keel, the mast and standing rigging is frequently grounded to a keelbolt. There are pitfalls to this method. First, the connection between the bottom of the mast and rigging to the keelbolt must be highly conductive. ABYC (American Boat and Yacht Council) standards say that each primary conductor for lightning protection systems should have a resistance equal to or less than a #4 AWG copper conductor. (Secondary conductors should have resistance not greater than a #6 AWG copper conductor.)There is no drawback to using an even larger conductor.
Connecting the short conductor to the mast and keelbolt presents some problems. A crimp eye can be used on the end that is to be attached to the mast, but you may have to fabricate a larger eye for attachment to the keelbolt. This can be made from sheet copper. Soldering the connections is not recommended, since the heat generated in a lightning strike could melt the solder.
Then you have to face up to a basic problem. Your mast is aluminum, yet you’re connecting it to ground with a copper cable. Everyone knows that aluminum and copper are not galvanically compatible, so what’s the solution? While it will not eliminate corrosion, a stainless steel washer placed between the copper cable’s end fitting and the aluminum mast will at least retard it. But this connection is going to require yearly examination to make sure that a hole isn’t being eaten through the mast. In addition, of course, the process of corrosion creates wonderful aluminum oxide byproducts, which have very low conductivity. The aluminum oxide may reduce conductivity to the point where your theoretical attachment to ground is in fact non-existent. Once again, disassembling the connection and cleaning it yearly are essential to maintain conductivity. Constant attention to all the conductor connections is essential in any grounding system, whether it’s for lightning protection or grounding of the electrical system.
Even if all the connections in the system are flawless, you’re faced with getting the electrical charge out of the boat and into the water. Keels are always coated with bottom paint. Depending on the type of bottom paint used, the keel itself may be a fairly poor ground. An iron keel properly primed with epoxy mastic before bottom paint is applied is fairly well isolated from the water. If it weren’t, it would rust. The same goes for lead keels prepared in the same way. In practice, the electrical charge will probably be powerful enough to get to ground through the protection system on the keel. The same problem exists, of course, on painted metal boats with their systems of barrier coats. The barrier coats reduce conductivity, but do not eliminate it.
Do not under any circumstances ground the rigging or mast to ballast located inside a fiberglass hull shell. The electrical charge tends to travel on the surface of the conductor. Finding no path to ground from the isolated inside ballast, you may literally blow a line of holes through the hull along the top of the ballast line. Surveyors have reported occurrences of this type of damage to us, as strange as it may sound.
For boats with inside ballasting, or for powerboats, some type of external grounding plate is required. These are usually made from sintered bronze: tiny particles of bronze fused into a porous block. The effect is to give a much larger surface area than defined by the dimensions of the block itself. It is very important to use as large aground plate as necessary, and to position it as close to vertically in line with the primary lightning conductor (the mast) as possible.
Racing boats are not going to be willing to do this, since a ground plate creates a fair amount of drag in light air. Cruisers would be advised to trade off the drag for the protection offered.
A grounding plate installation is not a nail-it-in-place-and-forget-it installation. As with any bare metal underwater, oxides build up in the grounding plate, reducing its efficiency. The manufacturer of the plate can tell you the proper remedies, which may include removing the plate yearly and treating it in an acid bath to restore proper conductivity.
It is probably a poor practice to use the same grounding plate for lightning grounding and grounding of electronics such as Loran. If the lightning charge is too great for the plate to instantaneously transmit to ground, the charge may travel back through the ground wire to your electronics, with disastrous results.
For this article in its entirety please click the below link…
Getting the Charge Out of Lightning
RELATED ARTICLES MORE FROM AUTHOR

Safeguarding Sailors via Passage Guardian
Leave a reply cancel reply.
Log in to leave a comment
Latest Videos

Hans Christian 41T – Boat Review

Seven dead after superyacht sinks off Sicily. Was the crew at...

What’s the Best Sailboats for Beginners?

Why Does A Sailboat Keel Fall Off?
Latest sailboat review.

- Privacy Policy
- Do Not Sell My Personal Information
- Online Account Activation
- Privacy Manager

- Forum Listing
- Marketplace
- Advanced Search
- All Topics Sailing
- General Sailing Discussions
- SailNet is a forum community dedicated to Sailing enthusiasts. Come join the discussion about sailing, modifications, classifieds, troubleshooting, repairs, reviews, maintenance, and more!
Lightning rigging questions
- Add to quote
I just bought Lightning hull 9369. If anyone's interested I can post pictures. Meanwhile, I have a couple of questions pertaining to the rigging. First, there are two halyards on the forward side of the mast. One is right next to the forestay and exits above the gooseneck. The other is slightly higher on the mast and exits way down near the base of the mast. Which is the jib, and which is the spin? Second, I've never seen a jib sheet set up like this. How does the jib sheet rig and operate? I'd be most appreciative if any lightning sailors here can help me out with explanations or diagrams.

Thank you 030. I've actually seen that diagram on the ILCA, but I need a little more detail on the jib. Apparently there are two ways of rigging the jib sheets, and it involves several sets of blocks. I wish there were an owner's forum for Lightnings; it's not a very straightforward boat.

My boat also had what I will call a Cunningham for the jib which pulled down the leading edge of the jib - giving better shape. Click to expand...

bluetick, I owned a Lightning for a few years. Yes, the jib sheet can be routed between the shrouds & mast (for upwind sailing) OR outside the shrouds (for off the wind sailing). My boat also had what I will call a Cunningham for the jib which pulled down the leading edge of the jib - giving better shape. Your jib halyard should exit the mast below the fore stay. Spin halyard should exit the mast above the fore stay. Lots of controls on a Lightning rigged for racing - took me some time to figure it all out too.
Caleb, I'm a little unsure of how the centerboard works. Also, can you raise it part way, or is it just an all the way down-all the way up deal?
BLUETICK: THere is a drum that the centerboard control line winds around to give you purchase. You should be able to cleat it off so the board is in any position you want, however you're probably going to want it all the way down while beating and close reaching, all the way up any other time. Very few instances where you'd want it part way down. But find the HINTS that are online to give you more info.
SailorDave, There's a block and a cam cleat on the port side, toward the aftmost part of the centerboard well. Is that the only control for the centerboard? It's on the trailer right now, so I'm guessing that I simply release that line from the cleat and let the centerboard lower (while holding the line for control). Is that right?
bluetick, the rigging arrangement on my Lightning for the centerboard was fairly complex. A line ran from up in the bow to the stern and there may even have been a drum that sailordave mentions. The point is: the center board weighs around 250# so it needs some fairly serious mechanical advantage/purchase to move it up or down. I suppose I am saying that I don't remember exactly how the lines are routed for the enter board. d'oh!
- ?
- 176.2K members
Top Contributors this Month

By Product Categories
Small Boat Blocks
Big Boat Blocks
Complementary Hardware
Travelers & Genoa Leads
Mainsail Handling
Headsail Handling
Mooring Solutions
Spare Parts
Accessories
Harken Canvas
Sportfishing
Fly Soft-Attach Blocks
Carbo Air Blocks
Small Boat Classic
Flip-Flop Small Boat
GP Catamaran Ceramic Mainsheet Systems
Protexit™ Exit Blocks
Through-Deck
Wire High-Strength
Dinghy Vang
Small Boat Deck Organizers
Midrange Classic
Midrange Deck Organizers
Zircon Blocks
Element Blocks
Black Magic Air Blocks
Cruising ESP Blocks
Megayacht Blocks
Stainless Steel Blocks
Black Magic Air Runners
FlatWinder Powered Blocks
Mastbase Blocks
Over-the-Top
Crossover Blocks
Big Boat Deck Organizers
Cam Cleats & Kits
Cam Cleat Accessories
Cam Cleat Bases
Stand-Up Bases
Deck Organizers
Spinnaker Pole Cars
Soft Attachments
Fixed Padeyes
Removable Padeyes
Bolt-Down Fairleads
Grand Prix Jib Leads
Halyard Tensioners
Tiller Extensions
Peter's Desk Drawer
Dinghy Jib Leads
Crossbow Pivoting Self-Tacking Jib Traveler
13 mm Micro
22 mm Small Boat
27 mm Midrange
32 mm Big Boat
Windward Sheeting
42 mm Mini-Maxi
T-Track Genoa Lead
Access Rail System
13 mm AA Battcar System
22 mm A Battcar System
27 mm B Battcar System
32 mm C Battcar System
18 mm Switch Battcar System
26 mm Switch Battcar System
26 mm Trysail Switch
32 mm Switch Battcar System
32 mm Trysail Switch
40 mm Switch Battcar System
40 mm Trysail Switch System
Furling Mainsail Outhaul Systems
Single Line Reefing
Harken Vang-Master
Carbo Racing Foil
Small Boat Furling
Small Boat Underdeck
Reflex Furling
MKIV Jib Reefing & Furling
MKIV Underdeck Jib Reefing & Furling
Furling Accessories
Powered Furling
MKIV Ocean Furling
SnubbAir (Not a Winch)
Grand Prix Winches
Air Winches
Circuit Breakers
Analog Switches
Digital System Switch
Aluminum, Chrome & Bronze Winch Handles
Carbo OneTouch Locking Winch Handle
Service Kits
CLR Mooring Winches
Electric Captive Reel Winches
Hydraulic Captive Reel Winches
UniPower Radial
Single-Acting Integral Backstay Adjuster
Single-Acting Cylinders
Locking Cylinders
Double-Pull Cylinders
Grand Prix Cylinders
Hydraulic Cylinder Rod End Blocks
Hydraulic Cylinder End Fittings
Control Valves
Control Manifolds
Control Panels
Compact Control Panel
Rotary Pumps
Hydraulic Pump Handles
Power Systems
Repair Kits
Ball Bearings
Block Spare Parts
Traveler Cars
Furling Spare Parts
Winch Spare Parts
Winch Service Kits
Blockheads Gear
Promo & Gifts
Marine Grip
Blue Performance
Jeep/Truck tops
Garage storage
One-design Covers
Boat accessories
Canvas bags
By Type of Sailing
Dinghy / One-Design
Offshore Racing
Coastal / Day Cruising
Bluewater Cruising
Megayachts / Custom
Service Guide
Tech/Service
deck layouts
Data Sheets (SDS)
How to choose
System diagrams
Calculators
Reeving diagrams
Traveler Purchase Selection Guide
How to Choose
Testimonials
Hoister Videos
Request a Quote
Request Samples
Fabric details
Cover Styles
Canvas Videos
Contract Services
Materials and Components
Our Equipment
Contract Cut-and-Sew Project Spotlight
- Harken at the front
- Safety & Rescue
Support / One-design deck layouts
Lightning Deck Layout

Adjustable Ball Bearing Lead Car
Upgrading to an adjustable lead car system allows you to change your lead under sail without having to tack to unload the car. The Micro CB traveler cars are very small and lightweight, but strong—perfect for the Lightning.

Belowdeck Vang System
This split boom vang lets you easily adjust the vang from both sides while hiking. The 24:1 purchase uses lightweight Carbo blocks for the power needed to control sail shape without adding weight to the boat. The cascading system uses small high-tech line to help keep everything clean above deck.

If you would like to link to or reprint this article please contact [email protected]
Class History
With over 15,000 boats,the Lightning has 60 years of tradition behind it. This competitive 19-foot trailerable centerboarder is one of the most competitive one-design classes today. But whether you're interested in serious racing or just want to go for a ride, the Lightning gives you what you're looking for. Some great sailors have been 'struck by Lightning': Ted Turner, Dennis Conner, Ken Read, Bill Shore, and Greg Fisher to name a few.
Links International Lightning Class McLube™ Harken Canvas
Boat Specifications
Length: 19 ft (5.8 m) Beam: 6 ft 6 in (2 m) Displacement: 700 lb (318 kg) Sail Area (main & jib): 177 sq ft (16.4 sq m) Spinnaker: 300 sq ft (28 sq m)

Related products

29mm Block — Swivel, Becket

44mm Through-Deck Dinghy Block

13mm Low-Beam Track — .6 m

29mm Cheek Block

29mm Clew Block

29mm Double Block — Swivel

29mm Triple Block — Swivel

40mm Traveler Block

57mm Ratchamatic® Block — Swivel

29mm Double Upright Lead Bullet Block

13mm Car — Pivoting Shackle

Standard Cam-Matic® Cleat - 150

Standard Cam Base — Swivel

Standard X-Treme Angle Fairlead

25mm Wire Block — Shackle
Product categories.
- United States
- New Zealand
- United Kingdom

VIDEO: Expert insight for Lightning rigging
Published on August 18th, 2014 by Editor -->
2013 Lightning World Champion David Starck provides a tour of the rigging on his new Lightning. Published on Aug 15, 2014.

Tags: David Starck , Lightning
Related Posts

Lightning Class dangles a big carrot →

Lightning North American Champs →

Something for everyone at Lightning North Americans →
2024 Lightning Boat Grant Team →
© 2024 Scuttlebutt Sailing News. Inbox Communications, Inc. All Rights Reserved. made by VSSL Agency .
- Privacy Statement
- Advertise With Us
Get Your Sailing News Fix!
Your download by email.
- Your Name...
- Your Email... *
- Phone This field is for validation purposes and should be left unchanged.

High School and College Sailors - 15% Off Apparel & Accessories - LEARN MORE
- Call Us +1-503-285-5536
- Sign in & Register
- Recently Viewed
- One Design Parts
Lightning Parts
West Coast Sailing is your source for Lightning sailboat parts and accessories. The Lightning has 60 years of tradition behind it. This competitive 19-foot trailerable centerboarder is one of the most competitive one-design classes today. But whether you're interested in serious racing or just want to go for a ride, the Lightning gives you what you're looking for. Some great sailors have been 'struck by Lightning': Ted Turner, Dennis Conner, Ken Read, Bill Shore, and Greg Fisher to name a few.
- Qty in Cart

Harken Aluminum Cam Cleat H150
")
Ronstan Medium Cam Cleat (Grey)

Harken 29 mm Single Fixed Block H348

Harken 29 mm Single Block w/ Becket H341

Harken 40 mm Carbo Block H2650

Ronstan 40 mm Single Stand Up Block

Ronstan 55 mm Orbit Ratchet Block w/ Swivel

Harken 29 mm Double Block H342

Harken 57 mm Carbo Ratchamatic Block H2625

Harken 29 mm Triple Block H344

Swiveling Mainsheet Cleat

Ronstan 30 mm Orbit Cheek Block

Harken 29 mm Cheek Block H350

Harken 25mm Wire Block H300

Ronstan 30 mm Orbit Double Clew Ring Block
- Total: items /
- Add all to cart
Adding your products to cart
Rigging - halyards, sheets, and wires.
West Coast Sailing has a full range of designs for all Lightning running and standing rigging which can be built to order in our rig shop. Email our team at [email protected] to learn more . Products coming to our online store Spring 2022.
Rigging Diagram
Use the diagram below to reference Harken part numbers to appropriate application on your Lightning sailboat. Parts recommendations are offered as a guide for common applications.
Adjustable Ball bearing Lead Car
Upgrading to an adjustable lead car system allows you to change your lead under sail without having to tack to unload the car. The Micro CB traveler cars are very small and lightweight, but strong—perfect for the Lightning.
Belowdeck Vang System
This split boom vang lets you easily adjust the vang from both sides while hiking. The 24:1 purchase uses lightweight Carbo blocks for the power needed to control sail shape without adding weight to the boat. The cascading system uses small high-tech line to help keep everything clean above deck.
Diagram provided by Harken. West Coast Sailing is an approved seller of Harken sailboat hardware.
Looking for other sailboat parts? We can help!
General Parts & Hardware - We offer a huge selection of General Parts including hardware, blocks, cleats, shackles, accessories and more here .
Product Suggestions - If you're looking for a specific part for Lightning sailboat that you cannot find, let us know. We are actively working to expand our one design parts offering and welcome your input for parts you think we should be stocking to make it easier for you to get back out on the water. Submit you idea via our Product Suggestion Form (opens in new tab).
Subscribe To Our Newsletter
Sign up for our newsletter to receive exclusive discounts, new product announcements, and upcoming sales.
The Worldwide Leader in Sailmaking
- Sail Care & Repair
- Sailing Gear
- Find A Loft
- Sail Finder
- Custom Sails
- One Design Sails
- Flying Sails
- New Sail Quote
- 3Di Technology
- Helix Technology
- Sail Design
- NPL RENEW Sustainable Sailcloth
- Sailcloth & Material Guide
- Polo Shirts
- Sweaters & Cardigans
- Sweatshirts & Hoodies
- Accessories
- Shop the look
- Mid & Baselayers
- Deckwear & Footwear
- Luggage & Accessories
- Fall Winter '24
- North Sails x 37th America's Cup
- Sailor Jackets
- SALT X North Sails
- NS x Slowear
- T-shirts & Tops
- Sailor Jacket
- Sustainability
- North Sails Blog
- Sail Like A Girl
- 37th America's Cup
- Icon Sailor Jacket
- Our Locations
- Certified B Corporation
- North SUP Boards
- North Foils
- North Kiteboarding
- North Windsurfing
SAIL FINDER
SAILING GEAR
COLLECTIONS & COLLAB
COLLECTIONS
WE ARE NORTH SAILS
ACTION SPORTS
Popular Search Terms
Organic cotton
Scuba fleece
Drawstring hood
Utility pocket
Stand collar
Sorry, no results for ""
Subscription
Welcome aboard.
We want to make our emails as relevant as possible for you.
Interests saved
Something went wrong, please try again
Welcome to North Sails
Stay up to date with the latest North Sails news.
Receive a 10% discount code for your first apparel order. Excludes sails and SUP’s. See our Terms and Conditions .
Yes, I agree to the terms of use and privacy policy.
LIGHTNING TUNING GUIDE
Proper boat speed depends mostly on constant and consistent adjustments to your rig and sails. The following measurements are those we have found to be the fastest settings for your new North Sails . We have included information on both the tuning of the M-5 and the MF-2 design sails. The M-5 is a more backstay sensitive sail, which sails fastest when the blocks and the lower shrouds are adjusted corresponding to the change in conditions. The MF-2 mainsail responds best to mainsheet tension with less emphasis on adjustment to the backstay, the blocks and the lower shrouds. Both tuning techniques have proven to be very fast and we’re confident that through following the basic numbers we offer in this tuning guide you’ll find top speed in all conditions. However, as always, your North Lightning team is anxious to help you any way we can. Feel free to call or email us anytime! Good luck and good sailing! In our new tuning guide we have divided the MF-2 and the M-5 tuning procedures. Note that the techniques used in setting both systems are quite different. Please check it over carefully! All of your North Lightning representatives are comfortable with the tuning for both techniques. Should you have any questions about either style, we urge you to call us. We are always happy to help.
THE STEPS IN TUNING
The tools necessary for properly tuning your boat are a 50 foot tape measure, the black Loos tension gauge (PT-1) and a permanent marker.

Note: The newer PT-1 black spring- loaded Loos gauge is very consistent and works great for checking the shroud tension on your uppers and lowers. Because of this we now use the PT-1 gauge for both tuning methods.
MARK YOUR HEADSTAY
Lay the forestay along the front of the mast and mark where it is even with the top of the mast band at the gooseneck. This can be accomplished with the mast on the ground or stepped with the uppers attached.

MAST STEP POSITION
For the M-5 Tuning System we suggest placing the butt of the mast at maximum forward (the aft edge of the butt of the mast should be 21 5/8” forward of the center of the centerboard pin). For the MF-2 Tuning System and for Allen boats we suggest placing the butt at maximum forward. For the Nickels Boats (both the newer (after 15200) and older) we suggest moving the butt aft one hole in the channel. For any boat having difficulty developing the proper prebend (or with the upper shrouds further aft (such as the Carson or Lippincott) we suggest moving the butt of the mast aft as much as 3/8” to 5/8”. For the Carson and Lippincott hulls the butt measurement should be only 20 1/4” forward of the pin.
ADJUST THE HEAD-STAY LENGTH
Hook up your headstay and measure from your mark that was determined in Step 1 of the tuning guide to the intersection of the stem and the deck.
|
| ||
| Nickels | 44.5” | |
|
| Allen | 45” |
| New Nickels | 45” | |
|
| Nickels | 44” |
| Allen | 44.5” | |
| New Nickels | 44.5” | |

Measure from the top of the mark on your forestay to the joint of the bow and your deck to set your forestay length.
THE M-5 TUNING SYSTEM
INITIAL SET-UP
Allow your mast to lean fully back on the forestay with no shrouds attached or mast blocks in place. Mark your deck on both sides directly across from the front or back of the mast. You can put in the side blocks and use the aft edge to make your reference mark clearer. This is your “0” datum point.
Place marks at ¾”, 1”, 1 ¼” and 1 ½” forward of the datum. These will be references for block position.

Attach your upper shrouds to the forward chain plates and tension them to the class maximum of 250 pounds. Do not attach the lowers or be sure that they are very loose. Note: It is important that the mast is straight in the boat and not leaning or bowing to either side. To verify this, hook a tape measure to the jib halyard. Measure to the chine below the upper chainplate on each of the boat. This measurement should be within 1/4” on each side and can be adjusted by adjusting the turnbuckles on either side.
Attach the lower shrouds to the aft chainplates and tighten them until they are just barely hand tight. Check that the mast is still straight laterally by sighting up the back of the mast. This adjustment to the lower shrouds is just initial tuning and will be adjusted later once the blocks are placed at the partners.
M-5 BASE SETUP (2 on rail-starting to hike)
Place your mast blocks behind your mast until the mast is 1 1/4” forward of your 0 datum point. This is base blocking.
Pull your backstay until the forestay just registers “7” (using the Black PT-1 Loos tension gauge).
Adjust your lower shrouds equally until they are “11” on the Black PT-1 Loos gauge.
Sight the mast to make sure it is still straight. Adjust the lowers if needed to straighten (ie. 1 off and 1 on, until it is straight)
M-5 TUNING MATRIX
This tuning matrix eliminates some variables by referencing power in the boat instead of wind speeds. For each change in power, you’ll adjust the lowers or the blocking and sometimes both.
|
|
|
|
|
|
| 0-5 "drifter" | -1 | 1 1/2" | varies | -2 |
| Light-2 in boat | -1 | 1 1/4" | varies | -1 |
| 2 on rail-starting to hike | Base | 1 1/4" | 11 | 0 |
| 3 up-Fully hiking | 1 | 1 1/4" | 18 | 1 |
| Fully-hiking-Backstay coming on | 1 | 1 1/4" | 20 | 2 |
| Depowering | 0.5 | 1 1/8" | 20 | 2.5 |
| Maximum depowering | 1(or 1.5) | 1" | 21 | 3.5 (or 4) |
| Main starting to luff | 1.5 | 3/4" | 28 | 5 |
*Lower tension PT-1 gauge. Pull backstay to make headstay 7
The mast blocking and lower tension go hand in hand to properly set up the sails. The blocking controls lower mast bend, stiffening or softening the mast. The lower tension controls, or allows mast bend and poke or sag at the spreaders.
In light air we need to prebend the mast. If the mast were too straight, the front of the main would be too deep (drag) and the jib couldn’t be trimmed. So, we block forward (blocks behind the mast), softening the mast and bending it down low. The lowers are also eased to let the middle of the mast go forward. Both actions contribute to a looser headstay, powering up the jib.
As it gets windier and we start pulling on the backstay, we need to straighten and stiffen the mast. Without tightening the lowers, or blocking aft, the mast would bend too much creating overbend wrinkles (from the middle of the mast towards the clew) taking the shape out of the sail. So, we block back (blocks in front of the mast) which reduces lower mast bend and stiffens that section. We also tighten the lowers which will restrict mast bend at the spreaders. Now when the backstay is tensioned to reduce power, the bottom of the main doesn’t over-flatten, the top of the sail gets flatter, and the headstay is tightened.
Note: Without the proper backstay tension in light winds the mast will lean much too far forward and there will be too much headstay sag. An overabundance of jib luff sag will result in the jib leech hitting the spreader and the shroud no matter how it is trimmed. The backstay is just tensioned to remove enough sag to keep the jib leech off the spreader and the shroud when the upper batten is angling just at the end of the spreader.
THE MF-2 TUNING SYSTEM
Set your upper shrouds at 250 lb. Tension with the lower shrouds tensioned to 80lbs. Note: Important!! This initial shroud setting is different from the Lightning Class maximum shroud tension measurement. Be sure to set the uppers at 250 while the lowers are set at approximately 80lbs.
Push the mast forward in the partners and place nearly all your mast blocks behind the mast until the lower shrouds read close to 250-300lbs. It will require a great deal of pressure to push the mast far enough forward to induce the necessary 1 3/4” to 2” of positive prebend in the mast at the spreaders. To check this, pull your main halyard down and hold it up against the back of the mast at the gooseneck. The distance from the taught halyard wire to the back of the mast at the spreaders should be very close to 1 3/4”.

Usually a 1/2” block will be in place in front of the mast with the New Allen and New Nickels boats. Note: With the later model Nickels and Allen boats usually the proper prebend will be reached while a ½” block is placed in front of the mast at the deck. On the Allen and newer Nickels the lower shrouds will read 300 lbs when set properly to achieve the necessary prebend. For the older Nickels and boats with the upper shrouds aft the lowers will be tensioned to 250lbs. 3. Verify that your lower shroud tension has now increased to 250-300 pounds. If your lower shroud tension is too light, chances are you will not induce the proper prebend. Increasing the lower tension will help achieve the prebend. At this point, because the mast has hopefully developed the prebend discussed above, the upper shrouds will drop in tension to 160-190lbs. Note: Important!! Do not re-tighten the uppers above 190lbs. This reduced tension is necessary for proper mast bend and is indicative that you’ve developed proper prebend. Note: It is important that the mast is straight in the boat and not leaning or bowing to either side. To verify this, hook a tape measure to the jib halyard. Measure to the chine below the upper chainplate on each of the boat. This measurement should be within 1/4” on each side and can be adjusted by adjusting the turnbuckles on either side. 4. Hoist your 50’ tape measure on the main halyard and latch it in your lock. Check the measurement from the top of the mast to the intersection of the transom and the rear deck without the jib up but the proper prebend and rig tension as indicated above. Do not pull hard on the tape- take the measurement with the rig “relaxed. The rake should be close to 26’ 7” for the Allen and newer Nickels Boats. For the older Nickels the rake should be 26’6”. For the Lippincott/Carson boats this number should be at 26’ 3” to 26’ 4”. Note: If your rake measurement is farther forward than the numbers listed above (more than l/2”), then consider pulling a small mast block ( ¼” increment) from behind the mast and re-tensioning the lowers to 250 pounds. Replace the block at the front of your mast and recheck that your prebend is the necessary 1 3/4”. Your mast should also have raked farther aft so that the rake number is smaller. 5. Without applying tension on the tape measure ( as described above) record the measurement at the transom. Now grab the backstay and pull until the slop in the forestay is just barely eliminated (not when the Loos gauge reads “O”). The change in your rake from the backstay pulled on to the backstay relaxed should be 3” to 4”. If this measurement is more than 4”, pull a small block from behind the mast and retention the lowers to 250-300 pounds (as described above). If the “rake change number” is less than 3”, place another small block behind the mast and ease the lowers off until they read the proper tension. This will allow the entire mast to tilt (rake) slightly farther forward. 6. Re-check your lower shroud tension side to side by sighting up the back of the mast to be sure the mast is perfectly straight laterally. Loosen and tighten the opposing sides until the mast is straight from the deck to the hounds, always maintaining the proper lower tension and prebend.
Once on the water double check your lateral straightness once again when sailing upwind in an 8-10 m.p.h. breeze.
Note: In breeze above 10-12 mph the upper sections of the mast above the spreader will fall off slightly sag to leeward. This is normal.
CONGRATULATIONS! You have completed all the tuning with the MF-2 setup. You will never need to adjust your lower shrouds or blocks until you take your mast down. When re stepping simply place everything back where you had it last!
JIB HALYARD TENSION
5A+ and V17+
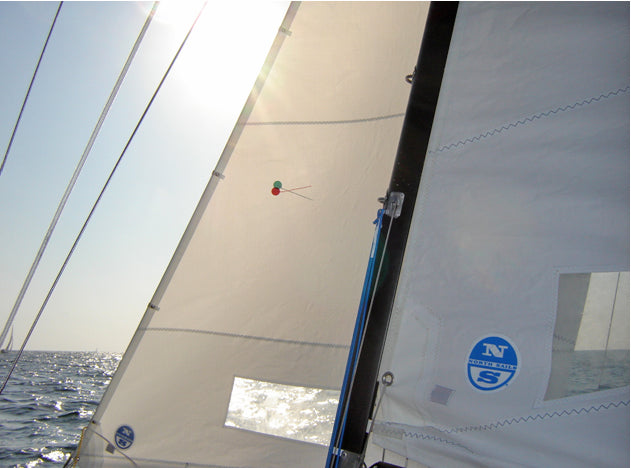
Generally, set your jib halyard tension so that the jib luff wire (in the front of the jib) is just equal tension wise with the forestay when sailing upwind (There should be no sag in between the snaps.).
JF-2 and RJF
In all conditions set the jib halyard tension so that the luff wire is just slightly tighter than the forestay in all conditions. The forestay will show a slight “snake” between the snaps. From light to heavy winds this will mean an adjustment of nearly 2 1/2”. In very heavy winds jib halyard stretch will make it difficult to set the halyard tighter than the forestay. More tension on the halyard will be necessary.
JIB CLOTH TENSION
FOR ALL JIBS
In light winds the cloth tension will be set loose enough that there may be slight wrinkles along the luff. As the breeze increases, increase the cloth tension until all the wrinkles are barely removed in heavy wind. In very heavy winds pull the jib cloth tension a little tighter than just barely removing the wrinkles to flatten the sail and help open the upper batten.
LASHING AT THE HEAD OF THE JIB
Each North jib has the luff wire attached to the head of the jib with a light line lashing which allows the height of the jib to be adjusted on the luff wire. Depending on the type of tack fitting on your boat, you may want to adjust this lashing to raise or lower the jib to sit on the deck properly. If the skirt of the jib is not laying on the deck approximately 1 1/2” to 2” (or the jib tack is higher than 3 1/2” off the deck) you may want to loosen the lashing and allow the jib to slide down closer to the deck. Be sure to tie well, or even tape, the lashing when done to prevent the lashing from coming untied.
JIB LEAD POSITION
Your North jibs are marked with a trim line near the clew drawn from the clew grommet toward the body of the sail. Your lead should be positioned so that the sheet is a direct extension of this trim line. This is more effective than a measurement from the stem to the lead position because of the variances in jib lead fittings and placement, rake, and jib wire height off the deck. Generally, you should set the lead in this direct extension position unless the boat is overpowered when the lead may be moved aft as much as 2”.

JIB SHEET TENSION
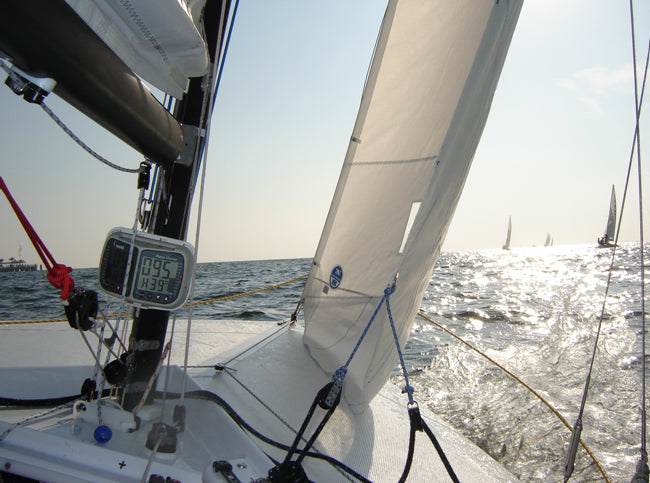
Normal jib sheet trim for 8 - 12 m.p.h. and flat water for the 5-A+ and the JF-2 jibs would be 2” - 3” inside the spreader tip. The V17+ tends to allow for a bit tighter sheeting. In winds below 8 m.p.h. or when trying to accelerate, leaving a tack, etc., the sheet will be progressively eased out until the top batten is angled even out past the end of the spreader. In extremely light winds it is advantageous to hold the clew of the jib up so the upper batten angles 1” outboard of the tip of the spreader. In heavy winds above 15, it may be necessary to ease the jib sheet to the point where the batten might be angled 1” or more past the end of the spreader. However, with any jib, in any condition, the best final check on jib sheet trim is that the jib leech telltale is flowing all the time. To aid in setting up the trim for your North jibs, we suggest placing rings of tape on your spreaders 2” and 4“ in from the tips of the spreaders.

Mark your spreader as a reference for jib trim, BUT check that the telltale on the leech at the top batten is always streaming.
MAINSAIL TRIM
MAINSAIL OUTHAUL
Your North mainsail is constructed with a shelf foot. Judge the outhaul tension at the center of the boom. The seam which attaches the shelf foot to the sail, the bottom seam in the sail) gets closer to the boom when the outhaul is tensioned or further away from the boom when the outhaul is eased. At maximum outhaul tension this seam will lay next to the boom and the shelf foot is closed. This is proper trim for heavy winds when the boat is overpowered. In light winds the center of this seam should be 1” to 2” from the boom. We do not feel it is advantageous to loosen the outhaul more than this when sailing upwind. Downwind loosen the outhaul to allow the shelf foot to open completely. This should place the clew of the main nearly 3” in from the band at the end of the boom.

Use the shelf foot seam as a guide for outhaul tension.
CUNNINGHAM TENSION
In light winds the MF-2 mainsail performs best with the cunningham completely slack. There should be nearly 8” wrinkles perpendicular to the luff from head to tack. On the M-5, the cunningham will be tensioned so that wrinkles are only evident below the spreader window.
In medium winds the cunningham should be tensioned on both mains so that wrinkles are evident just in the bottom of the mainsail below the spreader window. In heavy winds, it is beneficial to pull in the cunningham fairly aggressively. While the backstay is applied to de-power the main, the cunningham should be pulled on to maintain the proper draft position.

The backstay controls mast bend and headstay sag. Pulling it harder flattens both the main and the jib. It also changes the main leech tension and the angle of the upper batten of the main. In very light winds when the mast is blocked forward and pre-bent (see mast blocking) tension the backstay slightly to keep the headstay from sagging (and bouncing) too much. In heavy air more backstay is necessary to flatten the main. If you pull the backstay too hard, the main will invert as evidenced by large diagonal wrinkles running from the upper area of the main above the spreaders down towards the clew.
In medium to heavy winds, some inversion wrinkles below the spreader window are normal and desirable as they indicate that maximum mast bend has been achieved.

Ideally, overbend wrinkles will fall just below the spreader window and halfway back on the boom when proper prebend and mast bend is achieved.
As a basic guide, for the mainsail to take shape and the upper batten to be trimmed parallel to the boom (see mainsheet trim), the backstay should be applied to just barely remove the slop. Once all three crew are on the high side and beginning to hike, the backstay should be tensioned much more tightly. As the boat hits waves or sails into lulls, be sure to ease the backstay to power the rig back up. It is also important to remember that as you pull on more backstay you must also pull on a proportionate amount of both jib cloth and main cunningham. These three controls working in harmony are the best way to keep your sails performing at their designed best shape.
THE MAIN BRIDLE AND TRAVELER
If you have a bridle that is adjustable in height, it is advantageous to raise the bridle for light winds so when the main is sheeted properly (upper batten parallel to the boom), the top of the bridle block should be close to the block on the end of the boom. This will bring the boom to center when the mainsheet is trimmed. In medium winds above 6-8 mph, the bridle should be approximately 11” to 12” above the deck; in heavy winds, the bridle should only be 9” above the deck. If your bridle is not adjustable, set it at 11” off the deck. The traveler is normally centered for light to medium winds, but as the boat starts to heel and becomes overpowered, and therefore develops more helm, the traveler should be eased to leeward. Do not ease the traveler to leeward until the outhaul is fully tensioned and moderate tension has been applied to the backstay. Often, it pays to moderately depower with the backstay, outhaul and Cunningham before easing the traveler.

MAINSHEET TENSION
The general rule is to trim the mainsheet to maintain the top batten parallel to the boom. This is viewed by sighting directly underneath the boom up towards the upper batten. When power is necessary in light or choppy conditions or just after a tack it is important that the mainsheet is eased so that the upper batten is angled outboard (10 - 15°) from parallel to the boom.
Once up to speed, re-trim the main to upper batten parallel. In heavy winds, when maximum backstay tension is applied and the main is fairly flat, the upper batten will angle slightly outboard in relation to the boom. In drifting conditions where the weight of the boom will hook the upper batten, ease the mainsheet until the upper batten is parallel to the center line of the boat. The boom will be positioned well to leeward of center line, as much as 18”. Be sure to recheck the top batten position whenever the backstay and Cunningham are adjusted. Consider the mainsheet your throttle. It helps to keep the mainsheet in hand and play it to keep the boat moving. When it starts to feel slow, ease the sheet and when it feels fast try trimming in tighter to increase pointing ability. In other words, if it feels good, pull! When it feels ugly, ease it out. Upwind in heavy air or very puffy conditions with the MF-2 Main, the boom vang is tensioned so the mainsheet can be played like a traveler. Tension the vang in these conditions so the upper batten is angled outboard 10°. With this proper necessary tension, the boom may actually show a bit of bend. Play your mainsheet to keep the boat flat and the helm balanced! Be sure to ease your vang as you round the weather mark! With the M-5 Main, most of the main control is accomplished with careful balance between the mainsheet and traveler. However, some sailors have had success tensioning the vang just to point where the boom will not raise up when the main sheet is eased. With any “style” of mainsheet trimming you choose to sail with upwind it is imperative that in puffs the boat remains flat, stable and the helm balanced. Quick and deliberate adjustments to the mainsheet, vang, backstay and traveler are important. Adjust quickly but re-trim just as quickly after sailing through the puff and the boat is back under control and balanced.

BOOM VANG TENSION DOWNWIND
The boom vang is used downwind to maintain the upper batten nearly parallel to the boom. Be conscious of not over- tensioning the vang, especially in light winds, as it can greatly slow the Lightning when sailing downwind. In puffs while reaching, when the boat becomes overpowered, try dumping the vang (completely eased) to keep the end of the boom from hitting the water and allow the top of the main to luff, dumping extra power.
THE SPINNAKER

Trimming your North spinnaker is fairly easy as long as you follow a few guidelines. Always attempt to fly your spinnaker so there is nearly 6” of curl in the luff. This is important so the spinnaker is not over trimmed and does not choke the slot between the spinnaker and the main. We suggest flying your spinnaker with the halyard eased approximately 6” off the mast to open the slot up high. Always keep your clews even through adjustment to your pole topping lift. When your leeward clew is hidden behind the main and you cannot see it, keep the center seam of the spinnaker parallel to the mast. In puffy conditions, especially in lighter winds, constant adjustment of the pole height along with the sheet and guy is important. Keep the pole nearly perpendicular to the wind.
The sun is one of your sail’s greatest enemies. Care should be taken to not leave an uncovered sail directly in UV light for long periods. Spinnakers are most susceptible to UV damage. However, your sail’s greatest enemy is prolonged luffing. Putting your sails up before you are ready to leave the dock and allowing them to flog unnecessarily, literally wastes valuable hours and days of the competitive life of your sails. Even before the start on a breezy day, try to spend as little time as possible with the jib up and luffing to save wear and tear. The jib especially takes a beating when luffing as it slams back and forth against the mast. This breaks down the resin in the weave of the cloth. When finished using your sails, even after just a couple races or in-between races, we strongly suggest taking the time to roll up your sail parallel to the battens (it is never necessary to remove the battens). Be careful not to set anything heavy that can crush a sail or to lash the main too tight on to the boom. Be sure to roll the sail parallel to the battens to avoid putting a permanent twist in your special tapered fiberglass battens. Fold your spinnaker to keep it smooth before storing. When sailing in saltwater, be sure to wash all your sails off completely with fresh water and dry completely before storing them. Check all your sails, especially at the front and back of batten pockets and around grommets for signs of wear. Check your spinnaker for tears, so they don’t get bigger and create big problems in the future. If Dacron sail tape is not available, duct tape will work just fine!
GET IN TOUCH
REQUEST A QUOTE
BROWSE ALL SAILS
FIND YOUR SAIL
Featured stories, offshore sailing guide, how to care for your foul weather gear, npl renew faq.
- Refresh page
Great choice! Your favorites are temporarily saved for this session. Sign in to save them permanently, access them on any device, and receive relevant alerts.
- Sailboat Guide
Lightning is a 18 ′ 11 ″ / 5.8 m monohull sailboat designed by Sparkman & Stephens and built by Nickels Boat Works, Inc., Skaneateles Boat & Canoe Co., Helms - Jack A. Helms Co., Siddons & Sindle, Lippincott Boat Works, J.J. Taylor and Sons Ltd., Lockley Newport Boats, Eichenlaub Boat Co., Mobjack Manufacturing Corp., Clark Boat Company, Allen Boat Co., and Loftland Sail-craft Inc. starting in 1938.

- 2 / 8 Charlotte, NC, US 1982 Lightning $4,500 USD View
- 3 / 8 Charlotte, NC, US 1982 Lightning $4,500 USD View
- 4 / 8 Charlotte, NC, US 1982 Lightning $4,500 USD View
- 5 / 8 Charlotte, NC, US 1982 Lightning $4,500 USD View
- 6 / 8 Charlotte, NC, US 1982 Lightning $4,500 USD View
- 7 / 8 Charlotte, NC, US 1982 Lightning $4,500 USD View
- 8 / 8 Charlotte, NC, US 1982 Lightning $4,500 USD View

Rig and Sails
Auxilary power, accomodations, calculations.
The theoretical maximum speed that a displacement hull can move efficiently through the water is determined by it's waterline length and displacement. It may be unable to reach this speed if the boat is underpowered or heavily loaded, though it may exceed this speed given enough power. Read more.
Classic hull speed formula:
Hull Speed = 1.34 x √LWL
Max Speed/Length ratio = 8.26 ÷ Displacement/Length ratio .311 Hull Speed = Max Speed/Length ratio x √LWL
Sail Area / Displacement Ratio
A measure of the power of the sails relative to the weight of the boat. The higher the number, the higher the performance, but the harder the boat will be to handle. This ratio is a "non-dimensional" value that facilitates comparisons between boats of different types and sizes. Read more.
SA/D = SA ÷ (D ÷ 64) 2/3
- SA : Sail area in square feet, derived by adding the mainsail area to 100% of the foretriangle area (the lateral area above the deck between the mast and the forestay).
- D : Displacement in pounds.
Ballast / Displacement Ratio
A measure of the stability of a boat's hull that suggests how well a monohull will stand up to its sails. The ballast displacement ratio indicates how much of the weight of a boat is placed for maximum stability against capsizing and is an indicator of stiffness and resistance to capsize.
Ballast / Displacement * 100
Displacement / Length Ratio
A measure of the weight of the boat relative to it's length at the waterline. The higher a boat’s D/L ratio, the more easily it will carry a load and the more comfortable its motion will be. The lower a boat's ratio is, the less power it takes to drive the boat to its nominal hull speed or beyond. Read more.
D/L = (D ÷ 2240) ÷ (0.01 x LWL)³
- D: Displacement of the boat in pounds.
- LWL: Waterline length in feet
Comfort Ratio
This ratio assess how quickly and abruptly a boat’s hull reacts to waves in a significant seaway, these being the elements of a boat’s motion most likely to cause seasickness. Read more.
Comfort ratio = D ÷ (.65 x (.7 LWL + .3 LOA) x Beam 1.33 )
- D: Displacement of the boat in pounds
- LOA: Length overall in feet
- Beam: Width of boat at the widest point in feet
Capsize Screening Formula
This formula attempts to indicate whether a given boat might be too wide and light to readily right itself after being overturned in extreme conditions. Read more.
CSV = Beam ÷ ³√(D / 64)
One of the most popular one-design classes in the US since the 1940’s. But fleets also exist in other parts of the world. Although originally designed for wood planked construction, nearly all boats since the early 1960’s have been built of fiberglass. Ballast above is max weight of centerboard.
Embed this page on your own website by copying and pasting this code.

- About Sailboat Guide
©2024 Sea Time Tech, LLC
This site is protected by reCAPTCHA and the Google Privacy Policy and Terms of Service apply.

Lightning Tuning Guide
Vsp lightning tuning guide.
There are many proven methods for tuning a Lightning. The measurements and the settings included in this guide are ones that I have found to be the fastest for VSP Lightning sails. Since crew, wind and sailing conditions and boats vary, you may find that slightly different settings are best for you.
I try to keep the tuning as simple as possible and try to use our “medium air” setting as much as possible. This tuning guide is being constantly updated so please check back frequently! Recent changes are made in red.
Please feel free to contact me if you have any tuning or trim questions –
– Bill Fastiggi
Before stepping the mast 1) Make sure all shrouds are securely attached to the mast, and the screws are tight. 2) Make sure the spreader tips are secure to the spreader. If they are loose, put tape over the ends to secure the tips. 3) Put “trim tapes” on the spreader 2″ in from the tip.
Setting the Mast Butt
The determining factor to finding the proper mast butt position for your boat is the location of the upper shroud chainplates. Modern Allen and Nickels Lightnings will have the chainplates at or near the maximum forward position. You should also locate the mast butt at the maximum allowable forward position. The aft edge of the mast should be 21 7/16″ from the forward edge of the centerboard pin.
Headstay Length To measure headstay length with the mast up, we measure a short segment of the headstay at the bow. Simply unhook the headstay from the stemplate and run it down the front edge of the mast. Mark the point where the top of mast band intersects with the headstay with a piece of tape. Be sure to align the top of the tape with the top of the mast band. Reattach the headstay. Remove all slack from the headstay by pushing aft just above the mark. Now measure from the top of the headstay mark to the forward most edge of the deck at the bow. This measurement should be 44.5″ for a Nickels boat, and 45″ for an Allen boat. When you are sailing, you can “fine tune” this dimension for your own boat by making sure the boom is parallel to the deck.
Shroud Tension Uppers should be tensioned to 250 lbs. Lowers should be tensioned to 120 lbs. on a Nickels boat and 170 lbs on an Allen. This should be done with the backstay disconnected and with the mast blocks removed. Using a Loos model A tension gauge, the uppers should measure 29 and the lowers should measure 15 on the Nickels and 21 on the Allen. This is your baseline measuring position. If you are sailing a new Nickels boat (15300 and newer) you should use the “Allen” lower tension. The difference in lower tension is due to the different locations of the lower chain plates.
Check that the mast is straight and centered in the boat. Pull your tape measure up the jib halyard and measure to each upper chainplate to make sure the mast is centered. Once this dimension reads the same on each side, sight up the back of the mast and adjust each lower as needed to get the mast as straight as possible. Recheck that the shroud tensions are still 250 and 120/170 lbs.
Fine Tuning the Rig Mark this baseline position, fore and aft, of the mast in the mast gate. To do this, mark the side of the mast, approximately in the center, we suggest using a white piece of tape with a conspicuous dark line drawn vertically. Place a mark on the deck that corresponds with the mark on the mast. This mark on your deck is your baseline. Measure 7/8″, 1 1/4″ and 1 1/2″ forward of the neutral mark and place a mark at each. These marks will be used to measure pre-bend in your mast.
Once the mast is straight and centered, tape off the uppers, you won’t need to adjust them again.
Dry Run In order to achieve proper lower shroud tension on the water, we suggest that you conduct a dry run of the following pre-bend settings in the parking lot. This will allow you to get to a desired lower tension by simply counting the number turns that have been taken off from the heavy air setting. This should be done with the backstay disconnected.
First, block the mast to 7/8″ and measure the shroud tensions. The tension of the uppers should have dropped slightly and the tension of the lowers should have increased to about 250 lbs on the Nickels and 300 lbs on the Allen. This is your heavy air sailing position. At this point the mast should have about 1 1/2″ pre-bend.
To go from the heavy air setting to the medium air setting, block the mast forward to the 1 1/4″ mark. The tension of the lowers should have increased substantially. Count the number of turns that it takes to get the tension of the lowers back to 250 lbs (300 on the Allen). On my boat this is two full turns. Record this number in the chart below so that you can duplicate it out on the water. You should still have about 1 1/2″ of pre-bend in the mast, and the “extra” forestay length should be about 2″.
Finally, block the mast forward to 1 1/2″. The tension of the lowers will again increase substantially. Count the number of turns it takes to get the tension of the lowers back to 200 lbs (250 on the Allen). On my boat this is three full turns off of each lower. Record this number below. You should have about 3 1/2″ extra forestay length.
Mast Pre-Bend and Lower Shroud Tension
| Wind Speed | Pre-Bend | Lower Tension | # of Turns from Neutral |
| 0-5 mph | 1 1/2″ | 200 lbs. (250) | |
| 6 -16 mph | 1 1/4″ | 250 lbs. (300) | |
| 17+ mph | 7/8″ | 250 lbs. (300) | 0 |
I draw this chart on my deck next to the mast partner for reference.
Jib Trim Your VSP Jib is equipped with a jib leech telltale located at the top batten. It acts as an extension of the leech to gauge jib trim off the spreader. When the telltale stalls it indicates the degree that your jib is over-trimmed. This is the number one indicator that we use to trim the jib. Our goal is to have the leech tell-tale streaming all the time.
In light air, the jib leech is normally trimmed right on the spreader tip. If it is light and choppy, you will probably find that trimming 1″ or 2″ outside the spreader tip is best. If the leech tell-tale isn’t streaming, ease the jib, and if it is streaming, try trimming it until it stalls, and then ease back out just a touch.
The jib is generally easy to trim but in light and spotty conditions, as with all jibs, it requires constant trimming to keep the leech telltale streaming. In this condition, the top batten should be anywhere between the tip of the spreader and 4″ outboard. You’ll find the lighter it gets the further outboard you will need to go to keep the leech telltale streaming. This will keep you powered up and going fast!
In medium air, the leech telltale should be streaming and the top batten should be trimmed to the 2″ mark inside of the spreader tip. If it gets a little lumpy or you find you need a little power, ease the jib sheet about 1″. If it is flat water, or you need a little extra height off the starting line you can trim a little tighter, but never more than 3-4″ inboard of the spreader tip.
In heavy air, the top batten should be outside the spreader tip except for the lulls. As the wind increases over 20 mph, the top batten should get further and further from the spreader-up to 4″-and the leech telltale should be streaming 90-100% of the time.
Jib Lead Position The placement of the jib lead is found by measuring the distance from the forward edge of the bow, straight over the splash rail to the jib track.
| Wind strength | 0-7 | 8-15 | 16-20 | 20+ |
| Lead position | 97″ | 98″ | 99″ | 100+ |
Jib Wire/Halyard Your jib wire adjustment is best described by comparing the tension on the wire to the tension of the headstay . In all conditions, the jib wire should be tensioned so that it is tighter than the headstay. We’ve found that the VSP jib works best with a lot of wire tension. When we are sailing upwind, if the luff of the jib seems at all unstable or “bounces” we add more tension to the jib wire to remove this “bounce.” In lighter conditions, this can mean pulling the wire on as much as 3 or 4″ tighter than the forestay. If you feel like you aren’t pointing well, pull the jib wire on harder.
Jib Cloth/Jib Cunningham This control is relatively easy to adjust and is effective in moving the draft placement in the jib. In light to moderate winds, 90% of the wrinkles around the snaps should be removed. When the wind is consistently 15 mph and above, all the wrinkles should be removed.
Mainsail Trim Mainsheet In most conditions, the mainsheet should be pulled tight enough so the top batten is parallel to the boom on a vertical plane (this can be checked by sighting directly up the sail from under the boom). The exception to this rule is in high winds when the upper leech needs to twist off to depower the sail plan.
Bridle The boom should be on centerline up to 10 mph and then dropped to leeward in 1-2″ intervals as the breeze builds until the bridle is all the way to leeward. In smooth water the bridle does not have to be dropped as soon as it does in choppy conditions.
Bridle height (from the deck) should be set for the desired main leech tension. The objective is to get the mainsheet between 1″ and 1/2″ from being two blocked, at a desired sail trim. This extra sheeting capability will allow the main to be over trimmed at critical times.
Another sail trim indicator is the top telltale located at the end of the top batten. In light air the top telltale should stall about 40% of the time, and in medium air it should stall a maximum of 60%. In breeze above 16 mph, the top telltale should be streaming most of the time because the backstay has most likely been pulled on to depower the main.
Backstay In light and medium winds, the backstay should be pulled on slightly to stabilize the rig and to prevent The rig from bouncing around. When the wind picks up, the backstay should be the first control used to depower and relieve weather helm. In smooth water, you will pull the backstay more than you will ease the bridle to leeward. When it is choppy, the bridle will be dropped to leeward earlier to keep the boat driving through the waves.
The backstay tensions the headstay/jibwire when it is pulled on. In heavy winds, a tight headstay is desirable because it will flatten the jib making a faster heavy air shape.
Main Cunningham This control is relatively easy to adjust and is effective in moving the draft placement in the main. In all conditions, remove about 90% of the luff wrinkles.
Outhaul The VSP Mainsail is designed very flat in the lower section so the outhaul has more effect over the shape of the entire sail. In most conditions, the outhaul is adjusted so that the shelf foot is just taken out while going upwind. In light air, the bottom half of the sail should be flat (which is why we put in so much pre-bend). This keeps the jib slot open and reduces backwind. In medium breeze, ease the outhaul slightly if you are looking for more power. As the wind increases, pull the outhaul towards the end of the boom but be aware. Because of the design of the sail, it is possible to over-tighten the outhaul.
Boom Vang Upwind in windy conditions, the vang should be tight so that when a puff hits, the main can be eased without losing leech tension. If you don’t apply the vang in higher winds, the boat will become very unstable. Otherwise, just remove the slack from the vang while sailing upwind. In higher winds, be sure to ease the vang before turning downwind or you might break the boom.
Leech Line The leech line should be completely slack until the leech starts to flutter. Tension the leech line until the fluttering stops. Remember to ease it off as the breeze drops or your leech will hook.
How to reach us Via mail: Vermont Sailing Partners 150 West Canal Street Winooski, VT 05404
Via phone: (802) 655-7245 (802) 655-SAIL
Via email: [email protected]
Welcome to our store
Item added to your cart
Nickels Boat Works
Couldn't load pickup availability
Lightning Details
The International Lightning Class is a 1938 Sparkman and Stephens design. This active racing class has grown to nearly 15,000 boats. The quality, performance and speed of the Nickels Lightnings are proving themselves for hundreds of current owners including North American and World Championship skippers. Why not join them with the confidence that you are buying the best there is?
The Nickels Lighting features a new hull and deck. The hull design maximizes down wind speed while preserving upwind performance, while the new rolled deck affords greater comfort when hiking in addition to our optimization of control line location. The new deck also provides for increased interior room for crew and skipper. We have also included a new location for fine tuning of the backstay. This new deck is stiffer insuring durability and strength.
Fully rigged w/ stainless steel centerboard: $24,995
A new Nickels custom race equipped Lightning includes:
- Lightning Class Number—royalty and measurement certificate (from the class)
- One color hull—one color deck New style rubrail white or black
- Harken Equipment— Carbo blocks now standard
- Mainsheet swivel with hexaratchet Jib sheet—Custom NBW jib car
- Spinnaker guy and sheet Ratchamatic Jib uphaul—6 to 1
- Twing lines with guy hooks Jib cloth—2 to 1
- All block Boomvang 22 to 1 Backstay—8 to 1
- NBW mast all lines internal Cunningham—4 to 1
- Mainsheet bridle—Winward sheeting type, pull down
- Centerboard hoist—10 to 1
- Dual side controls—for backstay, mainsheet bridle, boomvang & cunningham with color coded lines.
- 360 degree swivel cleat—on centerboard hoist 2 Hinged transom bailers
- 3 padded hiking straps (your choice of color)
- Large storage compartments in both cross seats
- Lifting bridle
- Nickels aluminum mast, boom, spinnaker pole and tiller with extension
Color Options: White is standard but for modest charge we customize for your color and striping
Rigging Options: There are numerous options. Give us your specifications and we will customize a price proposal for you.
Sails: Sails by North, Quantum and Vermont Sailing Partners. Current prices less 10% with new boat purchase. Covers are available from all manufacturers on request.
Also Available: Trailer - $1895 Spare Tire - $90.00 Aft Kick Stand - $35.50 (installed) Spare Tire Bracket - $37.50 (installed) 4 Stanchions - $449.00
Subscribe to our emails
Be the first to know about new collections and exclusive offers.
- Choosing a selection results in a full page refresh.
- Opens in a new window.
- Print This Page
- Text Size
- Scroll To Top

Manufacturers — Rigging

| Sponsor Number | URL address |
|---|---|
| Sponsor 1 | https://www.marksetbot.com/ |
| Sponsor 2 | http://www.onedesign.com/Default.aspx |
| Sponsor 3 | https://www.thesailinginc.com/lightning |
| Sponsor 4 | http://nickelsboats.com/ |
| Sponsor 5 | http://awardandsports.securesites.net/ |
| Sponsor 6 | http://www.capitallogoinc.com/shop/pc/home.asp |
| Sponsor 7 | http://www.rookesails.com/ |
| Sponsor 8 | http://www.sailorstailor.com |
| Sponsor 9 | https://www.harken.com/ |
| Sponsor 10 | http://www.sailorstailor.com |
Lightning Class Supporters
COMMENTS
PO Box 475 Tarpon Springs, FL 34688 Phone: 727-942-7969 Skype: ilcaoffice
Lightning Spinsheet (SSR) West Coast Sailing Rig Shop. $72.99. $62.04. Upgrade your Lightning sailboat with a new spinnaker sheet (or a pair of sheets). Sold individually, our Lightning spin sheets are cut to a working length of 50 feet with end whips for a clean finish. This option is made from Alpha Ropes SSR, a single...
Lightning Class (Int) Download Boat Record: Notes. One of the most popular one-design classes in the US since the 1940's. But fleets also exist in other parts of the world. ... Sailboat Rigging Diagram. ShipCanvas. KiwiGrip. Bruntons. Rudder Craft. Latell Evolution Sails BR. Seaworthy Goods. SPW BR. Pelagic Autopilots. Boater's Closet BR. EWOL.
Other Resources. This manual is an evolving site with articles of general interest to new Lightning sailors, learn about: stepping the mast, winterizing, tuning. The Clever Pig is a new website whose goal is to help young sailors plan more successful racing campaigns. The site is designed for any sailor who wants to take the next step in their ...
He even helps you pick a boat. While we know you have or will pick a Lightning he tells you what to look for and what to watch out for. Here are some of the subjects he covers: Chapter 1. Choosing Your First Boat. Chapter 2. New or Used Boat. Chapter 6. The Racing Sailboat.
A quick racing seminar at the 2019 Lightning European Championship after races were postponed due to weather. One of the great things about the Lightning Cl...
The Lightning, a 19-foot trailerable centerboard sloop, was originally designed by Sparkman & Stephens as an affordable family day-sailor and racing boat. She has evolved into one of the most popular. This is an older thread, you may not receive a response, and could be reviving an old thread.
The lightning that concerns sailors is the discharge of electricity between a cloud and the surface of the earth, or an object on the surface of the earth, namely, your boat. The amount of electricity involved in lightning can be, well, astronomical. We're talking about millions of volts. Granted, the duration of a lightning strike is ...
Lightning rigging questions. I just bought Lightning hull 9369. If anyone's interested I can post pictures. Meanwhile, I have a couple of questions pertaining to the rigging. First, there are two halyards on the forward side of the mast. One is right next to the forestay and exits above the gooseneck. The other is slightly higher on the mast ...
The rigging diagram of a Lightning sailboat is a crucial tool for understanding the various components and their relationships. It provides a visual representation of how the mast, boom, sails, and rigging are interconnected, allowing sailors to properly set up and adjust their sails for optimal performance.
Belowdeck Vang System. This split boom vang lets you easily adjust the vang from both sides while hiking. The 24:1 purchase uses lightweight Carbo blocks for the power needed to control sail shape without adding weight to the boat. The cascading system uses small high-tech line to help keep everything clean above deck. If you would like to link ...
2013 Lightning World Champion David Starck provides a tour of the rigging on his new Lightning. Published on Aug 15, 2014.
The boat can be sailed dry. It can however turtle. If this occurs, external help will be needed. Don't buy a Lightning if you don't EVER want to go swimming or get wet, but don't be afraid of a capsize either, particularly in a post 1985 boat. Other details the first time buyer should know about include saltwater.
Rigging Diagram. Use the diagram below to reference Harken part numbers to appropriate application on your Lightning sailboat. Parts recommendations are offered as a guide for common applications. ... Product Suggestions - If you're looking for a specific part for Lightning sailboat that you cannot find, let us know. We are actively working to ...
Tweet. #4. 10-10-2005, 09:32 PM. Yes, it was an Olin Stephens design, S&S Design number 265 drawn in 1937. S&S sold the plans outright to the Lightning Class Association. In his book "The American Sailboat", Gregory Jones quotes Stephens writings, "As we watched the fleet grow we decided not to do that again."
Lightning 368 Class Association: Download Boat Record: Notes. John Claridge began building the boat in 2009. These became the Mk2. ... Sailboat Rigging Diagram. ShipCanvas. KiwiGrip. Bruntons. Rudder Craft. Latell Evolution Sails BR. Seaworthy Goods. SPW BR. Pelagic Autopilots. Boater's Closet BR. EWOL. bottom ads1 row1.
LIGHTNING TUNING GUIDE. Proper boat speed depends mostly on constant and consistent adjustments to your rig and sails. The following measurements are those we have found to be the fastest settings for your new North Sails. We have included information on both the tuning of the M-5 and the MF-2 design sails. The M-5 is a more backstay sensitive ...
Lightning is a 18 ′ 11 ″ / 5.8 m monohull sailboat designed by Sparkman & Stephens and built by Nickels Boat Works, Inc., Skaneateles Boat & Canoe Co., Helms - Jack A. Helms Co., Siddons & Sindle, Lippincott Boat Works, J.J. Taylor and Sons Ltd., Lockley Newport Boats, Eichenlaub Boat Co., Mobjack Manufacturing Corp., Clark Boat Company, Allen Boat Co., and Loftland Sail-craft Inc ...
Jib sag may be the single most important gear we have on the Lightning to help power-up/depower the rig. Utilizing the tools available for power (backstay, mainsheet blocks, cloth, etc.) are essential to control the entry and fullness of the jib. Hence, jib sag may be that missing ingredient to your tuning and racing success.
Before stepping the mast. 1) Make sure all shrouds are securely attached to the mast, and the screws are tight. 2) Make sure the spreader tips are secure to the spreader. If they are loose, put tape over the ends to secure the tips. 3) Put "trim tapes" on the spreader 2″ in from the tip. Setting the Mast Butt.
Members of this group own, are former owners, or are enthusiasts for the Lightning. A classic Lightning is one built of wood or one of the early fiberglass boats, typically built prior to the early 1980's. In addition to supporting each other with discussions of maintenance, boat construction, rigging, tuning, racing, daysailing, boat camping ...
Lightning Details The International Lightning Class is a 1938 Sparkman and Stephens design. This active racing class has grown to nearly 15,000 boats. ... Rigging Options: ... Sails: Sails by North, Quantum and Vermont Sailing Partners. Current prices less 10% with new boat purchase. Covers are available from all manufacturers on request. Also ...
Lightning Class Association. Home; Membership. Information/Join; News; Fleet Finder; Fleet Status; ... Manufacturers — Rigging Allen Boat Company Boats, all parts and equipment 200 Cornwall Ave Buffalo, NY 14215 USA ... Wooden spars and wooden boat repairs 1322 East Genesse Street Skaneateles, NY 13152 Phone: 315-685-7558 Fax: 315-685-6076.