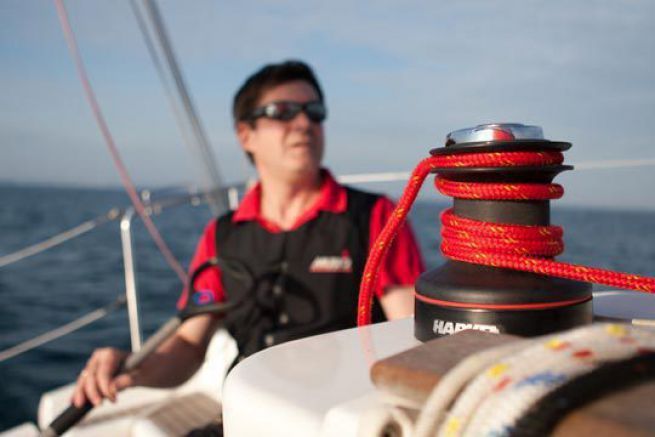
BoatNews.com

Maintenance of winches on a sailboat, step by step to grease and oil your winch
A winch needs maintenance. It is a mechanical device that needs to be checked and greased at least once a year. You take it apart, clean the internal gears, check for wear parts like pawls and springs, and grease it before reassembling it. It may seem like a scary process, but it's much simpler than it sounds.
The winch is a mechanism subject to high stress. And like all good mechanics , it requires maintenance . A beginner can easily be frightened by the task. However, there is nothing rocket science about it. No special equipment is needed, no special tools , just a little concentration and method.

Cleaning the winch: the main rules
- A winch should be cleaned at least once a year at the beginning of the season. - No rush, take your time. - In a winch the gears are greased and the pawls are oiled. - Too much grease is detrimental to the proper functioning. With salt it turns into a sticky paste. - Replace wearing parts (pawl, spring) before breaking.
For cleaning , you will need : Tools : - Flat and Phillips screwdriver - Allen key set - Rags - Brush to clean the parts, another to apply grease
Consumables : - Fine oil for mechanics - Winch grease - Liquid cleaner ( diesel , petrol, white spirit) - Spare kit (pawls and springs adapted to your winches)
And now it's time to practice!
CLEAN YOUR WINCH IN 16 STEPS
1 - Unscrew the upper cup. A screwdriver or an Allen key depending on the model.

2 - Lift the headstock off the winch. Be careful that the bearings do not get stuck inside.
3 - Remove the two needle bearings. Don't worry, the needles can't escape.

4 - Remove the gearbox from the winch using an Allen key. Make sure that the screws do not go in the water.

5 - Remove the column, watching the third bearing.
6 - Remove the central axis. You can see the first pawls appear.

7 - The pawl seats must be very clean and the pawls must operate freely.
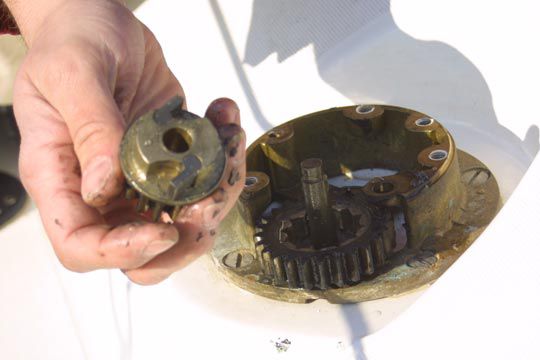
8 - Dismantle all the gears. Be careful not to lose the pawls.
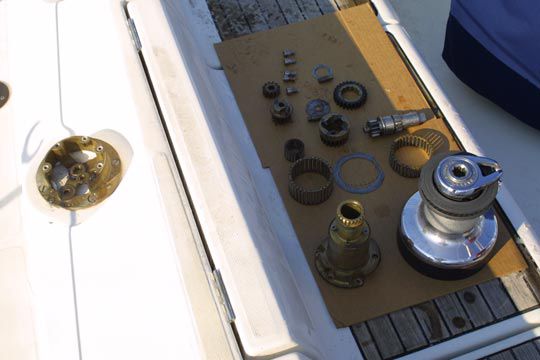
9 - Organize yourself by placing the parts in the order of disassembly. Reverse order for reassembly!

10 - Clean the parts with diesel , petrol or white spirit. Avoid gasoline, too dry!
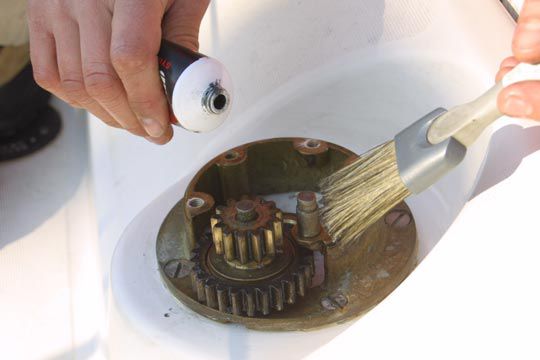
11 - When reassembling, the greasing must be light. A little grease at the end of the brush is enough.

12 - Grease only the moving parts: gears and bearings.

13 - No grease on the pawls! Just fine oil.

14 - Use seawater resistant grease.
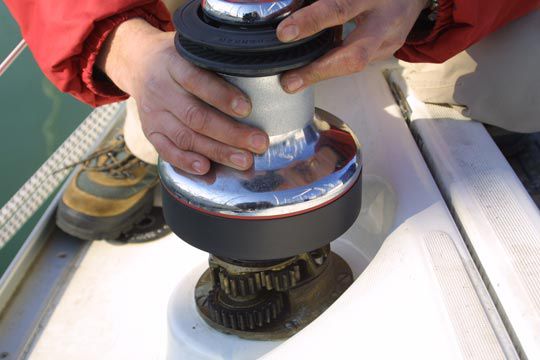
15 - When closing, we have the pleasure of hearing the soft sound of clean ratchets...
16 - Manufacturers offer repair kits with ratchets, spring and grease. Have one ready.
- New Sailboats
- Sailboats 21-30ft
- Sailboats 31-35ft
- Sailboats 36-40ft
- Sailboats Over 40ft
- Sailboats Under 21feet
- used_sailboats
- Apps and Computer Programs
- Communications
- Fishfinders
- Handheld Electronics
- Plotters MFDS Rradar
- Wind, Speed & Depth Instruments
- Anchoring Mooring
- Running Rigging
- Sails Canvas
- Standing Rigging
- Diesel Engines
- Off Grid Energy
- Cleaning Waxing
- DIY Projects
- Repair, Tools & Materials
- Spare Parts
- Tools & Gadgets
- Cabin Comfort
- Ventilation
- Footwear Apparel
- Foul Weather Gear
- Mailport & PS Advisor
- Inside Practical Sailor Blog
- Activate My Web Access
- Reset Password
- Customer Service

- Free Newsletter
Catalina 270 vs. The Beneteau First 265 Used Boat Match-Up

Ericson 41 Used Boat Review

Mason 33 Used Boat Review

Beneteau 311, Catalina 310 and Hunter 326 Used Boat Comparison

Tips From A First “Sail” on the ICW

Tillerpilot Tips and Safety Cautions

Best Crimpers and Strippers for Fixing Marine Electrical Connectors

Thinking Through a Solar Power Installation

Polyester vs. Nylon Rode

Getting the Most Out of Older Sails

How (Not) to Tie Your Boat to a Dock

Stopping Mainsheet Twist
Fuel Lift Pump: Easy DIY Diesel Fuel System Diagnostic and Repair

Ensuring Safe Shorepower

Sinking? Check Your Stuffing Box

The Rain Catcher’s Guide

What Do You Do With Old Fiberglass Boats?

Boat Repairs for the Technically Illiterate

Boat Maintenance for the Technically Illiterate: Part 1

Whats the Best Way to Restore Clear Plastic Windows?

Giving Bugs the Big Goodbye

Galley Gadgets for the Cruising Sailor

Those Extras you Don’t Need But Love to Have

What’s the Best Sunscreen?

UV Clothing: Is It Worth the Hype?

Preparing Yourself for Solo Sailing

How to Select Crew for a Passage or Delivery

R. Tucker Thompson Tall Ship Youth Voyage

On Watch: This 60-Year-Old Hinckley Pilot 35 is Also a Working…

On Watch: America’s Cup

On Watch: All Eyes on Europe Sail Racing

Dear Readers
- Boat Maintenance
- Sails, Rigging & Deck Gear
Winch Servicing Basics

While using the right winch grease is important, servicing the winch before the grease turns to gum, washes out, or the pawls start to hang up is more important. Makers recommend annual servicing, but racers and full-time cruisers may go one to three years, and weekend sailors might stretch it a bit further. Three years really would be the max, unless you can live with increased wear. If you go any longer, you risk increased wear and even damage. If the pawls hang up and the drum releases, parts can break, and people can get hurt as the handle whips around.
Here is a quick review of the basics of winch servicing. Most major manufacturers offer handy videos and guides that can help guide the project:
1. Read the instructions. Most winches come apart by loosening a single screw or removing a clip, with little risk of losing important parts. If in doubt, tape a cardboard box around the winch to catch any strays; the caged bearings can stick to the drum and fall out when it is removed. Note the orientation of the line stripper. Move the parts to a safe work area.
2. Work on one winch at a time. Seemingly identical winches a few years apart in age can have significantly different parts. Weve wasted a few minutes figuring this out.
3. When disassembling the winch, keep track of the order you take things apart in; a phone camera can be helpful for this. Specifically, watch out for the pawls and pawl springs. If you are working on the boat, a cafeteria tray (or similar) is very handy.
4. Degrease the winch parts with mineral spirits. A paintbrush, tooth brush, and lots of rags are helpful.
5. Replace the pawls and springs if they have seen more than a few rebuilds, if they seem worn, or if the motion is not crisp. These are lubricated with oil, not grease, since grease can thicken and cause them to hang up. A manufacturers winch-servicing kit may contain special oil, but motor oil works well, too.
6. Grease all of the gears and bearings before assembly. They don’t need to be generously packed the way vehicle bearings are, since excess can run down into the pawls; they just need to be lightly coated with good surface coverage. Wipe a very thin coat of grease on all internal parts to prevent corrosion.
7. When reassembling the winch, be certain to face the line stripper in the correct direction.
8. Add canvas winch covers. They may reduce wash-out, and we know they protect UV-vulnerable plastic parts.
RELATED ARTICLES MORE FROM AUTHOR
Is there any value to winch covers of a particular design? Or is any cover just a sack?
LEAVE A REPLY Cancel reply
Log in to leave a comment
Latest Videos

Hans Christian 41T – Boat Review

Seven dead after superyacht sinks off Sicily. Was the crew at...

What’s the Best Sailboats for Beginners?

Why Does A Sailboat Keel Fall Off?
Latest sailboat review.

- Privacy Policy
- Do Not Sell My Personal Information
- Online Account Activation
- Privacy Manager
Yachting Monthly
- Digital edition

How to service a winch – video guide
Rachael Sprot
- November 29, 2020
Servicing winches regularly is critical for safety, to keep things working easily and to prolong your equipment's life. Rachael Sprot of Rubicon 3 explains how to disassemble, clean and rebuild your winch.
A backwinding winch can be extremely dangerous and cause serious injury, so winches should be serviced every year in order to clean the mechanism, check for damage and replace worn parts.

Springs and pawls, the heart of the ratchet system inside, are most likely to jam or fail, so should be replaced on a regular basis. You’re also checking that the gears and teeth are not worn or burred, and that there is no serious corrosion. After that, it’s a simple case of cleaning and regreasing to keep things spinning smoothly.
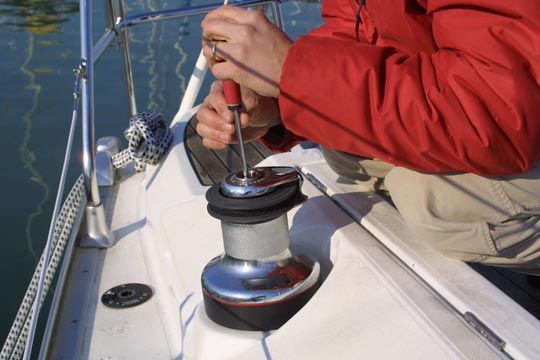
1. Setting up
Most winches can be taken apart with two tools – a flat-headed screwdriver and a set of allen keys. Protect your decks with a sheet or cardboard, and it’s a good idea to put something over the guardwires to stop any parts dropping over the side. Have a small container to hand for the small parts. You’ll need a cleaning agent, a toothbrush, winch grease, and oil. Finally have a manual to hand in case you get lost, and a smartphone to take photos to retrace your steps if needs be.

2. Stripping down
Some winches will have a circlip or locking ring, but on this Harken winch, there’s a screw at the bottom of the handle socket, which allows you to remove the cover and undo the screws that hold the drum on. As you lift the drum take care no bearings drop out of the bottom.
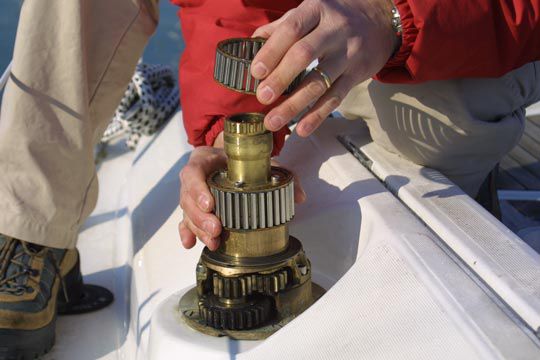
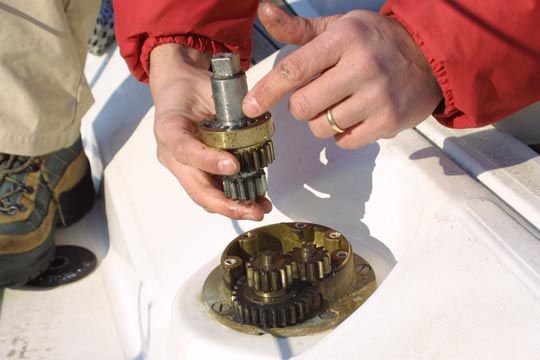
You can then remove the bearings, undo the screws around the assembly base and lift it off to reveal the gears. Carefully take the gears off and lay them out in order, the same way up you take them out.
To remove the pawls, slide a small flat-headed screwdriver under the spring to lift it out of its recess, and slide it out.

3. Cleaning
Grease collects salt and dirt so will need cleaning off. Use a tub of mineral spirit or diesel and scrub with a toothbrush. As you go, check for wear or corrosion.
Dry off, then grease the gears and teeth with winch grease or marine grease. Non-metal bearings don’t need to be greased, but a tiny amount can help.

4. Reassembly
Replace the pawls and springs into their housings – pinch the spring into the pawl, then slide it down. Just use pawl oil, or light oil, as grease will go sticky and can make the pawl stick.
Make sure the gear rings go back in the right way round. Newer winches have rings that are reversible for longer life. Before replacing the gears, check the pinions are secure and free of corrosion.
Secure the central body, replace the bearings and slide the drum back on.

5. Final checks
Make sure the rope stripper for the self tailer points into the cockpit, as this is where the rope tail will go as you winch. Dab anti-corrosion compound onto the screws and hand tighten – check with a torque wrench if you have one.
Give it a spin to check the ratchet works and the winch doesn’t backwind.

Our how to video series is brought to you in association with gjwdirect.com
GJW Direct offers some of the most comprehensive and competitive boat insurance policies on the market. With more than 175 years in marine insurance, when you insure your yacht with us, you’re dealing with the boat insurance specialists, leaving you free to enjoy your time on the water.
With thanks to Bruce Jacobs and the experts at rubicon3adventure.com, the UK’s specialists in adventure sailing and training.

How To Fix A Sailboat Winch (12 Steps And Tips!)

Sailboat winches will help keep your sails trimmed for optimal speed. If you just purchased an old sailboat or your winch seems to be cranking a little rough, maybe it needs some servicing. Follow the steps below to make your winch like new again.
1. Tools You Will Need
The first step is to get the necessary tools for the project. The list below is all the essential tools you will need.
- Snap Ring Pliers
- Sharp Pointed Knife or Awl
- Wrench to remove winch from boat hull
- Small Bowl to hold the parts
2. Remove The Winch From The Boat’s Hull
The second step after gathering all your tools is removing the winch from the boat. This will make it much easier to deconstruct and clean. Make sure not to drop anything in the water!
3. Remove The Spring Clip From The Top Of The Winch
To remove the spring clip, you will need a sharp pointed knife or awl. This will allow you to get under the spring clip and pry it up. Once you have pried it up, carefully removed it from the winch. It is very important to not bend it!
4. Separate The Drum From The Spindle/Base
Now that the spring clip has been removed, you can separate the drum from the spindle. Slowly separate the two while turning one part. This will help separate the two more smoothly.
5. Take Out The Half-Circle Spacers
The half-circle spacers need to be removed next. These are located between the spindle and the base. They are very thin and easy to bend. Be sure to not lose these, they are very important. Once you have removed them, place them in the bowl with the rest of the parts.
6. Remove The Snap Ring
You should have a pair of snap ring pliers nearby. I have done this with other tools, like tiny needle nose pliers, but it’s quite difficult. Definitely use the snap ring pliers if you have them.
Turn the base over and look into the bottom hole. You should see the snap ring at the base of the spindle. Use your snap ring pliers to remove the snap ring.
8. Separate The Spindle From The Base
Now that the snap ring has been removed, the spindle and the base should separate from each other. If they do not come apart, it may be time for a new winch. You may try some light tapping around the two parts to help separate them, but if they are stuck together, you probably have bigger problems than you thought.
9. Remove The Pawls
The pawls are small spring-loaded items on the base and spindle. Press them against the spindle or base and slide them up and out. You should have four total when done. As always, be careful not to lose these overboard. Getting new ones might be a bit of a hassle.
10. Clean All Parts Of The Winch Assembly
Make sure to remove all grease, dirt, and grime from the parts of the winch. This process is usually only performed once every few years at most, so make sure you do it correctly. I use dish soap to clean mine but there are marine cleaners out there if you prefer. Allow all parts to dry before reassembly.
11. Reassemble In Reverse Order
I am not going to walk you through each step in reverse order. Just reverse the steps above and you will end with a working winch.
One thing to remember before reassembly is grease! I recommend this tub of grease, it will last you forever and works on all parts of your boat.
Grease each part that is going to rub with another part. This will keep things running smoothly for years.
12. Attach The Winch To The Boat Hull
This is the final step in winch repair/maintenance. There is one very important thing to do when mounting your winch to the boat, WATERPROOF!
When you have bolts going through your deck, it’s very important to waterproof around those bolts so no water can get inside the boat’s fiberglass hull and cause rot or spongy soft spots. This is very bad for sailboats.
I use this 3M Marine sealeant on my sailboat. Its strong and flexible.
You can use any sealant you prefer. Just remember at some point you may want to remove that winch again so don’t use something that will never come off.
That is the complete guide step-by-step to servicing your sailboat winch.
Final Thoughts
Servicing your sailboat winches is not something you will do very often unless you are working them very hard on a daily basis. I have only serviced mine twice and that’s probably more than I needed to do. It will be up to you to decide how much servicing your winch needs.
I hope this article helps! Cheers!
Check Out These Other Articles On Sailboat Winches
Can Electric Winches Be Used Manually? – How To Install Them
Do You Need Self-Tailing Winches? Absolutely! Here’s Why
Boatlifehq owner and author/editor of this article.
Recent Posts
How to Repair a Sailboat Hull: Step-by-Step Guide
Maintaining your sailboat's hull is crucial for ensuring its longevity and performance on the water. Hull damage can occur due to various reasons, such as collisions, grounding, or general wear and...
10 Steps For Anchoring Your Sailboat
Anchoring a sailboat is a fundamental skill every sailor must master. Proper anchoring ensures your boat remains secure, preventing it from drifting and potentially causing damage. Whether you're...
By Product Categories
Small Boat Blocks
Big Boat Blocks
Complementary Hardware
Travelers & Genoa Leads
Mainsail Handling
Headsail Handling
Mooring Solutions
Spare Parts
Accessories
Harken Canvas
Sportfishing
Fly Soft-Attach Blocks
Carbo Air Blocks
Small Boat Classic
Flip-Flop Small Boat
GP Catamaran Ceramic Mainsheet Systems
Protexit™ Exit Blocks
Through-Deck
Wire High-Strength
Dinghy Vang
Small Boat Deck Organizers
Midrange Classic
Midrange Deck Organizers
Zircon Blocks
Element Blocks
Black Magic Air Blocks
Cruising ESP Blocks
Megayacht Blocks
Stainless Steel Blocks
Black Magic Air Runners
FlatWinder Powered Blocks
Mastbase Blocks
Over-the-Top
Crossover Blocks
Big Boat Deck Organizers
Cam Cleats & Kits
Cam Cleat Accessories
Cam Cleat Bases
Stand-Up Bases
Deck Organizers
Spinnaker Pole Cars
Soft Attachments
Fixed Padeyes
Removable Padeyes
Bolt-Down Fairleads
Grand Prix Jib Leads
Halyard Tensioners
Tiller Extensions
Peter's Desk Drawer
Dinghy Jib Leads
Crossbow Pivoting Self-Tacking Jib Traveler
13 mm Micro
22 mm Small Boat
27 mm Midrange
32 mm Big Boat
Windward Sheeting
42 mm Mini-Maxi
T-Track Genoa Lead
Access Rail System
13 mm AA Battcar System
22 mm A Battcar System
27 mm B Battcar System
32 mm C Battcar System
18 mm Switch Battcar System
26 mm Switch Battcar System
26 mm Trysail Switch
32 mm Switch Battcar System
32 mm Trysail Switch
40 mm Switch Battcar System
40 mm Trysail Switch System
Furling Mainsail Outhaul Systems
Single Line Reefing
Harken Vang-Master
Carbo Racing Foil
Small Boat Furling
Small Boat Underdeck
Reflex Furling
MKIV Jib Reefing & Furling
MKIV Underdeck Jib Reefing & Furling
Furling Accessories
Powered Furling
MKIV Ocean Furling
SnubbAir (Not a Winch)
Grand Prix Winches
Air Winches
Circuit Breakers
Analog Switches
Digital System Switch
Aluminum, Chrome & Bronze Winch Handles
Carbo OneTouch Locking Winch Handle
Service Kits
CLR Mooring Winches
Electric Captive Reel Winches
Hydraulic Captive Reel Winches
UniPower Radial
Single-Acting Integral Backstay Adjuster
Single-Acting Cylinders
Locking Cylinders
Double-Pull Cylinders
Grand Prix Cylinders
Hydraulic Cylinder Rod End Blocks
Hydraulic Cylinder End Fittings
Control Valves
Control Manifolds
Control Panels
Compact Control Panel
Rotary Pumps
Hydraulic Pump Handles
Power Systems
Repair Kits
Ball Bearings
Block Spare Parts
Traveler Cars
Furling Spare Parts
Winch Spare Parts
Winch Service Kits
Blockheads Gear
Promo & Gifts
Marine Grip
Blue Performance
Jeep/Truck tops
Garage storage
One-design Covers
Boat accessories
Canvas bags
By Type of Sailing
Dinghy / One-Design
Offshore Racing
Coastal / Day Cruising
Bluewater Cruising
Megayachts / Custom
Service Guide
Tech/Service
deck layouts
Data Sheets (SDS)
How to choose
System diagrams
Calculators
Reeving diagrams
Traveler Purchase Selection Guide
How to Choose
Testimonials
Hoister Videos
Request a Quote
Request Samples
Fabric details
Cover Styles
Canvas Videos
Contract Services
Materials and Components
Our Equipment
Contract Cut-and-Sew Project Spotlight
- Harken at the front
- Safety & Rescue
Support / Tech/Service Articles
Winch servicing

How often should you service your winches?
You should service your winches before the season and at least once during the season. If you race your boat hard, check your winches before every regatta. Keep your winches clean and operating smoothly by flushing them regularly with fresh water. Check pawls and springs, bearings, gears, and spindles for signs of wear and corrosion.

The process is simple
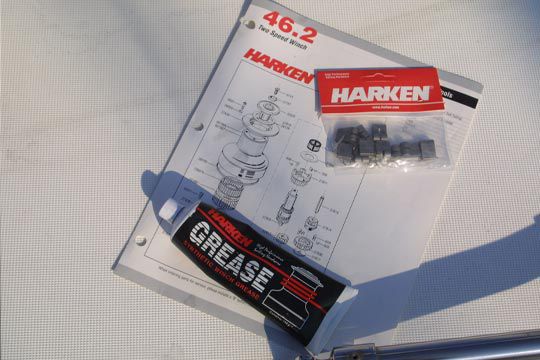
Dismantling a winch, degreasing, inspecting, lubricating and reassembling it is not difficult if you prepare, and are methodical. Preparation: Have the correct tools and consumables ready. Get an exploded diagram of the winch. If it is a Harken winch, you will find these included in each winch manual here . Surround the winch with towels in order to protect the deck and reduce “parts bounce.” If you are near the rail, put towels over the life lines to try to block the route to oblivion. Wear gloves to protect your skin from the winch grease and general dirt. If you wear two pair, one over the other, you can take the dirty outside pair off as you near completion so you don't get everything dirty as reassemble the winch. Be methodical: When dismantling the winch, compare what you find to the diagram. Lay out the parts logically so you can be confident about where they came from. When dismantling parts with bearings inside, don't let the bearings fall out. The main bearings inside the drum are traditionally most likely to do this, so lift the drum slowly and check to see whether the bearings are on the housing or stuck in the drum. If they are in the drum, wait until they fall, or tilt the drum so that you can see what is happening and so that they fall into the boat rather than out of it. If something does drop, make sure you don't compound the problem by over reacting, and turning a minor irritation (dropping a washer or bearing) into an expensive proposition (throwing the drum into the water while trying to catch the original dropped part).
Degrease and inspect the winch
Clean all the old grease and muck off the parts of the winch. (Use a tub or bucket tub with mineral spirits, diesel fuel or commercial degreaser. Do not use gasoline, which may damage plastic parts.) Assess the condition of the winch. Look for bent or chipped teeth on the gears. Don't forget the teeth on the inside of the drum. Make sure the bearings are intact and undamaged. Look at the holes where gear shafts, etc. are located and make sure they are not elongated. Check the pawls and springs, and especially the pocket where they reside. Look for any corrosion. If your winch has a thrust bearing (a row of steel ball bearings under a cover at the base of the housing that takes the downward load on the drum), do not open this without taking precautions, or you will have ball bearings going in all directions. If the bearings are not dry, leave them alone. Replace worn or corroded parts as necessary.
Reassemble your winch
Hopefully you have a nice clean winch base so that you can start the reassembly process. This generally is a reversal of the dismantling process. Lubricate as you go. Squeeze some winch grease into a bowl and apply it with a paint brush. Apply grease to the teeth of each gear and also to the shaft on which the gear sits. If the winch is big enough that the gears have bearings, grease the bearings too. DO NOT grease pawls and springs. This will cause them to stick and could result in a free-spinning winch. Oil the pawls with properly formulated pawl oil. Grease around the handle socket if it is contact with a bronze housing. When reassembling Harken Classic winches, make sure the ratchet gears are the correct way up, with the pawls sitting properly in the teeth. Failure to ensure this may cause excessive wear or friction in the winch. Once the winch is reassembled and closed, test it by spinning it by hand; put a handle in and wind both ways. You should have a nice, easy-to-spin winch ready for all that the sea, wind, and you can throw at it. Got a question? Ask us! If you have any questions about maintaining your winches, or anything else, feel free to email us at [email protected] . Twitter: @Harken Facebook: Harken If you would like to link to or reprint this article please contact [email protected]

Related products

Pawl Oil — For Springs, Pawls

High Performance Winch Grease — White

Classic, Radial Winch Service Kit — 10 Pawls, 20 Springs
Product categories.
- United States
- New Zealand
- United Kingdom
- Forums New posts Unanswered threads Register Top Posts Email
- What's new New posts New Posts (legacy) Latest activity New media
- Media New media New comments
- Boat Info Downloads Weekly Quiz Topic FAQ 10000boatnames.com
- Classifieds Sell Your Boat Used Gear for Sale
- Parts General Marine Parts Hunter Beneteau Catalina MacGregor Oday
- Help Terms of Use Monday Mail Subscribe Monday Mail Unsubscribe

Keel winch failure... and repair...
- Thread starter dbk0630
- Start date Sep 5, 2019
- Catalina Owner Forums
- Catalina 22

It does look like the drive shaft handle threads are on the wrong side of the gear and the drive shaft is sitting too far to the right/aft

In looking over the winch that failed on my ‘86 C22, I found that it’s a Fulton model K1050... and it was not designed to have a retaining ring (aka e-ring, circle clip, etc.) on the drive shaft. According to a 1995 catalog for Genie Industries I located on the inter-web, the K1050 was available from 1985-1986. Interestingly, the next model in the catalog, the Fulton K1051, added a retaining-ring on the shaft “to limit it’s side to side movement.” The K1051 was listed as being available from 1986 to 1995 (and possibly longer since that was the year the Genie catalog was published). One of my friends has a1987 C22... and at my urging he peeked in and found that his keel winch does have a retaining ring on the drive shaft. So I’m thinking that the risk of a keel winch failing, at least the way mine did, may only be relevant to those that have an early new design model; and maybe those with an original style 1985 C22 that also have the K1050 Fulton winch. As a notable aside, when he checked his winch, my friend found that both of the bolts holding his winch were loose... and one was very loose. It was an easy fix to tighten them... which he did right away... but over a beer the other night, we both admitted that given how easy it is to do... we should check our winch bolts on a more regular basis.
Thanks for the great write-up DBK. I also replaced my winch after some misbehaviors. I had an incident where our keel somehow swung down suddenly. It was after a crew member attempted to lower the keel. Not wanting this to ever happen again, I replaced the winch and turning ball. The turning ball had a fresh, shiny flat spot in the groove, much like your picture shows. I’m still not sure where the fault occurred, but I do not regret replacing the winch. We now count the turns when when we lower and raise the keel. 30 turns of the handle!
I too am having winch issues. While raising and lowering the keel I feel and hear thumping and popping sounds from the winch. I had the marina I purchased the 85 C22 from replace the cable and connections. The bottom of the winch is tilted toward the cabin and the keel cable clamp is protruding into the spool area. I think the cable is riding over the clamp bolt and causing the cable to seat unevenly in the spool. Should the winch sit straight up and down? It looks like the cable is reeling onto the backside of the spool where the clamp is. Any help would be appreciated.

Rick....winch should be vertical, not tilted, if tilted it would cause the cable to load on the spool to one side. Check the mounting bolts on the top of the winch to be sure they are tight, and that the attachment point (companionway) is intact. The clamp bolt should not be interfering with the cable....pclarksurf's shim is a good fix if that's the culprit.
Ricreitz55 said: I too am having winch issues. While raising and lowering the keel I feel and hear thumping and popping sounds from the winch. I had the marina I purchased the 85 C22 from replace the cable and connections. The bottom of the winch is tilted toward the cabin and the keel cable clamp is protruding into the spool area. I think the cable is riding over the clamp bolt and causing the cable to seat unevenly in the spool. Should the winch sit straight up and down? It looks like the cable is reeling onto the backside of the spool where the clamp is. Any help would be appreciated. Click to expand

dbk0630 said: The keel cable clamp should be on the outside of the spool... not protrude inside... Click to expand

FWIW, the cable never winds perfectly anyway, at least not on our winch. It always makes spooky noises when cranking it up or down.
Gene Neill said: FWIW, the cable never winds perfectly anyway, at least not on our winch. It always makes spooky noises when cranking it up or down. Click to expand
Rick....I think dbk may have nailed it...is your clamp INSIDE the spool?
rpludwig said: Rick....winch should be vertical, not tilted, if tilted it would cause the cable to load on the spool to one side. Check the mounting bolts on the top of the winch to be sure they are tight, and that the attachment point (companionway) is intact. The clamp bolt should not be interfering with the cable....pclarksurf's shim is a good fix if that's the culprit. Click to expand
Attachments

yikes! good you got to the bottom of it....when you re-install, be sure to chk the cable for new meathooks from catching on those bolts...
rpludwig said: yikes! good you got to the bottom of it....when you re-install, be sure to chk the cable for new meathooks from catching on those bolts... Click to expand
Ricreitz55 said: The marina that installed my new cable put the bolts into the spool backwards which made the cable ride up over the extend blot and nut. Also they did not wrap the cable around the shaft. (See pictures of the right way, new winch and the wrong way, my rusty winch.) I am very lucky I found this before the cable broke. I will repair both. Click to expand
here's my (similar) substantiation....took wife's car in for an oil change. As usual they check tires, show you the air filter (and try to sell you one).... Next day the check engine light came on yikes! Took it to the dealer, sat for two hrs in waiting room reading old magazines and watching CNN ( another yikes!).... Associate comes out with the invoice for diagnostics = $55.00!....verdict, the air filter cover was loose, unsecured, thus the engine was "getting too much air"! Drove pissed off straight away to the oil change place and handed them the invoice....reply "oh shit, next oil change is on us AND a free air filter"..... no brain hemorrage, but a wasted day nonetheless., and to quote Gene... "and they do this for a living!!!!!" (I'm old enuff to remember Larry, our Texaco guy with the necktie and the cap ("you can trust your car to the man who wears the star...")...he never screwed up tire pressure, air filters, or put winch bolts on backwards...AND pumped the gas and cleaned the windows too, with a smile! ...but I digress.)
Not to get too far off on a rant - but often times the issue is - you pay for the privilege of having someone else do the work, and then you spend an equal amount of time, which you previously paid for - going back and fixing the repair. Add in the significant time to originally take whatever to the repair shop, go home, go pick it back up, and then go home again - and it's actually a massive time and money savings to just do it yourself from the beginning. Plus - you learn a lot doing it - and later, very often times, that knowledge comes in real handy at a future inopportune time.
- This site uses cookies to help personalise content, tailor your experience and to keep you logged in if you register. By continuing to use this site, you are consenting to our use of cookies. Accept Learn more…
Service Locator
- Angler Endorsement
- Boat Towing Coverage
- Mechanical Breakdown
- Insurance Requirements in Mexico
- Agreed Hull Value
- Actual Cash Value
- Liability Only
- Insurance Payment Options
- Claims Information
- Towing Service Agreement
- Membership Plans
- Boat Show Tickets
- BoatUS Boats For Sale
- Membership Payment Options
- Consumer Affairs
- Boat Documentation Requirements
- Installation Instructions
- Shipping & Handling Information
- Contact Boat Lettering
- End User Agreement
- Frequently Asked Questions
- Vessel Documentation
- BoatUS Foundation
- Government Affairs
- Powercruisers
- Buying & Selling Advice
- Maintenance
- Tow Vehicles
- Make & Create
- Makeovers & Refitting
- Accessories
- Electronics
- Skills, Tips, Tools
- Spring Preparation
- Winterization
- Boaters’ Rights
- Environment & Clean Water
- Boat Safety
- Navigational Hazards
- Personal Safety
- Batteries & Onboard Power
- Motors, Engines, Propulsion
- Books & Movies
- Cockpit Confessions
- Communication & Etiquette
- Contests & Sweepstakes
- Colleges & Tech Schools
- Food, Drink, Entertainment
- New To Boating
- Travel & Destinations
- Watersports
- Anchors & Anchoring
- Boat Handling
Replacing A Winch Strap
Advertisement
Frayed, faded, stained, or torn — is your winch strap ready for replacement?

Frayed stitching, tears, cuts, and extreme fading are all signs that the winch strap needs to be replaced.
Be it by sun, moisture, misuse, or mere age, the time will come when you need to replace your boat trailer's winch strap. The signs of an ailing winch strap include frayed stitching, color fading, cuts, folds, tears, and twists. If yours shows any of these traits, do get it replaced before it fails just when you need it most, at the ramp. Fortunately, replacing a winch strap is a snap. In fact, I allowed my 10-year-old son to tackle the task on a PWC trailer we'd recently purchased while I documented the process in photos.

Other than a new strap, the tools required to replace a winch strap include box wrenches for the anchor bolt and perhaps a new bolt in case the original is damaged. A utility knife may be handy in case you need to cut off old webbing.
Rather than take for granted that the person who put on the existing strap did it correctly, the first step in the replacement process is to make sure you purchase the right strap for the winch. Determine the working load capacity of the winch, usually stamped somewhere on the winch or available from the manufacturer. Next, make sure the strap you purchase has a strength rating at or above that of the winch, and that both the strap and winch are rated for the weight of the boat.
Make sure the winch is designed for a webbing-type strap rather than rope or cable. Winches designed for use with webbing straps have a drum width of 2 inches or wider and a drum diameter of less than 13/4 inches. Webbing-strap winches also have a bolt (or holes for one) that goes through both sides of the spool adjacent to the drum. The bolt threads through the loop sewn into the end of the strap to anchor it on the drum when under tension. A winch built for use with rope will have only one hole on the side of the spool, through which the end of the rope is threaded and knotted or wound around to anchor it, and no bolt. Winches designed for use with cable will usually have a drum of at least 13/4 inches diameter, no bolt, and may be narrower than 2 inches.
Once you've determined that you have a winch designed for use with a webbing strap and have purchased the correct strap for the rig, the replacement job is simple. Here are steps in the process:

1. Remove the old strap by unwinding it off the winch drum. You may have to cut the old strap off the bolt to inspect or remove the anchor bolt.

2. Use the wrenches to loosen the locknut holding the strap anchor bolt in the drum and remove it. Replace the bolt and nut if needed.

3. Insert the bolt through the spool wall, through the loop sewn into the end of the new strap, and out through the opposite hole in the spool wall. Attach and tighten the locknut only enough to seat it securely on the bolt's threads and not tight against the spool.

4. Wind the new strap onto the winch drum, making sure it lies flat with no twists, creases, or folds.

5. Snap the new strap's hook to the boat's bow eye with the peace of mind that comes with having replaced an important component of your trailered rig.
Reverse Temptation
Don't succumb to the temptation of merely reversing, rather than replacing, the webbing strap on your boat's winch, such as you may do with the line on your fishing reel. Even if you trim back the worn end before reversing and reusing the strap, if the webbing is old enough to show wear at the working end, chances are good that the body of the material has suffered some, too. Plus, you'd have to sew a new loop into the anchor end and stitch a new hook into the boat end. Even if you locate an awning shop able to tackle the heavy-duty stitching, the expense and suspense you suffer with the patchwork job pales compared to the peace of mind from knowing you have a new connection between your beloved boat and the trailer.
Related Articles
The truth about ceramic coatings for boats.
Our editor investigates the marketing claims of consumer-grade ceramic coatings.
Fine-Tune Your Side Scan Fishfinder
Take your side-scanning fishfinder off auto mode, and you’ll be spotting your prey from afar in no time
DIY Boat Foam Decking
Closed-cell foam flooring helps make boating more comfortable. Here’s how to install it on your vessel
Click to explore related articles
Dan Armitage
Contributing Editor, BoatUS Magazine
A full-time travel and outdoors writer based in Ohio, Dan is in his 20th season hosting the popular syndicated radio show Buckeye Sportsman. He gets around on a pontoon boat and an Aquasport center-console, which he uses for all his DIY editorial projects and fishing features. A USCG Captain (Master 50-ton), he’s a popular speaker at boat and sport shows.
BoatUS Magazine Is A Benefit Of BoatUS Membership
Membership Benefits Include:
Subscription to the print version of BoatUS Magazine
4% back on purchases from West Marine stores or online at WestMarine.com
Discounts on fuel, transient slips, repairs and more at over 1,200 businesses
Deals on cruises, charters, car rentals, hotel stays and more…
All for only $25/year!
We use cookies to enhance your visit to our website and to improve your experience. By continuing to use our website, you’re agreeing to our cookie policy.
Please verify you are a human
Access to this page has been denied because we believe you are using automation tools to browse the website.
This may happen as a result of the following:
- Javascript is disabled or blocked by an extension (ad blockers for example)
- Your browser does not support cookies
Please make sure that Javascript and cookies are enabled on your browser and that you are not blocking them from loading.
Reference ID: 52f10dd5-6c32-11ef-97de-a99124a0a82a
Powered by PerimeterX , Inc.
IMAGES
VIDEO
COMMENTS
How to disassemble, lubricate, and reassemble a sailboat winch. This video uses an Arco 6 winch removed from a 1981 Catalina 22 sailboat as the example.More ...
Note the orientation of the line stripper. Move the parts to a safe work area. 2. Work on one winch at a time, and double check that you have the right service kit for each one. Seemingly identical winches that were manufactured just a few years apart in age can have significantly different parts. 3.
Your boat's winches should be serviced at least once or twice during the sailing season depending on the frequency and extent of your sailing endeavors, and again in the fall when the boat is hauled. Service them immediately if: Ratcheting seems sluggish or sticky: Pawls may have been greased instead of oiled.
All major winch manufacturers supply overhaul kits, which include grease for bearings, oil for pawls, pawl springs, a small brush, and an instruction booklet. The Lewmar kit, for example, retails for around £16 and is universal to all their winches. All major manufacturers also have helpful websites.
Pour 2 inches into the bottom of a bucket and use a stiff-bristled tooth brush to get all the grease out. Flat bearing surfaces can be cleaned with a plastic scourer or Scotchbrite pad, but never use wire wool or a metal scraper. Rinse the parts with a detergent to remove traces that would degrade the new grease. 2.
This video is all about how to take apart a sailboat winch as well as winch maintenance. When your winch gets loud and doesn't turn well it's time to dismant...
Lubricate the roller bearings lightly with grease and refit them. Lightly grease the gear teeth inside the drum. Replace the drum, lightly grease the self-tailing arm and the top cap, and refit. Check the action of the winch before patting yourself on the back and moving on to the next one.
1 - Unscrew the upper cup. A screwdriver or an Allen key depending on the model. 2 - Lift the headstock off the winch. Be careful that the bearings do not get stuck inside. 3 - Remove the two needle bearings. Don't worry, the needles can't escape. 4 - Remove the gearbox from the winch using an Allen key.
If you are working on the boat, a cafeteria tray (or similar) is very handy. 4. Degrease the winch parts with mineral spirits. A paintbrush, tooth brush, and lots of rags are helpful. 5. Replace the pawls and springs if they have seen more than a few rebuilds, if they seem worn, or if the motion is not crisp. These are lubricated with oil, not ...
3. Cleaning. Grease collects salt and dirt so will need cleaning off. Use a tub of mineral spirit or diesel and scrub with a toothbrush. As you go, check for wear or corrosion. Dry off, then grease the gears and teeth with winch grease or marine grease.
Small Bowl to hold the parts. 2. Remove The Winch From The Boat's Hull. The second step after gathering all your tools is removing the winch from the boat. This will make it much easier to deconstruct and clean. Make sure not to drop anything in the water! 3. Remove The Spring Clip From The Top Of The Winch.
Get an exploded diagram of the winch. If it is a Harken winch, you will find these included in each winch manual here. Surround the winch with towels in order to protect the deck and reduce "parts bounce.". If you are near the rail, put towels over the life lines to try to block the route to oblivion. Wear gloves to protect your skin from ...
3027 Capital Blvd Ste 111 , Raleigh NC 27604-3399. home. categories. sailing. sailing winches. winch repair parts. Check your spelling or try fewer, more generic words. If you're really stuck, visit the. Black Electronic Switch - Single-Function, Guard Top.
Maxwell 17, 2-speed winch, disassembly to clean and apply new grease. Detailed pictures of the disassembled assembly.Build your own home for the cost of mate...
Fisheries Supply also offers a range of repair kits, winch parts, and spare parts, including bearings, gears, springs, and pawls. These components are essential for maintaining and repairing worn sailboat winches. Sailboat Winch Handles Boat winch handles are designed to provide a comfortable and efficient method for operating sailing winches.
Hunter 46 Point Richmond, CA. Feb 26, 2021. #2. Below are links to two Youtube videos and thread on servicing your Maxwell winches. Contact Arco-Hutton to buy some spare parts. Suggest taking a photo of each disassembly step to refer to when re-assembling. Maxwell 2 speed winch repair:
I too am having winch issues. While raising and lowering the keel I feel and hear thumping and popping sounds from the winch. I had the marina I purchased the 85 C22 from replace the cable and connections. The bottom of the winch is tilted toward the cabin and the keel cable clamp is protruding into the spool area.
Shop Winch Parts & Service Kits for boats of all types at Defender. Get fast delivery and free shipping on eligible orders over $99. ... Inflatable Boat Components . Trailering . Brands Zodiac, Achilles, AB Inflatables, Tohatsu, Mercury, ... Harken Winch Handle Repair Kit - BK4517 $22.99. 0. Lewmar Winch Replacement Chrome Top Cap with O-Ring ...
To help you select from the winches described on this site the chart below is designed as a quick reference to match application, yacht size and winch. Cross reference your yacht size (for masthead rigs) or sail area (fractional rigs) with application, to ascertain the correct winch. You can also send your deck and sail plans to your Lewmar ...
1. Remove the old strap by unwinding it off the winch drum. You may have to cut the old strap off the bolt to inspect or remove the anchor bolt. 2. Use the wrenches to loosen the locknut holding the strap anchor bolt in the drum and remove it. Replace the bolt and nut if needed. 3. Insert the bolt through the spool wall, through the loop sewn ...
Barient Winch Repair Kit LEWMAR. Barient Winch Repair Kit 4.8 out of 5 Customer Rating Model # P002_070_004_508 Mfg # 19712056. $29.91 Model # P002_070_004_508 Mfg ... Sailboat Winch Handle Selection. This article will get you up to speed on the different styles of winch handles and the features and benefits of each.
Lewmar winches are designed with both cruising sailors and racing crews in mind. The EVO® range of winches meets the needs of sailors and boat builders with a perfect blend of looks, functionality and reliability. We have a range of new race-inspired winches and for short-handed crews, the revolutionary REVO® back-winding winch makes sail ...
3027 Capital Blvd Ste 111 , Raleigh NC 27604-3399. home. brands. lewmar. lewmar sailing. lewmar sailing winches. lewmar winch repair parts. Check your spelling or try fewer, more generic words. If you're really stuck, visit the.