Post by Pete Staehling » Thu Dec 10, 2020 11:55 pm
Spike A wrote: ↑ Thu Dec 10, 2020 7:24 pm I'm not sure about the Scamp Camp or building but I did have a Potter 15 I sold and purchased a used fiberglass Scamp. I'm not as agile as I used to be and the cabin in the Potter wasn't really usable. Also if you sail with anyone else, 2 is about max for the Potter. I've had 4 comfortably in the Scamp. There is no cabin but the stability, cockpit room, and lack of stays makes for a more useful boat for me. I too want to sail camp along the Gulf Coast and I'm trying to figure out a boom tent or other solution to keep out of the weather in the evenings.
Post by Spike A » Fri Dec 11, 2020 12:28 pm
Post by Pete Staehling » Fri Dec 11, 2020 1:21 pm
Spike A wrote: ↑ Fri Dec 11, 2020 12:28 pm I have also slept in an MRI machine. In my previous military life I slept in many unsavory places. The SCAMP will be luxury. Many SCAMPers, is that a word, will put slats between the cockpit seats to create one huge sleeping surface. You could probably fit a queen sized inflatable bed if you had the desire. My wife will definitely not be sleeping aboard so I'm planning on a nice sleeping bag/pad on the floor.
Post by wdscobie » Fri Dec 11, 2020 4:22 pm
Post by CurtisWWP » Wed Dec 23, 2020 11:18 pm
Post by wdscobie » Thu Dec 24, 2020 3:07 pm
CurtisWWP wrote: ↑ Wed Dec 23, 2020 11:18 pm I am curious about how well they point compared to a Potter 15?
(this new welsford cruiser checks a lot of boxes…).
Over the past few days I’ve had email exchanges with John Welsford, New Zealand designer, regarding a brainstorm that’s been percolating in his clever, whimsical noggin: A bigger, more commodious takeoff on his wildly popular SCAMP design.
As most SCA readers know, the 11’ 11” SCAMP design was conceived 13 years ago when Josh Colvin, editor of this fine publication, asked Welsford to come up with a new kind of small cruising boat—one small enough to explore the most hard-to-penetrate backwaters, while being easy to rig, light enough to trailer with the smallest of tow vehicles, surprisingly great under sail, and comfy for overnight camp-cruising adventures. So, following some tweaks by designer and master boatbuilder Kees Prins, the resulting sailboat was dubbed SCAMP, for Small Craft Advisor Magazine Project.
SCAMP DRAWING…
The rest is history: More building plans and kits for SCAMP have been sold over the years than any other small cruising boat we can think of. Besides the original wooden version, Gig Harbor Boat Works was licensed in 2013 to produce a fiberglass SCAMP, and the little giant killer—in wood and fiberglass—has since its debut been at the center of various small-boat rallies, workshops and sailing events.
While SCAMPs are still being built worldwide by enthusiasts, plan and kit sales have slowly been approaching what might be a kind of saturation point. It’s not that “everyone who wants a SCAMP has already built one,” but we get the feeling that it’s time for something new and different—like a SCAMP-inspired design that has the personality and quirky appeal of the original boat, but with more creature comforts (for an aging population of SCAMP lovers).
Meet SCALLYWAG, John Welsford’s big sister to SCAMP, a 15’ 4” x 7’ 3” wonder with a “real” cabin, tabernacle mast, mizzen sail, powerful main, water-ballast tanks, sitting headroom down below…and like SCAMP, faster than many onlookers might expect.
SCALLYWAG DRAWING…
This might turn out to be a timely, common-sense follow-up to the successful SCAMP design—so tempting that John Welsford is talking about building one for himself.
(As a footnote, we might add that in 2008, prior to the introduction of SCAMP in 2010, Welsford came up with another design that was similar to but somewhat larger than SCAMP—called TREAD LIGHTLY, which measured 13’ overall, with a beam of 5’ and addition of a mizzen. The series of similar hulls began with PEANUTS, an experimental build that never quite made the plans list. That design led to TENDER BEHIND, then SHERPA, then TREAD LIGHTLY, then SCAMP, then SCRAPS and now SCALLYWAG. Quite a series!)
TREAD LIGHTLY drawing…immediate predecessor to SCAMP)
Here is John Welsford’s description of the SCALLYWAG design:
“I’ve had a number of people tell me they love SCAMP, but they’d like a ‘real’ cabin—something that would provide shelter for a couple of friends to overnight out of the rain; somewhere with space enough for four to sit and chat over coffee or rum on a cold evening; somewhere with a bench for a cooker, a table to eat the food off of, and lockers for all the essentials…and room for the skipper and first mate to stretch out and sleep in comfort.
“SCALLYWAG is not so big as to make launching and retrieving a chore; her mainmast is in a tabernacle, which makes standing it up easy-peasy for clients who don’t like the idea of lifting a mast that size vertically into place. Her mizzen is light enough to not be a worry, too, in that respect.
“The rig is a powerful one, but easy to access for reefing, and she will heave to under mizzen with the main let free so she sits mostly head-to-wind, dry and restful if a gust has to be waited out.
“I’ve added a pair of big water tanks for ballast, so with that and her beamy shape she’ll be very stable. Her cockpit self-drains, the motor is inside the tall transom for easy access, and while there’s room in the cockpit for four, she’ll be easy to single-hand and relaxing to sail.
“While the relationship between SCALLYWAG and SCAMP is obvious, it’s not just the styling. The backroom calculations in hydrodynamics suggest she’ll handle well, and be faster than many expect. With high stability and the ability to sit upright when aground, she’ll be able to transition from hiding in the mud or sand up a creek somewhere, to making a longer coastal passage without any fuss.
“Construction is simply plywood over ply bulkheads, with stringers to line everything up, and with considerable buoyancy just in case. The plans will have scale drawings of all major components, and we anticipate soon having printable full-sized templates for frames and other key items.”
As for specifications, beyond the overall length of 15’ 4” and beam of 7’ 3,” SCALLYWAG will have board-up draft of 10,” a board-down draft of 3’ 4,” a total sail area of 143 s.f. and a fully-rigged dry weight of 750 lbs. (Incidentally, the beam-to-length ratios of SCAMP and SCALLYWAG are almost identical.)
John Welsford says that plans for SCALLYWAG will be available on December 1, but he can take orders in the meantime. Price will be $245 U.S. funds for emailed, printable PDFs, and the plans can be ordered via John’s website: jwboatdesigns.co.nz (Joel Bergen, well-known for the Welsford Navigator he built and sails in many Northwest small-boat events, will be developing a set of SCALLYWAG patterns in the not-distant future, according to Welsford. Editor’s note: We heard from Joel yesterday; he’s hoping to develop CAD-produced patterns “in a few weeks,” now that he’s received initial SCALLYWAG drawings. Stay tuned; we’ll provide updates on plans and patterns in this space.)
FIRST IMPRESSIONS OF THE SCALLYWAG DESIGN:
Eager to hear what SCAMP-savvy friends might have to say about the SCALLYWAG specs and just-released drawing, we sought initial reactions from…
JOSH COLVIN, editor of Small Craft Advisor , who commissioned the SCAMP design in 2010 and enjoys sailing SCAMP #1:
“There’s certainly no doubt who designed this one! It looks almost as much like Welsford’s PENGUIN as a SCAMP. SCALLYWAG’s length is a sweet spot in terms of accommodations potential. She’ll be rowed less than most SCAMPs, but I love the inboard motor well to keep her lines clean, and the engine right at hand. But her most exciting feature is the addition of the mizzen, which will improve seaworthiness and make managing the mainsail easier.
“Between LONG STEPS and SCALLYWAG, those looking for something like SCAMP, but larger, have great options. I’m excited to see the first boat built—she will be bigger than most expect, just looking at the drawing.” SIMEON BALDWIN, builder of an early SCAMP who has perhaps sailed more nautical miles with a SCAMP than anyone…and who has also served as a generous advisor to fellow SCAMP builders and is an expert on rigging and sailing the little 11’ 11” boats:
“I like what I see of this long-rumored design. Knowing John and his attention to ergonomics, I can anticipate it will work well. The tabernacled mast and addition of a mizzen are most appealing.
“From the drawing I think it may resemble LONG STEPS in terms of the recessed footwell. It also appears he is eschewing a by-design lazarette made popular by many SCAMP owners.
“The double water tanks are something to contemplate. I don’t envision SCALLYWAG as a purpose-built racer with crew, actively keeping high-side ballast on long tacks, like the SKATE 15 that Brandon Davis designed, which utilizes two tanks and a dump-valve system that may be more elaborate than a typical cruising sailor would want to live with. But John may be describing two water tanks that are filled and remain separate from one another.”
(Editor’s note: Welsford’s comment on tanks, “The ballast tanks are linked, and they’re not far enough off the centerline to work independently. There is one each side of the aft end of the centerboard case and they go out as far as the seat-front extensions.”)
“I’m looking forward to how all of this works out!”
BRANDON DAVIS, of Turn Point Design in Port Townsend, whose company cuts CNC kits for the SCAMP and a variety of other small boats. Brandon is also a skilled designer and small-boat sailor:
“I really like this boat, since it has just enough room to have a cabin but it’s still small enough to be trailered, beached and easily built in a garage. The enclosed cabin should encourage longer trips or taking a friend along.
“The longer waterline should increase average sailing speeds. My guess is that rowing speed will be lower than the SCAMP, as the rower will not be able to take advantage of the waterline length because of her weight.
“Will SCALLYWAG be offered as a kit? I could see it selling well as a kit and the market could be ripe. Many SCAMP builders might consider this as their next build.
“I look forward to seeing the first SCALLYWAGs on the water!”
KEES PRINS, designer and boatbuilder, who constructed the first SCAMP while serving as boatshop manager at the Northwest Maritime Center…and in the process suggested and implemented some changes that improved the design:
“I think SCALLYWAG will find a great following in the SCAMP world and beyond. Adding a cabin will greatly enlarge the ‘SCAMP Crowd.’ At that beam, and with twin ballast tanks, stability should be enormous for a boat this length. I would have liked to see a cross section through the cabin to know more about sitting comfort. (Four people hanging out inside seems a little optimistic, but two should be comfortable.)
“I’m curious about what the tabernacle for the unsupported mast will look like. A big sail area, together with a stiff hull will induce a significant load on the tabernacle. There seems to be a deep well for the mast base to swing through, judging by the drain hole.
“All in all, SCALLYWAG looks very promising.”
OSCAR LIND, a serious student of all various small-boat designs , and earlier builder of a SCAMP, who shares at least one thing in common with John Welsford—they’ve never met a pun they didn’t like:
“I might have to clear out the shop and make as much room as possible to build this boat (due to the 7’ 3” beam, especially). It’s so tempting and fills the bill for usability and function.
“It does need a Chinese lug rig, though. I expect quite a few SCALLYWAGS will ultimately be built.”
(Editor’s note: John Welsford comments, “I like the Chinese lugsail, but for a sail of this size on a boat that will be trailered, rigged and derigged for each outing and dry-stored, the extra complexity of the Junk sail slows the process. As well, the balanced lug is in my experience, a little quicker upwind—unless the junk rig has cambered-panel sails, and there are few sailmakers producing those, so I think in this case, simplicity and performance get the nod.”)
As for my personal view as a serial boatbuilder, restorer and sometimes buyer of project boats, I enjoyed owning a SCAMP several years ago. While I loved sailing the boat, I wished it was bigger and included a sleeping cabin. So, John’s new SCALLYWAG design checks many more boxes as an all-around keeper, and I prefer its overall hull, cabin and rig design, not to mention its potential as a serious cruising machine.
So, once again, here’s a chance for you, as a fellow boat nut, to offer your evaluation of SCAMP and her newly-hatched big sister, SCALLYWAG. (Also, please add other thoughts in the comments section below…) • SCA •
·Liked by Joshua Colvin, Marty Loken
Liked by Marty Loken
Ready for more?
S.C.A.M.P
I've been corresponding with Joshua Colvin and Craig Wagner, editors of , for a few years now, and have written articles and design features for quite a few issues. Even though we've not met face to face we've gotten to know each other some. The 8000 miles between us being only a fraction of a second away by e-mail. Knowing their bias to the small and simple I was not at all surprised to hear from them asking if a very small cruiser might be a practical proposition.
That's an area of boating that is very close to my heart. Being affordable is very important, as is being achievable, safe, and comfortable. Cruising yachts seem too often to be big, expensive, complex creatures that own their skippers rather than the other way around; what they were proposing was very much at the other end of the scale.
"Ten feet long," they e-mailed. "Sleep on board for a weekend. Something that would daysail an adult and a couple of children. Really easy to build in a garage, and small enough to not need an expensive trailer or a big car to tow it."
There were other considerations, but the above pretty much set the tone.
I have a very successful design called " ." It's a nine-foot long big little boat that will carry a heavy load in mountainous seas. Several of them are called which while not very original is appropriate and at least indicates that the owner-builders know a little of the history of Mt. Everest. Sherpa's a very good hullform for stability and load carrying. It sails well enough for a group of owners to have begun sailing as an informal class with a local yacht club, and is stylish enough to attract compliments. People love it, and I figure that it's one of my better designs.
With that as a starting point I drew a little sketch, photographed it, and e-mailed it to in Port Townsend.
The answer did not take long to come back to me-the response being very enthusiastic and encouraging. We had several exchanges of thoughts and ideas and I've since worked over the drawing, done all the arithmetic and adjusted a few things. S. C. A. M. P. (That's Small Craft Advisor Magazine Project) is a tad over 10 feet long and a whisker under five wide-she is short and fat. With her water ballast she will be exceptionally stable allowing the skipper to move around the little ship without worrying about falling out. SCAMP has plenty of freeboard, lots of dry stowage, a self draining cockpit-and for safety's sake a huge amount of air-tank buoyancy.
That little "cabin" is really a secure locker and buoyancy air tank. There is room in there for a sleeping bag, dry clothes, food, matches and such. There is also space for a lot more stores and equipment under the side seats, and if the skipper is intending to get away for a really big adventure, there is more space under the cockpit floor.
That self draining floor is the bunk, wide enough for shoulders, long enough for all but the tallest NBA player, sheltered and secure with their head up under the after end of the "cabin." I'd expect there to be about an even break between those who will tent the cockpit with a cover over the boom and those who will use a "bivysack" type outdoor sleeping bag. Either way it'll be easy to be comfortable in there.
Josh told me that a dedicated place for the bucket is very important, so there is a little well at the after end of the cockpit floor, the dinghy venturi bailers are positioned in there and it provides not only a secure place for the bucket in under the tiller, but also a place for any rainwater or spray to drain into.
The centerboard is hidden in the starboard side seat front, and does not get in the way at all. The asymmetry making such a tiny difference that few will ever notice from one tack to the other.
With twin skegs under her flat bottom, and a kickup rudder, she can sneak into very shallow water, and will sit upright when the tide goes out, often an ideal way of spending a night out in a small boat that would otherwise be bounced around by the waves and powerboat wakes in a big boat anchorage.
The rig is a simple balanced lugsail. I'd expect the boat to be ready to launch within 15 minutes of arrival at the boat ramp, the mast being unstayed and light enough to just pick up and plug in, the yard and boom with the sail being easy to fit, leaving only the rudder to put on.
I can imagine sailing around the point and into the glossy waters of a tiny sheltered cove, drifting along on the last of the evening breeze. It won't take long to get the tent up. The stove will have the water boiled for coffee by the time that's up and secure, and there are several choices of meals that can be heated and ready for supper by the time the coffee is down. While the little boat is indeed very small, it's comfortable, so why go home tomorrow, or even the next day? It's a big lake, and there are lots of anchorages like this to enjoy.
SCA (Small Craft Advisor) Editors on SCAMP
"What does a man need-really need? A few pounds of food each day, heat and shelter, six feet to lie down in-and some form of working activity that will yield a sense of accomplishment. That's all-in the material sense, and we know it. But we are brainwashed by our economic system until we end up in a tomb beneath a pyramid of time payments, mortgages, preposterous gadgetry, playthings that divert our attention for the sheer idiocy of the charade. The years thunder by, the dreams of youth grow dim where they lie caked in dust on the shelves of patience. Before we know it, the tomb is sealed. Where, then, lies the answer? In choice. Which shall it be: bankruptcy of purse or bankruptcy of life?" -Sterling Hayden
Our own youthful dreams often featured small boats in supporting roles. Stalwart little vessels aboard which we'd venture across nebulous bodies of water in search of uncharted shores and uninhabited islands. Sometimes we'd land and go ashore to explore or make camp, often retreating to our boats to wait out a summer storm beneath a boom tent. We'd read sea stories by oil lantern and, on clear nights, sleep under a blanket of stars.
Curiously, these fanciful voyages never involved wrestling with a heavy mast, fussing with a smelly outboard, or being held off shore by our boat's draft. And even when we pictured whitecaps kicked up by a stout afternoon breeze, never was there a chilly capsize.
It was a longing for those simple pleasures that inspired thoughts of SCAMP. That and a persistent desire to go over "there"-that place we often see but can never quite reach. It seems to happen on every cruise. Never mind that we're usually sailing the smallest boat around for miles. We always come upon some ultra-shallow bay or intriguing tidal stream that disappears into the reeds, trees and rushes. To get in there-all the way in there-a boat needs to be light, shallow and easily propelled-and preferably flat-bottomed should we decide to stay though the ebb.
Trying our best to distill small-boat cruising to its essence, we sorted out our ideas and took the best of them to one of our favorite designers-John Welsford. It shouldn't have surprised us that, being of a like mind, he responded enthusiastically.
What we commissioned was the most micro of cruisers. We wanted a cabin, not for a claustrophobic casket-like berth-but for dry stowage, buoyancy and a bulwark against wind and seas. We tried to be honest about the compromises. In describing the boat to John we said SCAMP would be so small that, "the designer himself might cringe a little when he puts the pencil down."
Remarkably, where we expected John would need eleven or even twelve feet to meet our goals, he was able to do so in slightly over ten. And where we'd resigned ourselves to the possibility she might be at least slightly less capable than larger microcruisers, John drew SCAMP with a selfdraining cockpit, abundant flotation, and 145-pounds of water ballast. Unlike many larger designs, SCAMP should be recoverable from a complete capsize.
We've long been fans of pram bows and how they maximize volume at a given hull length, and before we could ask, John's initial reply suggested one for SCAMP
Thanks to an offset centerboard the cockpit sole/ single berth measures 25 x 77 inches, making accommodations almost luxurious for the solo sailor. Designed to be sailed, rowed and perhaps sculled, SCAMP can also be fitted with an outboard in place of her rudder-or with an optional mount for a trolling motor.
We believe every boat needs a bucket, so we asked John if he could design in a designated spot for one. He did. Every SCAMP sailor will have at hand a storage container, fire extinguisher, drogue or emergency steering aid, rudimentary head, bailing device, and a tool for filling the ballast tanks.
We wanted the simplicity of a single sail (single halyard, single sheet, etc.) and John wisely recommended the balanced lug. Although we're fans of this rig and unanimously saw it as the best choice, we wondered if some potential builders might prefer the more familiar gaff sail. At our urging, and with some reluctance, John drew SCAMP with a gaff. The resultant drawing with the much higher aspect rig looked less purposeful, unwieldy-almost fragile. Seeing SCAMP dressed like this so convinced us of the balanced lug's better suitability that we scrapped the gaff option altogether. John appreciated our coming to our senses and wrote, "The lugsail gets the right amount of area in the space available without getting outside the ends of the boat or going up too high. Remember that this is a very stable boat, and can carry a lot of sail without risk, and that's one of the strengths of the lugsail."
John suggests a practiced amateur could have the construction done and ready for paint in about 110 hours. It's our hope that new sailors and first-time builders will appreciate the small size and simplicity of the design, and that more experienced builders and sailors will appreciate SCAMP's surprising level of sophistication.
Although SCAMP wasn't designed specifically with kids in mind, we think she would make an ideal exploration boat for young sailors-safe, capable and easily handled. We intend to donate a set of plans to any formal organization or school looking to build a SCAMP for this purpose.
Now on to the next step-finding a builder for the prototype and getting SCAMP in the water! SCA
SCAMP Plans are available at Duckworks
Boat Profile
A little camp cruiser for big dreams
From Issue Small Boats Annual 2016 October 2015
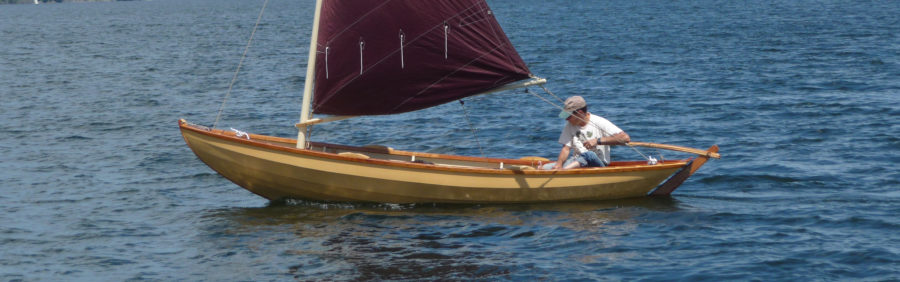
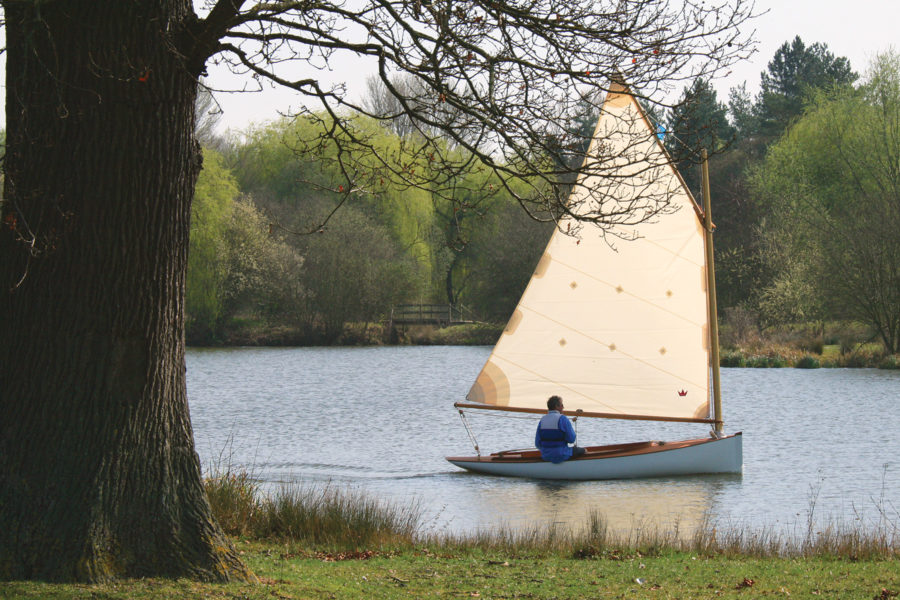
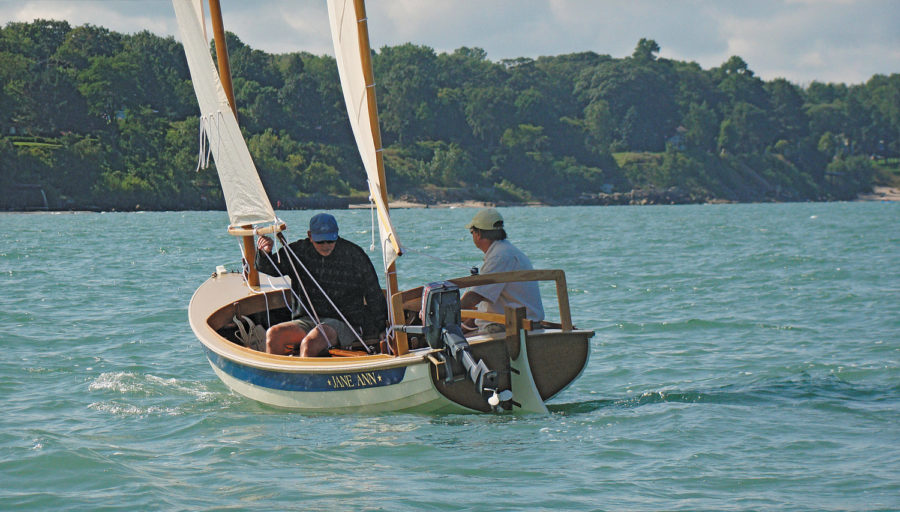
N ever mind that until grounding on a mudflat less than 30 miles from the finish line, SCAMP #4 breezed through a difficult year in the 300-mile Everglades Challenge adventure race a few years ago, pressing on comfortably when many bigger boats had to quit. Never mind that during the inaugural Race to Alaska earlier this year, SCAMP #11 completed a very rough 40-mile open-water crossing of the Strait of Juan de Fuca, taking its solo skipper safely from Port Townsend, Washington, to Victoria, British Columbia. And never mind that yet another SCAMP (extensively modified for the venture by its builder) may attempt to round Cape Horn—yes, that Cape Horn—this year and, if successful, will be the smallest sailboat ever to do so. Despite all that, the overwhelming impression I get when Dave Ender drives up with his newly built SCAMP to take me sailing is: What a cute little boat.
The buoyancy of the blunt pram bow resists digging in while running downwind and reduces the likelihood of broaching.
SCAMP is short, curvy, beamy, and high-sided, with a well-rockered flat bottom and a distinctive pram bow—a cross between a bulldog, a basketball, and an angry rubber duck. It’s also one of the easiest-launching boats I’ve ever encountered. I barely had time to grab my gear before Ender had the boat rigged and ready: mast stepped, sail hoisted, and rudder hung on the transom. He backed the trailer into the water and shoved SCAMP off. Less than 10 minutes from arrival and it was time to sail.
Josh Colvin, who commissioned SCAMP—an acronym for Small Craft Advisor Magazine Project—wasn’t looking for an ultimate adventure boat when he approached New Zealand designer John Welsford (see WB No. 225 for a profile on Welsford and his design work). “My initial goals for the boat were based largely on a 150-mile sail down the Columbia River, from Beacon Rock to Astoria,” Colvin says. “I kept coming across backwaters and shallow estuarine areas and thinking, That’s where I really want to go , but my 16-footer was too deep, wasn’t easy to row, and if I wanted to overnight up among the reeds, wouldn’t dry out level if the tide left. So the idea I eventually took to John Welsford was for the smallest possible boat that would be able to do all of these things, but still be seaworthy enough to cope with something like the middle of the Columbia River on a breezy afternoon.”
Judging by SCAMP’s popularity among amateur builders—roughly 340 kits or plan sets have been sold since 2011, with about 60 boats launched—plenty of other people are interested, too. Designer John Welsford sees SCAMP as a sort of 21st-century version of a much-loved classic, the Mirror dinghy. “While we don’t expect to do anywhere near as many boats,” Welsford says, “it’s hitting a similar, but older market.” Along the way, SCAMP has fostered an enthusiastic and supportive community of builders and owners, encouraging new builders to take the plunge.
The SCAMPS’s 100-sq-ft sail is set high for good visibility under the boom and is easily reefed.
To bring the new design to life, Welsford was able to make good use of his previous experimentation with similar boats. “SCAMP is number six in a series of very beamy, shallow-bodied boats with that distinctive high-positioned pram bow,” Welsford says. “Tender Behind, Tread Lightly, and Sherpa are the other designs that made it to plans. All work really well, can carry huge loads for their size, sail well, and are well balanced. I learned something from each of them, and SCAMP is a result of that learning.” Besides Welsford, boatbuilder/designer Kees Prins of Port Townsend, Brandon Davis of Turnpoint Design , and adventurer/prototype tester Howard Rice all contributed to final design details and kit elements for SCAMP.
SCAMP is built upright on its flat bottom, which serves as the base for an egg-crate arrangement of plywood that forms the boat’s furniture and structural members. No temporary molds or frames are used. It’s a method that makes for an exceptionally stiff hull, and a safe one—the completed “boxes” create six entirely separate buoyancy chambers within the glued-plywood lapstrake hull. Welsford reports that one SCAMP was able to remain comfortably afloat despite suffering “a hole in the side that you could put your head through” after hitting a snag. And although there are plenty of parts to assemble when building a SCAMP, no single step requires more than moderate woodworking skills and a selection of basic tools.
S CAMP is rigged with a single balanced lugsail, an excellent choice for a cruising rig that’s simple to handle and easy to reef. With 100 sq ft of sail and the stability to stand up to it, the boat also performs well. On my second sail in a SCAMP, working to windward on a gusty day, I was able to keep ahead of a 21′ Sea Pearl for several miles. SCAMP’s shallow draft and flat bottom make it a perfect gunkholer, and 173 lbs of water ballast (roughly 40 percent of the total hull weight) make it capable of much more. It’s no pulling boat, but SCAMP won’t be too difficult to move under oars when necessary. Some builders have considered experimenting with a single sculling oar at the transom; Dave Ender plans to try a yuloh. There’s room to mount a small outboard on the transom for backup propulsion.
Builders have the choice of building from plans or from a kit, with custom sails and hardware available for purchase. Another popular option for builders is the SCAMP Camp , a two-week intensive class in which participants come together to assemble their own SCAMP kits under the direction of designer John Welsford and prototype tester Howard Rice.
One unintended feature of the design deserves mention: several SCAMP builders I have met describe the boat as “a chick magnet,” and from my own observations at various messabouts and festivals, I’d say that such a claim is closer to reality than to hype. For potential builders with wives or girlfriends reluctant to take up sailing, this might be the single biggest advantage SCAMP has to offer.
A kick-up rudder allows sailing in shallow water and twin skegs help the SCAMP sit solidly upright when grounded.
B ack aboard Dave Ender’s Scamp, we were away from the dock with an easy shove, heading across Lake Pepin, a wide stretch of the Mississippi that’s often subject to strong winds sweeping down between tall bluffs. Dave filled the ballast tank under the cockpit sole. With the drain holes open, the tank floods itself almost completely; the top of the tank is a few inches above the waterline, so must be topped off by replacing the plugs and pouring water in with a bucket from the cockpit before sealing. He could pour water in quickly without worrying about spilling or overflowing: The excess water drains out of the cockpit’s scuppers. With the water ballast in, we soon shook out the reef we started with, and Dave put me at the tiller. It was a windy day, but even under full sail we continued on in perfect comfort. SCAMP may be a small boat, but it’s the biggest small boat I’ve ever sailed. In fact, it’s almost impossible to categorize SCAMP by size. It weighs just over 400 lbs empty, but has the cockpit and freeboard of a 20′ keelboat (in fact, the freeboard is so high that reboarding the boat without a pre-rigged foot stirrup or rudder step would be problematic). It’s easy to drag up a SCAMP onto a beach for a quick stop ashore, yet filling the ballast tank adds stability well beyond the reach of a typical small boat. The self-draining cockpit sits high enough above the water that you feel like you’re aboard a much bigger boat—yet SCAMP is extremely maneuverable, tacking easily and spinning around within its own length like the smallest dinghy.
While it performs well enough to keep experienced sailors interested—Dave and I kept pace with several much bigger keelboats without much trouble—SCAMP would also be a great boat for beginners to learn on. The balanced lug makes tacking or jibing very simple and stress-free; lazyjacks hold the sail and boom securely in place, making reefing easy once the lines and cleats are set up; the boat is stable and comfortable. And it’s pure fun to sail. The only thing that I needed some time to get used to was being so far from the water compared to the sail-and-oar boats I usually sail. Of course, that higher freeboard and greater volume help make it easy to recover from a capsize (see the video below). By the time Dave and I returned to the dock, I was reminded again of just how much I like this design, and how much it can do.
The diminutive SCAMP is easily trailered, rigged, and launched.
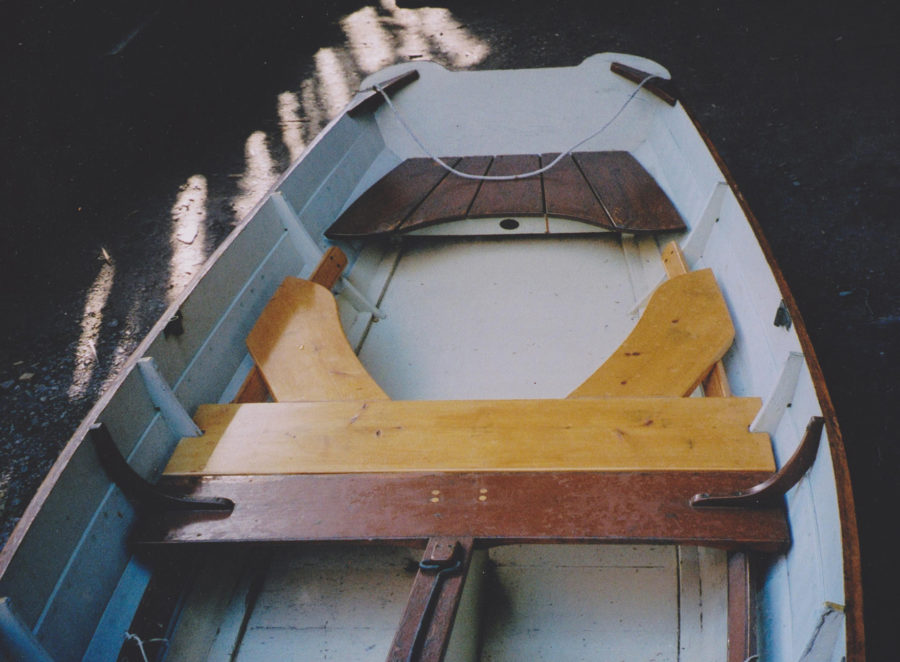
With its quick launching capabilities, SCAMP would work well as a family-friendly daysailer. There is space enough for four adults in relative comfort (three is better; two is luxurious), and the boat’s stability makes it a comfortable ride even for the elderly and infirm, young children, or passengers who might simply be a bit nervous around boats. The boom is high overhead, minimizing the risk of hitting an inexperienced passenger, and the seats are wide and comfortable.
Cruising solo or two-up is where SCAMP really shines. The 8′3″ x 29″ cockpit sole provides ample space for one person to sleep aboard very comfortably (the offset centerboard is hidden in the starboard seat face), and filler planks between seats can be used to create a double bunk. The benches themselves (6′8″ by 17.5″) offer a place to stretch out but aren’t quite wide enough for sleeping. There is plenty of stowage space under the seats and cockpit. The “veranda” (a small cuddy/locker at the forward end of the cockpit) provides additional stowage, sitting headroom, and shelter from the wind, as well as a convenient place to anchor the forward edge of a cockpit tent. Forward of the veranda’s bulkhead there are 8.5 cubic feet of sealed stowage that provide extra buoyancy well above the waterline, just where it would be most useful in a knockdown. And of course, like all small boats, a SCAMP can easily travel to windward at 60 mph, pulled on a small lightweight trailer by a small four-cylinder car.
Tom Pamperin ( www.tompamperin.com ) is a frequent contributor to Small Boats Monthly and WoodenBoat.
SCAMP Particulars
LOA/11′11″ Beam/5′4″
Draft (board up)/7″ Weight (including rig)/420 lbs Water ballast/173 lbs
Plans and information are available from Small Craft Advisor . Their YouTube channel has several videos featuring the SCAMP, including a capsize trial with Howard Rice, below.
Is there a boat you’d like to know more about? Have you built one that you think other Small Boats Monthly readers would enjoy? Please email us!
Share this article
Join The Conversation
We welcome your comments about this article. If you’d like to include a photo or a video with your comment, please email the file or link.
Comments (4)
Great article! Thanks. I especially enjoyed the fact that during the capsize test, Howard did not lose his hat! Now that’s a sailor. I’ve always been off put by the punt bow, but seeing the boat in action, I can now appreciate it.
That boat did not want to capsize…
Thanks for the kind words about the article; I enjoyed yet another excuse to go sailing aboard a Scamp. It’s a fun and very very capable little boat, that’s for sure.
These are great wee boats, totally sold on the concept especially the seaworthiness. The only thing I would do differently is wear a safety harness in winds like that in the video! I could quite easily see the boat sailing off while you flounder around in the briny!
Comments are closed.
Stay On Course
More From This Issue
Never mind that until grounding on a mudflat less than 30 miles from the finish line, SCAMP #4 breezed through a difficult year in the 300-mile Everglades Challenge adventure race…
The Caracal
Arey’s Pond is a green, bowl-shaped jewel, one of several ponds in Orleans, Massachusetts, that give access, through narrow, winding waterways, to Little Pleasant Bay and, just to the south,…
I’ve had a copy of Phil Bolger’s book Boats With An Open Mind for a long time, and I’ve always liked the looks of the Clam Skiff he designed for…
The Sand Bar by Tidal Roots
I was paddling on a placid Royal River with my four-year-old son Noah kneeling in front of me on a wooden Tidal Roots stand-up-paddle (SUP) board. The water hissed quietly…
The Taming of the Sheet
Most of us who build boats at home do not have the facilities needed to handle 4′ x 8′ sheets of marine plywood with ease. I’ve always found it challenging…
In Finland and much of the eastern Baltic region, networks of interlocking lakes were once the only links between settlements and farms; boats were the only form of transportation. The…
The E.M. White Guide Canoe
Not long after our first wedding anniversary—celebrated with an overnight canoe trip on the Narraguagus River in Maine—Sharon and I acquired our first boat, an 18′ Grumman aluminum canoe, complete…
Made in Vermont
I have always loved wooden boats of all kinds, but especially dories, for their elegant simplicity of design, the way they look upon the water, the way they handle in…
The Mallard
When the now-defunct magazine The Boatman was launched in the early 1990s, one of its objectives was to provide boat plans suitable for amateur construction. One such boat was the…
ZO Boats is a new company started by Bill Koffler and Scott O’Connell, partners in Aquidneck Custom Boatbuilding, a company specializing in high-tech composite construction. Involved in modern yacht construction…
The Somes Sound 12½
A century ago Nathanael Herreshoff designed a 16′ keelboat known widely as the H 12½ after its 12′6″ waterline length. She was intended to handle the steep chop and strong…
The Marsh Cat
I had spent a long time looking for a boat that I could build to sail the waters of Chesapeake Bay and beyond. The boat would need to be able…
Within the pages of Eric McKee’s Working Boats of Great Britain there are drawings of a 24′ Thames skiff attributed to W.A.B. Hobbs* at Henley-on-Thames in the very early part…
A Lapstrake Livery Boat
What was left of the boat rotting in the brambles on the north shore of Clear Lake in Western Washington was once a very fast boat under oars. Back in…
Making a Wood and Leather Scoop Bailer
Once upon a time the boat sharps on the Delaware River were sailing 15 footers with sail areas running to 400 sq ft. No self-bailers, no buoyancy tanks, no crash…
The Escargot Canal Cruiser
I was sitting in the cabin of the Escargot canal cruiser BONZO, a boat my son, Nate, and his friend Bobby Calnan built the summer after they’d graduated from high…
The Candlefish 13
Sam Devlin’s Candlefish 13 began with a client’s detailed request for the design of an outboard skiff suitable for the lakes of Alaska’s Far North. It had to be light…
The International 12-Foot Dinghy
In 1913, shortly before the start of WWI, England’s Boat Racing Association (BRA), a small club of sailing enthusiasts, called for a design to comply with the following requirements: length…
The Færder Snekke
Norway’s Færder snekker constitute a small racing class that hails from outside of Tjøme in the country’s Vestfold region, 55 nautical miles south of Oslo. The two-part name reflects the…
The MerryMac
The MerryMac catboat tends to make the blood hum with a sense of adventure and challenge. Its owners claim that it has always been so since the first of about…
The Mower Dory
One day in the early 1990s, a local contractor visited my boatbuilding shop in Marblehead, Massachusetts, telling me he’d been hired to convert an old boatshop into a playhouse. “The…
The Willis Boats of Maine’s Dark Harbor
At Dark Harbor, Maine, the legacy of the Rossiter Skiff outshines that of even its most popular fiberglass counterparts. Dark Harbor, located on the mid-coast island of Islesboro, is home…
Comfortable Seating for Sailing a Small Rowing-and-Sailing Skiff
As age makes its inevitable changes to the sailor’s once supple joints, certain positions that were once assumed without thought become uncomfortable, if not actually painful. When I was younger…
More Boat Profile
Boatbuilding student Michael Tyler wanted to build a Gil Smith catboat as part of his studies, but the boat of his fancy was too large for that endeavor. With the…
The Core Sound Series
From the 2008 Small Boats Annual - Designed by Graham Byrnes, the Core Sound 17 was a development of his earlier Spindrift 10-footer and Bay River Skiff 17. The latter,…
The 14’7” Fox double-paddle canoe, which weighs only 44 lbs, is casually portable. Its 6’8”-long cockpit offers considerable room, yet can be securely sealed with a spray skirt.
This 18’ cat-ketch, designed by Connecticut-based naval architect Rob Pittaway for New England’s coastal waters, is equally at home on the Great Lakes or inland waters, under sail, auxiliary outboard…
Subscribe Today!
Become a subscriber today and you’ll recieve a new issue every month plus unlimited access to our full archive of backlogged issues.
Already a subscriber? Sign In
Subscribe For Full Access
Flipbooks are available to paid subscribers only. Subscribe now or log in for access.
News & Trends
Dinghy sailing
Multiple sailing dinghy
Exhibitions
Multiple sailing dinghy 12′ Scamp traditional recreational catboat
Characteristics
12'00" (3.66 m)
Description
Other gig harbor products, boat 12 to 8 feet.
Sailing dinghy
Recreational sailing dinghy
Catboat sailing dinghy
Sailing skiff
Children's sailing dinghy
Traditional sailing dinghy
July / August Issue No. 299 Preview Now
Oar / Paddle
The versatile and easily built Scamp is an enlarged version of my Sprite design (see elsewhere in this directory). Scamp also has a broader stern transom designed to accommodate a small outboard motor for extended cruising. We use our Scamp as a beach cruiser for exploring some of our favorite sheltered waters. There’s plenty of room for two people, plus sleeping bags, a small tent and lunch box. In the evening we simply pull up on a beach and set up camp. Scamp is light and small enough to easily car-top or stow in the back of a compact pickup truck. Her sailing rig is larger than Sprite’s, but incorporates all the same features of simplicity and efficiency, and can be stowed inside the boat. The hull is built from 2 1/2 sheets of plywood.
Design Specifications
South Beach, OR 97366 Phone: 541-867-3141
ACCESS TO EXPERIENCE
Subscribe today.
Publishing dynamic editorial content on boat design construction, and repair for more than 40 years.
1 YEAR SUBSCRIPTION (6 ISSUES)
Print $39.95, digital $28.00, print+digital $42.95, from plans & kits.
16' 0" LORNA
MANDOLINO DAY SAILER
Half Model Plan GLORIANA
From the community.
1929 Hacker Craft Runabout 18'
Jimmy Steele Peapod
Good Vintage Boat - Hull Number 66 - Completed In 1989.
1967 Crosby Striper #86
Short cabin version. Restored in 2020 new lower frames, knees, floors and cockpit.
Boats Plans and Kits
Switzer Bullet 136
Jordan Wood Boats
$ 54.00 – $ 66.00
SPECIFICATIONS
Type
Sailing Pram
Length
9′ 6″
Beam
4′ 5″
Hull weight
~85 lbs.
Crew
1-2
Sail Area
40 sq. ft.
Power
2 HP outboard optional
Product #
SC
Description
Additional information
The versatile and easily built Scamp is an enlarged version of Sprite, our popular 8 ft. flat-bottom pram. At 9’-6” length, and 4’-5” beam, she is the perfect step up from Sprite for those wanting more capacity and comfort. Scamp also has a broader stern transom designed to accommodate a small outboard motor for extended cruising and trolling. My wife and I use our Scamp as a beach cruiser for exploring some of our favorite sheltered waters. There’s plenty of room for the two of us plus sleeping bags, a small tent and lunch box. In the evening we simply pull up on a beach and set up camp.
And Scamp is still light and small enough to easily cartop or stow in the back of a compact pickup for no-fuss transportation, a real plus for those who love uncomplicated boating. Her sailing rig is larger than Sprite’s, for better performance, but incorporates all the same features of simplicity and efficiency, and can be stowed inside the boat. The hull is built from 2 1/2 sheets of marine plywood, and all the structural joinery is gotten from common lumberyard materials. Building procedures are the same as for Sprite, and are uncomplicated and aimed toward the first-time boat builder.
The plans include detailed large-scale drawings for all assemblies, an accurate layout for the plywood planking and full size patterns for important parts. No lofting is required. Spar and sail plans detailing the rigging are also included, as well as a comprehensive booklet of construction notes that describe all components and building procedures and is number-keyed to the corresponding parts and assemblies in the drawings.
Includes Scamp plans, patterns, instructions, and US shipping.
~Take advantage of our 20% off special on orders of $75 or more! Apply coupon code: Boatbuilder Special at checkout. [Valid for US orders only] ~Plans in PDF: Plans can be ordered for email delivery in PDF format, at a discounted price. The plans for Scamp include some full size patterns. If you order the PDF version, you will need access to a large-format printer for those. (Page Size is 30″ x 48″) ~Consider including my book, Boatbuilding My Way , in your plans order. Available in Hardcopy or discounted PDF Format, it is the ideal companion to plans from Jordan Wood Boats.
Paying by check.
Our checkout system is through PayPal. If you wish to pay by check, please fill your cart as you would normally, then print it out and mail it to us with your check.
Options
Hardcopy, PDF
Related products
Cradle Boat Wee Pumpkin
Call Us: (253) 851-2126 Mon-Fri 9-5 Pacific Time
Announcing the SCAMP – in fiberglass by GHBoats!
by GHBoats Webmaster | Aug 10, 2011 | Announcements , SCAMP | 1 comment
The SCAMP is a 12′ micro-cruiser, shown here in wood. We’re now taking the first orders for a fiberglass version!
We have some exciting news to share! We’re adding a completely new boat to our production line – the SCAMP! Those of you familiar with new developments in small craft may have already heard of it… we are thrilled to be able to offer this 12′ micro-cruiser in a fiberglass version, with the same craftsmanship and attention to detail that you’ll find in our other traditionally-styled fiberglass boats.
The new fiberglass SCAMP to be built by Gig Harbor Boat Works will retain all of the characteristics of the wooden versions. Commissioned by Small Craft Advisor magazine, designed by John Welsford of New Zealand, the SCAMP has been available for the past year or so as a plans-only boat. Welford designed SCAMP for wood construction, but SCAMP is much more challenging to build in wood than is first apparent. Multiple bulkheads, reinforcements, water ballast tank, etc. have to be handcrafted in addition to the usual attention paid to frame shape/alignment, plus the usual seam-sealing and finish work. Soon after Small Craft Advisor began to offer plan sets, they received inquiries about when a fiberglass version would be available. The demand became such that SCA came to us and asked if we would be interested in building a fiberglass SCAMP.
We were immediately intrigued at the prospect of adding SCAMP to our line. But as mentioned, SCAMP is difficult to build- particularly so in fiberglass because the tumblehome stern will require a two piece hull mold…. Tooling for SCAMP will require more time and investment than for a typical 20 foot sailboat. And because of that, the retail price of a fiberglass SCAMP will have to be proportionately higher than your average 12’ sailboat.
We also want to ensure that the characteristics of SCAMP in fiberglass will be indistinguishable from well-built wood SCAMPs. Our goal is to have class consistency- in a race, neither wood or FRP construction should have an advantage. Hull shape, ballast tank, displacement and sail rigs must be completely competitive. There will be some minor cosmetic differences applicable to FRP construction, but that will be the limit of changes.
A few key points about SCAMP’s design: SCAMP is an eminently capable micro-cruiser commissioned by Small Craft Advisor magazine, designed by John Welsford. Only 12 feet long, yet the feel of a larger boat. High freeboard, hard chines and full ends give lots of buoyancy and carrying capacity. 178 pounds of water ballast. Flat bottom with keelsons tracks surprisingly well and sits flat on a beach or trailer. Swing keel with kick-up rudder. Balanced Lug Rig with lightweight carbon fiber spars Although only in existence for less than a year, homebuilt versions of SCAMP have completed challenging voyages such as the Everglades Challenge. Proven high capsize resistance and easy recovery. Fast and forgiving nature For further reading about the design, visit http://www.duckworksmagazine.com/10/designs/scamp/index.htm .
Because the tooling and molds will be complex, to help capitalize the project we will make a special ‘pre-introductory pricing’ offer to the owners placing the first six deposits for our fiberglass SCAMP:
GHBW fiberglass SCAMP pre-introductory offer (available to the first 6 buyers) includes: Complete, sailaway SCAMP with custom fitted high quality galvanized trailer for $12,795. Earn cash back; $200 per showing when we send you qualified leads who subsequently place an order. And more cash back; Earn $500 ‘finders fee’ per sale your referrals generate (no lead from us).
A deposit of $6,000 is required to secure this offer and your place in our construction queue. We already have several deposits; once we have the 6 th deposit we will commence tooling and expect to have SCAMP #1 finished about 4-6 months later. All deposits will be placed in a trust account so if 6 deposits are not received in a reasonable time frame they will be refunded 100%.
If this looks like the sort of boat you’ve been dreaming of, give us a call at (253) 851-2126 or email [email protected]! Once this becomes a regular production model, our price will have to go up, so don’t delay!
Click here to see updates about the Scamp development (with photos) on our blog!
Dave, Super news on your involvement in the Scamp. I’ve really liked what I’ve been reading about it in SCA. You and your crew at Gig Harbor Boat Works are definitely the group to pull this off. I know from my experience owning a GHBW Pt. Defiance Skiff, Melonseed and now the perfect Jersey Skiff you guys put togeather for me, that the Scamp will be super. If I were able to do all the expidition rowing I dream about we might be talking about setting one up with my Forward Facing Oar system and you keeping the center board and sails. I’ll be stopping by as the project unfolds for a look see. All the very best.
John Quatermass R/V Mistress Dory Gig Harbor, WA
Newest Posts
Annapolis Sailboat Show Oct 10-14, 2024
Small Boat Festival at Port Ludlow – July 27th
Lobster Boat Update #3: Preorders Now Open!
“Pale Valley” Salish Voyager Finishes Strong in Seventy48
See You at Anacortes Boat & Yacht Show, May 16-18!
Beach Dolly (1)
Best of GHBoats (5)
Customer Questions (8)
Customization (1)
Galleries (4)
Maintenance and Repairs (3)
Announcements (13)
Boat Shows (15)
Just for Fun (17)
Mailbag (44)
Newsletters (25)
Ocean Rowing (13)
Press Reviews (10)
Now Hiring (1)
Woodwork (3)
Captain's Gig (2)
Jersey Skiff (4)
Lobster Boat (5)
Melonseed (6)
Navigator (4)
Nisqually (2)
Point Defiance (7)
Salish Voyager (18)
Swampscott Dory (1)
Whitehall (7)
Sea Stories (13)
Site Guide (4)
Blog Archives
Site search.
Our popular and proven precision cut CNC SCAMP kit. Kit includes all plywood components (planks, bottom, bulkheads, seats, cabin, decks, etc.). Many pieces feature notches or scribe lines and numbering to aid construction process. The kit also includes a pre-cut building jig. Kits use precision jigsaw puzzle joints instead of labor-intensive scarfs, and the planks' variable bevels are pre-beveled so that they match-up perfectly right out of the box.
This kit package also includes the Foils Kit, pre-shaped 18mm marine plywood rudder and centerboard halves ready for assembly.
Kit does not include epoxy, fiberglass cloth, hardware, etc.
Kits can be picked up in Port Townsend, WA, or shipped domestically. Frieght will vary depending on location, so we will contct with a quote for payment.
SCAMP Building Kit + Foils
Plans & Kits
Kits and Packages
Qty in Cart
Scamp Foils Kit
SCAMP CNC PLYWOOD KIT
S.C.A.M.P. Plans Instant Download
Scamp Hardware
SCAMP Rigging Kits
Rudder Hardware for Scamp
S.C.A.M.P. Printed Plans
S.C.A.M.P. Sail
Total: items /
Add all to cart
Adding your products to cart
My Boats & Boat Articles
Boatbuilding Plans
Free Stitch and Glue Boat Plans
Info about Cedar
Steps in Building a SCAMP sailboat
Links to all my scamp building pages.
SCAMP gets side planks
The Scamp has 3 sets of planks. Each is made from 6mm ply joined. The 2 bottom planks have bevels to accommodate the plank above it.
Joining Planks
I used Dynamite Payson's method of joining the planks. He suggested butting the 2 sides, sanding to remove some thickness and using fiberglass to glue the 2 sides of the plywood. I tested this method and compared it to both making a scarf joint, and to making finger joints. The resulting joint is stronger than the plywood. It changes the flexibility of the ply a little but for a shallow bend it has no real impact. Simple, easy and strong, what's not to like. Here is my page on joining, it has more details on all the methods.
I joined the 2 planks together in a pile. I have waxed paper between them. The extra fiberglass is easy to cut off while the resin is still slightly soft.
Checking the fit
When I made the base of the boat and installed the stem onto the bottom panel I noticed a slight difference in the curve of the frame from the bottom curve of the stem. I did some adjustment and mostly removed the extra curviness. I then checked the fit of the first plank by making a cardboard plank and trying it on for fit. It went on with no problems. I have more details of the front assembly and checking here. I used cardboard because the real planks are stiff and not easy to just casually stick on to check the fit.
Having a kit would certainly have been much faster, perfect frame, perfect finger joints, no human error is cutting. I sort of like the challenge though.
Beveling the Planks
The plans give the dimensions and position of the bevel. It ranges from about 23 mm to 8mm depending on the position. The bevels are on the top edge of the planks and allow the next plank to fit nicely over the bottom plank. This overlap gives a good gluing surface and allow for a much nicer fit.
First step in making the bevels is to very carefully mark the location. Plans are clear but it takes a bit of time. The measurements are for every 30 cm. I put little nails in the spots and used my bendy piece of wood to get the proverbial fair curve. I marked it in dark pencil along with all the area that needs to be cut off.
I was quite worried about this step. I decided to use the bench plane but I could have used the belt sander.
I had sharpened my planes and this paid off. The bevel turned out to be quite easy to cut. I'm very proud of the nice plywood curls of wood that were coming off.
It took less time to carefully cut the bevels than to mark them. The wood grain makes the line look crooked but it's even. Really. The lines of the plywood helped me see how the cuts were going and the very bottom ply gave a nice line that told me when I had reached the lower surface.
The plywood and glue is hard on the plane and I touched up the edge between planks. This kept my plane really sharp. This ply is very brittle and tears out easily if the blades are not sharp. I had a bit of tear out at the very end of the plank but not enough to cause any damage. My hand also wobbled so the bevel is a bit off but I expect that will fill easily.
I made the various supports and the filling hole of the compartments under the cockpit sole. The side planks makes it harder to reach the bottom so it's better to do all this now. I have to be patient, not my strength.
I glued on the transom. The tape worked well but left some goo on the wood when I took it off. It was annoying glue and hard to remove.
In the meantime I taped the inside of the water tank and added some ply to the bottom to make the drain hole level with the floor. These were suggestions by John Welsford and Howard Rice.
Installing the first Planks
I should really work some more on finishing the interior but I can't stand it anymore. I'm going to install the first planks! And pay for it later.
I tied the planks to the side so they would be supported and tried to fit them on. I realized that unless I beveled at least the back 2/3 of the boat bottom the planks would not fit very well. I used a combination of plane and sander with coarse paper to bevel the bottom. This improved the fit a lot and I was able to roughtly place the planks and check the fit on both sides.
The green tape protects the bevel on the top of the plank. It is quite thin on the edge.
The build manual instructs to fit the back first and go forward. I did the opposite mostly because I'm working alone and it was easier to handle this way.
Fitting the plank was easier than I though it would be. I first put a wire stitch in the front and a couple along the side to roughly position the plank and make sure the back would fit. It took quite a lot of time to tweak the plank so that it lay smoothly along the bottom and the bulkheads but it was not difficult. At the back I put a wire stitch. All these wire stitches are quite loose and the plank is not in final position yet.
I repeated the process for the other side. I now had 2 planks roughly wired in but not in perfect position.
I went back to the front and added some more stitches to both sides till the front fit well. Pushing the front in position was the hardest part. There is just a hint of a compound curve that requires a bit of pushing and pulling. Eventually I had the front evenly tied and lined up.
The next step was to make my way to the back and gradually tighten the stitches I had placed and fine tuned the position of the planks. I aligned the bevels so that the next planks would fit smoothly on.
I already had one stitch in place that needed some tightening to finalize the position. I added a couple more stitches along the bottom of the boat and the plank. The stitches are not under very much tension since the plank actually fits quite nicely onto the bulkheads and the bottom. The front is the only place that is quite tight. I left the bottom part of the joint a bit loose for now because I will be putting glue in there. I tightened after gluing.
The plank curves smoothly along the side. The planks need checking so that 2 sides are as symmetrical as possible and there are no areas that have been pulled in to make an irregular spot. After a day of installing I'm tired and prefer to wait for rested fresh eyes before glueing.
It took me most of the day to place the 2 bottom planks and wire them. I was working quite slowly.
I'm ready to tack the planks in place but I'll wait. I'm too tired and I'm stupid when I'm tired.
After checking for symmetry as best I could. I went around the wires and tacked the plank to the bottom and to the bulkheads.
The next day I snipped off the wires except for the very front and the back and tacked the plank to the bottom and to the bulkheads.
I cut my fiberglass fabric into strips rather than buy the tape. It was quite expensive to buy and deliver here so I'm living with the the little fiberglass hairs.
Using a foam roller works best and doesn't pull the hairs out. It helps to have clean gloves that are not too sticky.
Plank number 2
I dug up the second plank and lined it up. I used a string on the drafting line. Once I had a good position I temporarily nailed them to the bench and sanded a slight depression at the seam. This compensates for the thickness of the fiberglass patch.
Wax paper works well to keep the seam from sticking to the plywood I used under the weights. I did not try to glue the 2 sides OR the 2 planks. Next day I placed the second plank on top and lined it up exactly and joined it. That way I'm sure that my second plank is exactly the same as the first side.
I don't have the advantage of kit people who don't have to worry about lining up the pieces. The puzzle joints are very good for lining up the boards.
I also went around and put a second coat of epoxy onto the taped seams on plank 1.
After glueing the pieces of plank 2 I marked the bevel location. I used my batten and small nails to get a fair curve.
After sharpening the plane I was ready to cut. I've been using mineral oil and it seems to be working really well. I use several methods of sharpening but find that for a quick edge the oilstones work well. I can't seem to do that with the chisels so with them I use a honing guide.
Again it took less time to cut the bevels than to prepare to do the cut. I'm very pleased with these plywood shavings.
I taped the edge so it would not get banged up and laid the planks beside the boat ready to be fitted on.
Plank 2 is ready to go on the boat but I'm waiting till I'm rested and plan to spend most of the day making sure the second plank goes on right.
It took all afternoon to place and fit the second plank. I had to cut slight bevels on the back bulkhead so the plank would fit better, but since it was the same on both sides I did not worry. I would worry if they were not symmetrical.
No big gaps or odd angles so I guess it fits OK. Like Cookie Monster said, "not bad but not terrific" when asked about a cookie.
The front view shows that the top of the 2nd planks are just a bit high. They fit very well on the bottom. I extended the same bevel on the first plank that is cut on the front piece. This looks odd but will be trimmed off. The planks extend about a quarter inch beyond the front. I guess I will have to trim both pieces when I install the last plank. I'm not sure why the front of the planks are too wide. It's only about 3/16 of an inch at the most so it will work.
Other than that the 2nd plank sits very nicely on the first.
As in the first plank there was no difficulty in installing the plank. I made a few temporary stitches and went from back to front fine tuning the fit.
Tacked everything down after checking and left it overnight. Then took out the wires except at the front and back and started making fillets.
I had put off cleaning up inside the bow compartment so I got to it, did a bit of sanding while it's still easy to reach and cleaned up a few fillets. I still have to tape the second strake in place.
At the transom, I added some doublers on the port side to help support any future motor mount. I have not decided what I will use but while the compartment is open it's easy to add. I had also put some tape between the planks and the transom before the doubler.
While I was in an epoxy mood, I glued in some of the seat supports on the starboard side.
The current batch of wood flour is very dark and shows up very well even after I've cleaned up the seams. It won't matter after sanding/painting.
One of my table had become quite bumpy from epoxy drips so I spent some time chiseling off lumps and sanding the table smooth. I did not want to mark the parts I would be working on.
After making some shallow fillets, I taped the seams between plank 1 and 2. Not complicated but it takes some time to get it nice and even and smooth. The light is not good and the tape looks poorly saturated but it is actually fully wetted. I'm glad that's done. It's not my favourite job.
The Sheer plank goes on.
While waiting for the shop to warm up, I dug up the third planks and checked them for fit, and lined one set up to glue. I do them separately because it's easier to line them up that way. One set has good markings made when I drew the parts from the measurements but the second set has no markings at all since I marked them from the first set.
Glassed the joint as soon as the room was warm enough and put waxed paper and weights.
I'll join the second plank by placing it on top of the first and matching it perfectly. That results in identical planks. This is not a problem kit builders have but for plan builders even a small difference can make it difficult to adjust the strakes.
Since these are the sheer planks there is no other to fit to them so there is no bevel to cut. I expect I will have to adjust the top line but that should be simple.
The third planks are joined and covered in epoxy. The boat is now ready to get its third plank.
I'm also having to make some decisions about hatches, motor and wiring and various other bits of hardware.
After trying on the top planks I ran into a problem at the bow. I was half expecting to have to trim the top of plank 2 because it extended beyond the bow angle. It was simple using my super sharp plane and a file to modify the second plank for about 2 feet. This did not detract from the sweep of the strakes and the third plank now fits much better.
Once I had the front trimmed the plank went on quite nicely. It is exactly the right length, or maybe 1 mm. short but that will be fixed once I round over the ends in order to fiberglass the corner. A couple of the bulkheads are just a little proud of the strake edge and a couple are just a bit shy. Luckily they are the same on both sides so whatever happened is symmetrical and I can live with that.
I'll trim or fill depending on how the side deck fits. It's only a few mm anyway.
Here is the transom and the bow. The fit of the trird plans is acceptable. At the bow the plank is just a touch too wide but I'll wait till other pieces are ready to go on before trimming anything. It's safer that way.
It has taken me most of the day to fit this set of planks. I'm tired and will take a fresh look at the fit tomorrow. If all is good, I can tack the plank in place. It is only wired on now.
After tacking with epoxy glue and tightening the wires I let it set and the next day completed the gluing. Next came the glassing of the seam and the making of the fillets. This is just about completed.
I've started working on the front compartments. Finishing off the resin coating and sanding. I think there is a limit on how much sanding and finishing I will do in the front. It will not be seen and cannot really be accessed. Once the structural requirements have been done and a minimum of sanding, I think I will go on to other bits. It's not in bad shape anyway. I think that as long as it feel smooth to the touch and does not have bits to scratch the hands or catch on to whatever gets stored there, I'm happy.
I've been going around and making sure the plank seams on the outside are well filled with glue. I had glued them when I installed the planks, and had removed any squeeze out, but I had a few spots that did not have a lot of glue. I'm using a spatula and forcing a quite wet glue mixture in. It's not taking much but enough to show me I need to do this.
When I turn the boat over, I will go over the joints again and put a small fillet so there is a very small radius between the planks.
I spent a day sanding the inside and outside of the hull planks. This included rounding the corners of the bow. I'm planning to glass this soon so I can install the towing/anchoring ring. Once the deck is on it's near impossible to reach the front. Maybe if I was a smaller very bendy person I might be able to but I'm not. Any fastener needs to be in place before I close the front.
At this point the outside and inside of the hull planks have at least 2 coats of epoxy, and the fiberglass tape that connects the strakes and the bottom is filled.
It took a bit of time to set up the glass and tape it so I could do a tidy job of the glassing. The rounded corner is not a huge radius but enough to allow the glass to come around to the side. I used painter's tape to tighten the cloth over the front and side.
emails: Christine
If you decide to build a boat be careful. These tools can be dangerous. If you don't know how to safely handle something find out. There are lots of forums out there.
This web site reflects my personal ideas and doesn't represent anyone else's point of view. I don't claim to be an expert in anything, just some little old lady muddling along.
The Scamp is a seaworthy 12′ sailboat that can handle a good dose of adventure. ... An offset centerboard opens up the cockpit and an 8′ 3″ sleeping area, and 172 pounds of water ballast provide exceptional stability. The cockpit is self-bailing, and a pair of grounding skegs on her flat bottom keep Scamp perfectly upright when landing on ...
New guy Scamp questions
New guy Scamp questions. by Pete Staehling » Thu Dec 10, 2020 3:24 pm. I recently became aware of the existence of the Scamp. I haven't been active in sailing or boatbuilding for a number of years. I formerly lived near the Chesapeake Bay and owned a few different sailboats. My sailboats all lived in slips except for the sailing dinghies and ...
Boat Designs: Evaluating SCAMP'S Big Sister
The rest is history: More building plans and kits for SCAMP have been sold over the years than any other small cruising boat we can think of. Besides the original wooden version, Gig Harbor Boat Works was licensed in 2013 to produce a fiberglass SCAMP, and the little giant killer—in wood and fiberglass—has since its debut been at the center of various small-boat rallies, workshops and ...
Ep. 17
Ever wondered how to sleep on a dinghy less than 12 feet in length? In this episode we show you how we do it, and also share some SCAMP tips and tricks inclu...
SCAMP vs. Tread Lightly
In my experience, the weight difference between the original SCAMP and the enlarged SCAMP (195 pounds vs. 350 pounds) is more significant than the weight difference between the enlarged SCAMP and Tread Lightly (350 pounds vs. 660 pounds). A 195-pound boat is light enough that two strong people can easily lift it off the trailer without help ...
SCAMP Review in Small Craft Advisor Magazine!
Exciting news that's been a long time coming . . . the Small Craft Advisor magazine released their first formal review of the SCAMP! For a bit of backstory, the SCAMP, which stands for Small Craft Advisor Magazine Project, was originally conceived by the magazine as a kit boat that would meet the needs of adventurous small craft sailors.It was designed by a team of passionate and ...
The Nuts and Bolts of Sail Camping
The Nuts and Bolts of Sail Camping. Ida Little and Michael Walsh. Updated: Mar 16, 2023. Original: Sep 8, 2015. When we first decided to try out sail camping, we already knew how to sail and camp. However, there remained the question of a boat with which to explore the shallow, clear waters and white sand beaches of the Bahamas, where we had ...
Duckworks
SCAMP has plenty of freeboard, lots of dry stowage, a self draining cockpit-and for safety's sake a huge amount of air-tank buoyancy. ... There is room in there for a sleeping bag, dry clothes, food, matches and such. ... In describing the boat to John we said SCAMP would be so small that, "the designer himself might cringe a little when he ...
SCAMP
Josh Colvin, who commissioned SCAMP—an acronym for Small Craft Advisor Magazine Project—wasn't looking for an ultimate adventure boat when he approached New Zealand designer John Welsford (see WB No. 225 for a profile on Welsford and his design work). "My initial goals for the boat were based largely on a 150-mile sail down the Columbia ...
SCAMP
A boat with a BN of 1.6 or greater is a boat that will be reefed often in offshore cruising. Derek Harvey, "Multihulls for Cruising and Racing", International Marine, Camden, Maine, 1991, states that a BN of 1 is generally accepted as the dividing line between so-called slow and fast multihulls.
Multiple sailing dinghy
The Scamp is a seaworthy 12′ sailboat that can handle a good dose of adventure. Just under 12 feet in length, Scamp boasts an unusual combination of features that give her the unique ability to explore waters too shallow for a larger boat, while retaining most of the bigger boat's comforts and capabilities. An offset centerboard opens up ...
Scamp
Scamp also has a broader stern transom designed to accommodate a small outboard motor for extended cruising. We use our Scamp as a beach cruiser for exploring some of our favorite sheltered waters. There's plenty of room for two people, plus sleeping bags, a small tent and lunch box. In the evening we simply pull up on a beach and set up camp.
S.C.A.M.P. Printed Plans
SCAMP features an offset centerboard, massive flotation from sealed seats and stowage cabin, a water ballast tank holding 173 pounds of water, an after cabin "veranda" that functions like a hard dodger, and a flat bottom and skegs for beaching. PLANS: Complete plans now available on 7 24 x 36" sheets. A complete "Building guide" with suggested ...
SCAMP Archives
Photos from SCAMP Skills academy. by GHBoats Webmaster | Apr 26, 2014 | SCAMP. We had a very interesting time at last weekend's Scamp Skills academy, taught by SCAMP guru Howard Rice. Attendees included owners of Gig Harbor and homebuilt Scamps, plus a few folks contemplating getting or building a Scamp. Topics includes sailing techniques,...
Scamp
SKU: N/A Category: Wood Boat Plans. Description. Additional information. The versatile and easily built Scamp is an enlarged version of Sprite, our popular 8 ft. flat-bottom pram. At 9'-6" length, and 4'-5" beam, she is the perfect step up from Sprite for those wanting more capacity and comfort. Scamp also has a broader stern transom ...
Build Log of the SCAMP Sailboat Argo
Jason died when later in life he was sleeping under the Argo and it fell on him. Specifications of the SCAMP that I built: Rig: Balanced Lug Rig (Lugger) LOA: 11 ft 11 in (3.63 m) Beam: 5 ft 4 in (1.63 m) Draft: 7 in (180 mm) with centerboard and rudder up. Hull weight: 420 lb (190 kg) (including rig)
Steps in Building a SCAMP Sailboat from Plans
Installing the bow eye. Making the portholes/deadlights. Oar Socket Placement. Making the SCAMP mast. Turning SCAMP over. Sanding, marking waterline and Painting outside of hull. Finishing shaping the Bottom. Making the centreboard. Centreboard pivot and details.
Announcing the SCAMP
SCAMP is an eminently capable micro-cruiser commissioned by Small Craft Advisor magazine, designed by John Welsford. Only 12 feet long, yet the feel of a larger boat. High freeboard, hard chines and full ends give lots of buoyancy and carrying capacity. 178 pounds of water ballast. Flat bottom with keelsons tracks surprisingly well and sits ...
Scamp Sailboat
Add to Cart. SCAMP Building Plans. Price$149.00. Add to Cart. SCAMP Articles Package. Price$9.95. Add to Cart. SCAMP Brass Name Plate. Price$29.00.
SCAMP Building Kit + Foils
Our popular and proven precision cut CNC SCAMP kit. Kit includes all plywood components (planks, bottom, bulkheads, seats, cabin, decks, etc.). Many pieces feature notches or scribe lines and numbering to aid construction process. The kit also includes a pre-cut building jig. Kits use precision jigsaw puzzle joints instead of labor-intensive scarfs, and the planks' variable bevels are pre ...
Kits and Packages
SCAMP Rigging Kits. $69.99 - $329.99. Boom and RUNNING RIGGING plus Hardware 2 10-foot lengths of 3/16" Raid Braid for 1st Reef2 20-foot lengths of 3/16" Raid Braidfor 3rd Reef4 SD-043030 3" cleats for reefing lines1 60-foot length of 3/16" Raid Braid for Topping / Lazy jack system (cut to...
Building A SCAMP Sailboat, Planking the Boat
It ranges from about 23 mm to 8mm depending on the position. The bevels are on the top edge of the planks and allow the next plank to fit nicely over the bottom plank. This overlap gives a good gluing surface and allow for a much nicer fit. First step in making the bevels is to very carefully mark the location.


COMMENTS
The Scamp is a seaworthy 12′ sailboat that can handle a good dose of adventure. ... An offset centerboard opens up the cockpit and an 8′ 3″ sleeping area, and 172 pounds of water ballast provide exceptional stability. The cockpit is self-bailing, and a pair of grounding skegs on her flat bottom keep Scamp perfectly upright when landing on ...
New guy Scamp questions. by Pete Staehling » Thu Dec 10, 2020 3:24 pm. I recently became aware of the existence of the Scamp. I haven't been active in sailing or boatbuilding for a number of years. I formerly lived near the Chesapeake Bay and owned a few different sailboats. My sailboats all lived in slips except for the sailing dinghies and ...
The rest is history: More building plans and kits for SCAMP have been sold over the years than any other small cruising boat we can think of. Besides the original wooden version, Gig Harbor Boat Works was licensed in 2013 to produce a fiberglass SCAMP, and the little giant killer—in wood and fiberglass—has since its debut been at the center of various small-boat rallies, workshops and ...
Ever wondered how to sleep on a dinghy less than 12 feet in length? In this episode we show you how we do it, and also share some SCAMP tips and tricks inclu...
In my experience, the weight difference between the original SCAMP and the enlarged SCAMP (195 pounds vs. 350 pounds) is more significant than the weight difference between the enlarged SCAMP and Tread Lightly (350 pounds vs. 660 pounds). A 195-pound boat is light enough that two strong people can easily lift it off the trailer without help ...
Exciting news that's been a long time coming . . . the Small Craft Advisor magazine released their first formal review of the SCAMP! For a bit of backstory, the SCAMP, which stands for Small Craft Advisor Magazine Project, was originally conceived by the magazine as a kit boat that would meet the needs of adventurous small craft sailors.It was designed by a team of passionate and ...
The Nuts and Bolts of Sail Camping. Ida Little and Michael Walsh. Updated: Mar 16, 2023. Original: Sep 8, 2015. When we first decided to try out sail camping, we already knew how to sail and camp. However, there remained the question of a boat with which to explore the shallow, clear waters and white sand beaches of the Bahamas, where we had ...
SCAMP has plenty of freeboard, lots of dry stowage, a self draining cockpit-and for safety's sake a huge amount of air-tank buoyancy. ... There is room in there for a sleeping bag, dry clothes, food, matches and such. ... In describing the boat to John we said SCAMP would be so small that, "the designer himself might cringe a little when he ...
Josh Colvin, who commissioned SCAMP—an acronym for Small Craft Advisor Magazine Project—wasn't looking for an ultimate adventure boat when he approached New Zealand designer John Welsford (see WB No. 225 for a profile on Welsford and his design work). "My initial goals for the boat were based largely on a 150-mile sail down the Columbia ...
A boat with a BN of 1.6 or greater is a boat that will be reefed often in offshore cruising. Derek Harvey, "Multihulls for Cruising and Racing", International Marine, Camden, Maine, 1991, states that a BN of 1 is generally accepted as the dividing line between so-called slow and fast multihulls.
The Scamp is a seaworthy 12′ sailboat that can handle a good dose of adventure. Just under 12 feet in length, Scamp boasts an unusual combination of features that give her the unique ability to explore waters too shallow for a larger boat, while retaining most of the bigger boat's comforts and capabilities. An offset centerboard opens up ...
Scamp also has a broader stern transom designed to accommodate a small outboard motor for extended cruising. We use our Scamp as a beach cruiser for exploring some of our favorite sheltered waters. There's plenty of room for two people, plus sleeping bags, a small tent and lunch box. In the evening we simply pull up on a beach and set up camp.
SCAMP features an offset centerboard, massive flotation from sealed seats and stowage cabin, a water ballast tank holding 173 pounds of water, an after cabin "veranda" that functions like a hard dodger, and a flat bottom and skegs for beaching. PLANS: Complete plans now available on 7 24 x 36" sheets. A complete "Building guide" with suggested ...
Photos from SCAMP Skills academy. by GHBoats Webmaster | Apr 26, 2014 | SCAMP. We had a very interesting time at last weekend's Scamp Skills academy, taught by SCAMP guru Howard Rice. Attendees included owners of Gig Harbor and homebuilt Scamps, plus a few folks contemplating getting or building a Scamp. Topics includes sailing techniques,...
SKU: N/A Category: Wood Boat Plans. Description. Additional information. The versatile and easily built Scamp is an enlarged version of Sprite, our popular 8 ft. flat-bottom pram. At 9'-6" length, and 4'-5" beam, she is the perfect step up from Sprite for those wanting more capacity and comfort. Scamp also has a broader stern transom ...
Jason died when later in life he was sleeping under the Argo and it fell on him. Specifications of the SCAMP that I built: Rig: Balanced Lug Rig (Lugger) LOA: 11 ft 11 in (3.63 m) Beam: 5 ft 4 in (1.63 m) Draft: 7 in (180 mm) with centerboard and rudder up. Hull weight: 420 lb (190 kg) (including rig)
Installing the bow eye. Making the portholes/deadlights. Oar Socket Placement. Making the SCAMP mast. Turning SCAMP over. Sanding, marking waterline and Painting outside of hull. Finishing shaping the Bottom. Making the centreboard. Centreboard pivot and details.
SCAMP is an eminently capable micro-cruiser commissioned by Small Craft Advisor magazine, designed by John Welsford. Only 12 feet long, yet the feel of a larger boat. High freeboard, hard chines and full ends give lots of buoyancy and carrying capacity. 178 pounds of water ballast. Flat bottom with keelsons tracks surprisingly well and sits ...
Add to Cart. SCAMP Building Plans. Price$149.00. Add to Cart. SCAMP Articles Package. Price$9.95. Add to Cart. SCAMP Brass Name Plate. Price$29.00.
Our popular and proven precision cut CNC SCAMP kit. Kit includes all plywood components (planks, bottom, bulkheads, seats, cabin, decks, etc.). Many pieces feature notches or scribe lines and numbering to aid construction process. The kit also includes a pre-cut building jig. Kits use precision jigsaw puzzle joints instead of labor-intensive scarfs, and the planks' variable bevels are pre ...
SCAMP Rigging Kits. $69.99 - $329.99. Boom and RUNNING RIGGING plus Hardware 2 10-foot lengths of 3/16" Raid Braid for 1st Reef2 20-foot lengths of 3/16" Raid Braidfor 3rd Reef4 SD-043030 3" cleats for reefing lines1 60-foot length of 3/16" Raid Braid for Topping / Lazy jack system (cut to...
It ranges from about 23 mm to 8mm depending on the position. The bevels are on the top edge of the planks and allow the next plank to fit nicely over the bottom plank. This overlap gives a good gluing surface and allow for a much nicer fit. First step in making the bevels is to very carefully mark the location.