
Search form

Blue Jays, and Lightnings, and Lasers, Oh My
There must be a couple of hundred small sailboats available new or used that would serve just fine on any Maine lake. In this issue, we narrow the choices down to just three: the Blue Jay, the Lightning, and the Laser.
Lightnings and Blue Jays—like Stars and Comets, Indians and Town Class, Thistles and International 14s—could be considered size variations on a theme. Both are Sparkman & Stephens designs, and Blue Jays are often referred to as “baby Lightnings.” Back in the heyday of one-design sailing, this mama and baby sailboat theme was common.
Blue Jays have an emotional connection for me. My twin brother and I built our first boat, a Blue Jay, at the age of 14 in our family’s garage. Back in the day, before one-designs were all popped out of a mold, each with a white hull and a colored deck, a youngster’s first boat was a unique and treasured thing, more so of course if he and his brother built it themselves.
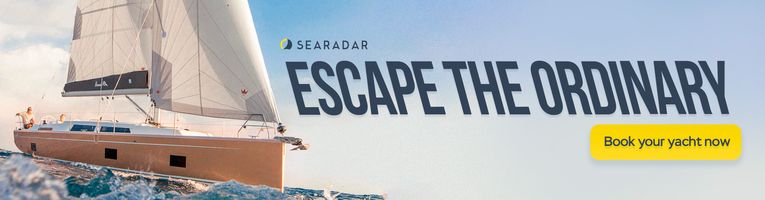
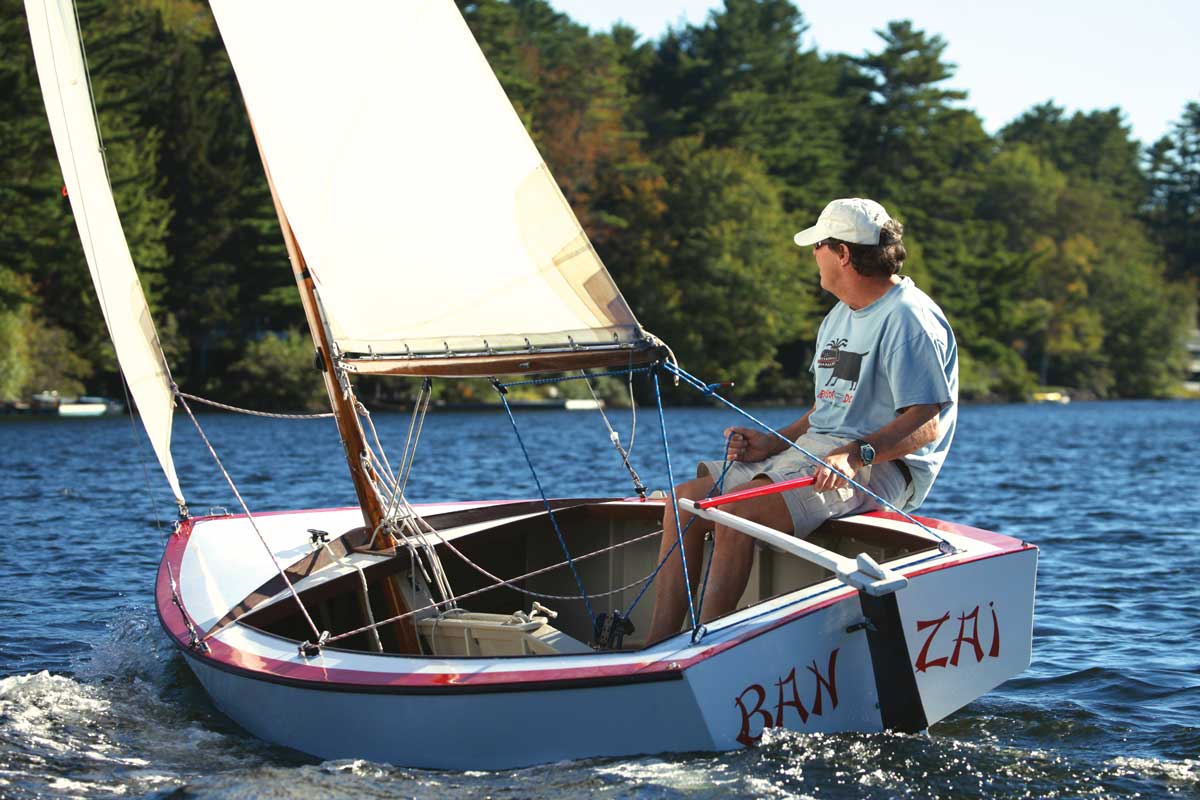
Blue Jays were inspired by Drake Sparkman and designed by his firm, Sparkman & Stephens. The former chair of his yacht club’s junior sailing program, Sparkman intended the boats to be used to teach sailing. Accordingly, Blue Jays feature a complete sloop rig with a mainsail, jib, and spinnaker. This setup provided the essential lines for two children to learn how to trim and coordinate sails. The boats, which have roomy open cockpits and no seats, can easily hold three kids or two adults.
The original design (1947) called for the boats to be easily built with readily available quarter-inch-thick plywood (the plans are still available from the International Blue Jay Class Association). A fiberglass version became available in the 1960s.
At 13'6" long with a draft of just 6 inches—or 4 feet with the centerboard down—the Blue Jay makes a great lake boat. Small and light, these boats can be trailered behind any old car, kept on a mooring, pulled up on the beach or just tied up at the dock. The small sail plan is manageable by kids of average size and limited strength, but in a strong wind this flattish-bottomed box still can get up and plane. It can capsize, too—although that takes a fair amount of effort. When you are just 14 or so, if the water is midsummer warm, capsizing just adds to the fun.
Now that I’m fully grown, it is easy for me to rig a Blue Jay on Lake Megunticook and sail it alone. Given my history with these boats, an afternoon sail in a Blue Jay is a special pleasure. The beauty of this design is that anybody can delight in the Blue Jay’s lively maneuverability, the enjoyment of hiking hard and making the boat point and go to windward. When I pull the centerboard halfway up, hike out hard, and hear those staccato little pulsations reverberating up from the cutwater, I’m buff, I’m young, and I’m ineffably happy.
While the Blue Jay’s centerboard is made of common plywood or laminated wood, the centerboard of its mama Lightning is galvanized or stainless-steel plate, only 3/8 of an inch thick. This metal board helps make the boat a little more stable. It also happens to be a good choice for rocky Maine lakes because it can bash into a rock without expensive damage. The thin centerboard has minimal resistance at high speed, allowing a Lightning to plane in good winds almost any time the spinnaker is up.

Modern fiberglass Lightnings are low maintenance. They are usually fitted with side ballast chambers or buoyancy bags so they can, with lots of grunting and groaning, be re-righted after capsizing by a crew of three. It helps to have some clothing or rags to stuff into the top of the centerboard trunk, and a nearby powerboat can be helpful. The fact is that I have sailed my buddy’s Lightning all around Panther Pond, just him and me, in all kinds of wind, and never had any trouble.
There are many high-tech expensive dinghies that can sail circles around a Lightning, but for me, when I sail a Lightning on a lake and heel her over displaying the flashy varnished seats and ribs and floorboards to lakeshore dwellers, I feel like John Beresford Tipton cruising downtown in his Duesenberg Touring Car.
The design was perfect in terms of performance, and also perfect in simplicity: The easy-to-build hull mated to the easy-to-build deck lid by means of a cleverly turned-down edge. The one slipped over the other and all that was needed to mate the parts together was a little bit of goo. (One might say it was a goo-ed idea!) Over 200,000 of these hulls have been manufactured and they can be found all over the world.
The Laser mast is just a round aluminum tube, or actually a pair of tubes that fit together. The single sail slips down over this pole before it is stepped, and since the sleeve rotates around with the sail, it’s all very aerodynamic. This is far easier and way less prone to trouble than you might imagine. In most any other boat you would have a halyard. But the Laser flips over and unflips with ease. If a thunderstorm looms, instead of dropping the sail you can intentionally capsize for a spell. The boat floats high and visible, becoming one huge life preserver.
Laser hulls are light enough (130 pounds) that one person can easily drag it back and forth from the shore to beach or woods. I owned a Laser at one time and by myself could haul it off the top of my car, where it customarily lived. I was a lot younger then….
If you get really good at sailing a Laser, you can qualify to compete in the Olympics. There is a somewhat smaller mast and sail combo available and whole gaggles of thusly-rigged Lasers form a separate official class, the Laser “Radial.” This is a great equalizer for the light and the small of stature.
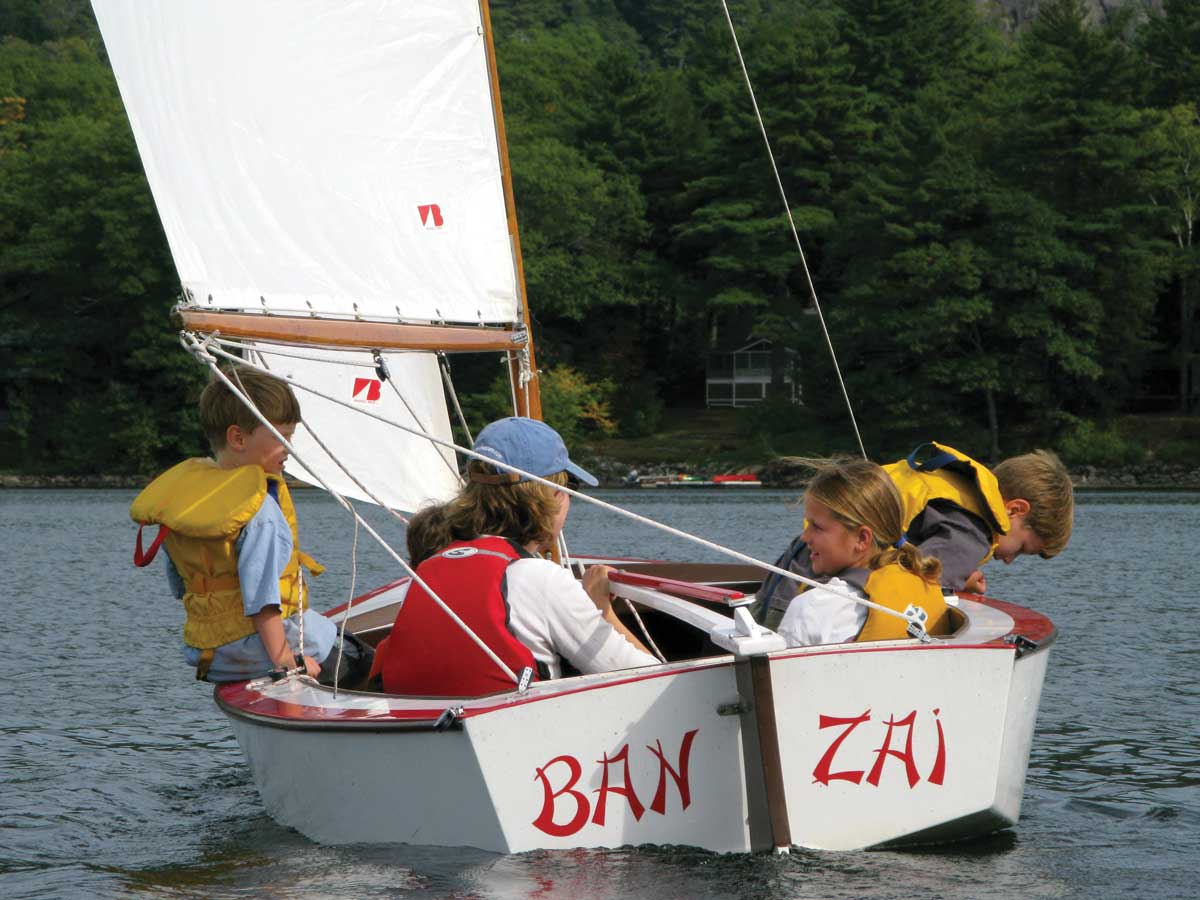
But all that is racing stuff, and what I really wanted to emphasize is that there probably isn’t a boat in the whole world that is as much fun to just sail as a Laser. That’s what I’m talking about!
Flitting around at high speed on a windy blue day on a whitecapped Maine lake, your eyes just inches above the water. Some people can even gybe without catching the mainsheet under the corner of the transom! Not me—not always. But who cares?
We are on a lake, it’s midsummer, it’s hot, and a periodic dunking just washes off the sweat.
Contributing Author Art Paine is a boat designer, fine artist, freelance writer, aesthete, and photographer who lives in Bernard, Maine.
Related Articles

Share this article:

Digital Edition Available ×
Can't get to the store to buy your magazine? We deliver the stories of Maine's coast right to your inbox. Sign up here for a digital edition .
2023 Maine Boat & Home Show ×

Join Us for the Maine Boat & Home Show !
Art, Artisans, Food, Fun & Boats, Boats, Boats
August 11 - 13, 2023 | On the waterfront, Rockland, Maine
Click here to pre-order your tickets.
Show is produced by Maine Boats, Homes & Harbors magazine.
- Print This Page
- Text Size
- Scroll To Top

Why Buy a Lightning
The Ultimate One-Design Sailboat Sean Fidler – USA 14969
The Lightning combines a perfect balance of sail / tuning adjustments with boat / crew size. At only 700 lbs., Lightnings are light enough to trailer and launch easily. They are also small enough to be sailed easily with 3 people. A Lightning planes downwind in moderate breeze, yet it is very solid feeling and controllable upwind. Lightnings can handle a wide range of sailing conditions well. They have the feel of a larger boat upwind, and a smaller boat downwind with an enormous spinnaker (300 sq./ft.).
The Lightning Class is, consistently and by far, the largest multi-crew one design in the world in terms of number of fleets, active class members, and regatta participation. Lightnings are extremely technical and tactical to race due to a hard-chine hull and advanced sail plan. The Lightning class is, very arguably, the strongest level of competition in all of one design racing. This combination of comfortable size, depth of talent, and a technically challenging design has generated the premier one design racing platform in the World. If you haven't already, check one out!
| Sponsor Number | URL address |
|---|---|
| Sponsor 1 | https://www.marksetbot.com/ |
| Sponsor 2 | http://www.onedesign.com/Default.aspx |
| Sponsor 3 | https://www.thesailinginc.com/lightning |
| Sponsor 4 | http://nickelsboats.com/ |
| Sponsor 5 | http://awardandsports.securesites.net/ |
| Sponsor 6 | http://www.capitallogoinc.com/shop/pc/home.asp |
| Sponsor 7 | http://www.rookesails.com/ |
| Sponsor 8 | http://www.sailorstailor.com |
| Sponsor 9 | https://www.harken.com/ |
| Sponsor 10 | http://www.sailorstailor.com |
Lightning Class Supporters
Allen Boat Company
Allen boats, spars, trailers and the very best racing equipment builder of the lightning, highlander, jet-14 and blue jay.
- 200 Cornwall Ave.
- Buffalo NY 14215, USA
- Phone: (716) 842-0800
- Fax: (716) 842-0113
- Email: [email protected]
- Email - [email protected]
Highlander Class International Association
Jet-14 Class Association
International Blue Jay Class Association
Yachting Monthly
- Digital edition

Sailing in lightning: how to keep your yacht safe
- In partnership with Katy Stickland
- July 22, 2022
How much of a concern is a lightning strike to a yacht and what can we do about it? Nigel Calder looks at what makes a full ‘belt and braces’ lightning protection system

Storm clouds gather at Cowes, but what lightning protection system, if any, does your boat have for anchoring or sailing in lightning? Credit: Patrick Eden/Alamy Stock Photo
Most sailors worry about sailing in lightning to some extent, writes Nigel Calder .
After all, going around with a tall metal pole on a flat sea when storm clouds threaten doesn’t seem like the best idea to most of us.
In reality, thunder storms need plenty of energy, driven by the sun, and are much less frequent in northern Europe than in the tropics.
However, high currents passing through resistive conductors generate heat.
Small diameter conductors melt; wooden masts explode; and air gaps that are bridged by an arc start fires.

Sailing in lightning: Lightning is 10 times more likely over land than sea, as the land heats up more than water, providing the stronger convection currents needed to create a charge. Credit: BAE Inc/Alamy Stock Photo
On boats, radio antennas may be vaporised, and metal thru-hulls blown out of the hull, or the surrounding fiberglass melted, with areas of gelcoat blown off.
Wherever you sail, lightning needs to be taken seriously.
Understanding how lightning works, will help you evaluate the risks and make an informed decision about the level of protection you want on your boat and what precautions to take.
Most lightning is what’s called negative lightning, between the lower levels of clouds and the earth. Intermittent pre-discharges occur, ionising the air.
Whereas air is normally a poor electrical conductor, ionised air is an excellent conductor.
These pre-discharges (stepped leaders) are countered by a so-called attachment spark (streamer), which emanates from pointed objects (towers, masts, or lightning rods) that stand out from their surroundings due to their height.

Summer is the season for lightning storms in the UK. Here, one finds early at Instow, Devon. Credit: Terry Matthews/Alamy Stock Photo
This process continues until an attachment spark connects with a stepped leader, creating a lightning channel of ionised air molecules from the cloud to ground.
The main discharge, typically a series of discharges, now takes place through the lightning channel.
Negative lightning bolts are 1 to 2km (0.6 to 1.2 miles) long and have an average current of 20,000A.
Positive lightning bolts are much rarer and they can have currents of up to 300,000A.
Preventing damage when sailing in lightning
A lightning protection system (LPS) is designed to divert lightning energy to ground (in this case the sea), in such a way that no damage occurs to the boat or to people.
Ideally, this also includes protecting a boat’s electrical and electronic systems, but marine electronics are sensitive and this level of protection is hard to achieve.
Lightning protection systems have two key components: First, a mechanism to provide a path with as little resistance as possible that conducts a lightning strike to the water.
This is established with a substantial conductor from an air-terminal to the water.

Components of an external and internal lightning protection system. Credit: Maxine Heath
This part of the LPS is sometimes called external lightning protection.
Second, a mechanism to prevent the development of high voltages on, and voltage differences between, conductive objects on the boat.
This is achieved by connecting all major metal objects on and below deck to the water by an equipotential bonding system.
Without this bonding system high enough voltage differences can arise on a boat to develop dangerous side flashes.
The bonding system can be thought of as internal lightning protection.
Rolling ball concept
Lightning standards, which apply ashore and afloat, define five lightning protection ‘classes’, ranging from Class V (no protection) to Class I.
There are two core parameters: the maximum current the system must be able to withstand, which determines the sizing of various components in the system, and the arrangement and number of the air terminals, aka lightning rods.
Let’s look at the arrangement of the air terminals first. It is best explained by the rolling ball concept.
A lightning strike is initiated by the stepped leaders and attachment sparks connecting to form the lightning channel.
The distance between the stepped leader and the attachment sparks is known as the breakdown distance or striking distance.
If we imagine a ball with a radius equal to the striking distance, and we roll this ball around an object to be protected, the upper points of contact define the possible lightning impact points that need to be protected by air terminals.

Lightning protection theories and classifications rely on a ‘rolling ball’ concept to define requirements, areas of risk and protected areas. Credit: Maxine Heath
The air terminal will theoretically provide a zone of protection from the point at which the terminal connects with the circumference of the rolling ball down to the point at which that circumference touches the water.
The shorter the striking distance, the less the radius of the rolling ball and the smaller the area within the protection zone defined by the circumference of the rolling ball.
The smaller the protection zone, the more air terminals we need. So, we use the shortest striking distance to determine the minimum number and location of air terminals.
Class I protection assumes a rolling ball radius of 20m; Class II assumes a rolling ball radius of 30m.
Continues below…

Lightning: why we were struck
A personal investigation into how and why a catamaran was hit by lightning

‘Lightning destroyed the boat’s electronics’
Paul Tinley recounts a truly shocking lightning experience aboard his Beneteau 393 Blue Mistress and the subsequent insurance claim

Expert advice: boating emergency
A boating emergency is the sort of thing that everyone taking to the water should be prepared for even if,…

How batteries can explode – and how to avoid it
Marine electrical expert Nigel Calder explains why boat batteries emit hydrogen and how to minimise the dangers
Boat building standards are based on a striking distance/rolling ball radius of 30m (Class II).
For masts up to 30m above the waterline, the circumference of the ball from the point at which it contacts the top of the mast down to the water will define the zone of protection.
For masts higher than 30m above the waterline, the ball will contact the mast at 30m and this will define the limit of the zone of protection.
If Class I protection is wanted, the radius of the ball is reduced to 20m, which significantly reduces the zone of protection and, on many larger recreational boats, may theoretically necessitate more than one air terminal.
Protection classes
With most single-masted monohull yachts, an air terminal at the top of the mast is sufficient to protect the entire boat to Class I standards.
The circumference of the rolling ball from the tip of the mast down to the surface of the water does not intercept any part of the hull or rig.
However, someone standing on the fore or aft deck might have the upper part of their body contact the rolling ball, which tells us this is no place to be in a lightning storm.
Some boats have relatively high equipment or platforms over and behind the cockpit.

Protection classes to protect your boat while anchored or sailing in lightning
These fittings and structures may or may not be outside the circumference of the rolling ball.
Once again, this tells us to avoid contact with these structures during a lightning storm.
Ketch, yawl, and schooner rigged boats generally require air terminals on all masts, except when the mizzen is significantly shorter than the main mast.
The external LPS
The external LPS consists of the air terminal, a down conductor, and an earthing system – a lightning grounding terminal.
The down conductor is also known as a primary lightning protection conductor.
All components must be sized to carry the highest lightning peak current corresponding to the protection class chosen.
In particular, the material and cross-sectional area of the air terminal and down conductor must be such that the lightning current does not cause excessive heating.
The air terminal needs to extend a minimum of 150mm above the mast to which it is attached.

A graph depicting NASA’s record of yearly global lightning events. The Congo once recorded more than 450 strikes per km2
It can be a minimum 10mm diameter copper rod, or 13mm diameter aluminum solid rod.
It should have a rounded, rather than a pointed, top end.
VHF antennas are commonly destroyed in a lightning strike.
If an antenna is hit and is not protected by a lightning arrestor at its base, the lightning may enter the boat via the antenna’s coax cable.
A lightning arrestor is inserted in the line between the coax cable and the base of the antenna.
It has a substantial connection to the boat’s grounding system, which, on an aluminum mast, is created by its connection to the mast.
In normal circumstances, the lightning arrestor is nonconductive to ground.
When hit by very high voltages it shorts to ground, in theory causing a lightning strike to bypass the coax – although the effectiveness of such devices is a matter of some dispute.
Down conductors
A down conductor is the electrically conductive connection between an air terminal and the grounding terminal.
For many years, this conductor was required to have a resistance no more than that of a 16mm² copper conductor, but following further research, the down conductor is now required to have a resistance not greater than that of a 20mm² copper conductor.
For Class I protection, 25mm² is needed. This is to minimise heating effects.
Let’s say instead we use a copper conductor with a cross-sectional area of 16mm² and it is hit by a lightning strike with a peak current corresponding to Protection Class IV.

Sailing in lightning: This catamaran relies upon cabling to ground from the shrouds but stainless steel wire is not a good enough conductor. Credit: Wietze van der Laan
The conductor will experience a temperature increase of 56°C. A 16mm² conductor made of stainless steel (for example, rigging ) will reach well over 1,000°C and melt or evaporate.
Shrouds and stays on sailboats should be connected into a LPS only to prevent side flashes.
The cross-sectional area of the metal in aluminum masts on even small sailboats is such that it provides a low enough resistance path to be the down conductor.
Whether deck- or keel-mounted, the mast will require a low resistance path, equivalent to a 25mm² copper conductor, from the base of the mast to the grounding terminal.
Grounding terminal
Metal hulled boats can use the hull as the grounding terminal. All other boats need an adequate mass of underwater metal.
In salt water this needs a minimum area of 0.1m². In fresh water, European standards call for the grounding terminal to be up to 0.25m².
A grounding terminal must be submerged under all operating conditions.
An external lead or iron keel on monohull sailing boats can serve as a grounding terminal.

This owner of this Florida-based yacht decided to keep the keel out of the equation when is came to a grounding plate. High electrical currents don’t like sharp corners, so a grounding plate directly beneath the mast makes for an easier route to ground. Credit: Malcolm Morgan
In the absence of a keel , the cumulative surface area of various underwater components – propellers, metal thru-hulls, rudders – is often more than sufficient to meet the area requirements for a grounding terminal.
However, these can only be considered adequate if they are situated below the air terminal and down conductor and individually have the requisite surface area.
Metal through-hulls do not meet this requirement.
If underwater hardware, such as a keel, is adequate to be used as the grounding terminal, the interconnecting conductor is part of the primary down conductor system and needs to be sized accordingly at 25mm².
Propellers and radio ground plates
Regardless of its size, a propeller is not suitable as a grounding terminal for two reasons.
First, it is very difficult to make the necessary low-resistance electrical connection to the propeller shaft, and second, the primary conductor now runs horizontally through the boat.
The risk of side flashes within the boat, and through the hull to the water is increased.

Sailing in lightning: GRP hull, fairing filler and iron keel will have carried different voltages during the strike – hence this damage
An engine should never be included in the main (primary) conducting path to a grounding terminal.
On modern engines, sensitive electronic controls will be destroyed in a lightning strike, and on all engines, oil in bearings and between gears will create resistance and therefore considerable heat which is likely to result in internal damage.
However, as it is a large conductive object, the engine should be connected to the internal lightning protection system.
Internal lightning protection
On its way to ground, lightning causes considerable voltage differences in adjacent objects – up to hundreds of thousands of volts.
This applies to boats with a functioning external lightning protection system but without internal protection.
Although the lightning has been given a path to ground along which it will cause as little damage as possible, dangerous voltages can be generated elsewhere, resulting in arcing and side flashes, threatening the boat and crew, and destroying electronic equipment.
We prevent these damaging voltage differences from arising by connecting all substantial metal objects on the boat to a common grounding point.

One of the holy grails of marine photography – a direct lightning strike on a yacht’s mast. Credit: Apex
The grounding terminal is also wired to the common grounding point.
By tying all these circuits and objects together we hold them at a common voltage, preventing the build-up of voltage differences between them.
All conductive surfaces that might be touched at the same time, such as a backstay and a steering wheel, need to be held to the same voltage.
If the voltages are the same, there will be no arcing and no side flashes.
The bonding conductors in this internal LPS need to be stranded copper with a minimum size of 16mm².
Note that there can be bonding of the same object for corrosion prevention, lightning protection, and sometimes DC grounding.
We do not need three separate conductors.
Electronic Device Protection
With lightning protection systems, we need to distinguish electric circuit and people protection from device protection.
Even with an internal LPS, high induced voltages may occur on ungrounded conductors (such as DC positive) which will destroy any attached electronics.
A mechanism is needed to short high transient voltages to ground.
This is done with surge protection devices (SPD), also known as transient voltage surge suppressors (TVSS) or lightning arrestors.

Marine-specific SPDs are few in number and domestic models are not suitable for boats
In normal circumstances these devices are non-conductive, but if a specified voltage – the clamping voltage – is exceeded they divert the spike to ground.
There are levels of protection defined in various standards depending on the voltages and currents that can be handled, the speed with which this occurs, and other factors.
This is a highly technical subject for which it is advisable to seek professional support.
Most SPDs are designed for AC circuits.
When it comes to DC circuits there are far fewer choices available to boat owners although there are an increasing number for solar installations that may be appropriate.
There is no such thing as a lightning-proof boat, only a lightning-protected boat, and for this there needs to be a properly installed LPS.

Nigel Calder is a lifelong sailor and author of Boatowner’s Mechanical and Electrical Manual. He is involved in setting standards for leisure boats in the USA
Even so, in a major strike the forces involved are so colossal that no practical measures can be guaranteed to protect sensitive electronic equipment.
For this, protection can be provided with specialised surge protection devices (SPDs).
The chances of a direct lightning strike on a yacht are very small, and the further we are north or south of the equator, the smaller this chance becomes.
It’s likely your chances of receiving a direct lightning strike are very much higher on a golf course than at sea.
‘Bottle brush’-type lightning dissipators are claimed by sellers to make a boat invisible to lightning by bleeding off static electrical charge as it builds up.
The theory rests upon the concept that charged electrons from the surface of the earth can be made to congregate on a metal point, where the physical constraints caused by the geometry of the point will result in electrons being pushed off into the surrounding atmosphere via a ‘lightning dissipator’ that has not just one point, but many points.
It is worth noting that the concept has met with a storm of derision from many leading academics who have argued that the magnitude of the charge that can be dissipated by such a device is insignificant compared to that of both a cloud and individual lightning strikes.
It seems that the viable choices for lightning protection remain the LPS detailed above, your boatbuilder’s chosen system (if any), or taking one’s chances with nothing and the (reasonable) confidence that it’s possible to sail many times round the world with no protection and suffer no direct strikes.
Whichever way you go, it pays to stay off the golf course!
Enjoyed reading Sailing in lightning: how to keep your yacht safe?
A subscription to Yachting Monthly magazine costs around 40% less than the cover price .
Print and digital editions are available through Magazines Direct – where you can also find the latest deals .
YM is packed with information to help you get the most from your time on the water.
- Take your seamanship to the next level with tips, advice and skills from our experts
- Impartial in-depth reviews of the latest yachts and equipment
- Cruising guides to help you reach those dream destinations
Follow us on Facebook , Twitter and Instagram.
By Product Categories
Small Boat Blocks
Big Boat Blocks
Complementary Hardware
Travelers & Genoa Leads
Mainsail Handling
Headsail Handling
Mooring Solutions
Spare Parts
Accessories
Harken Canvas
Sportfishing
Fly Soft-Attach Blocks
Carbo Air Blocks
Small Boat Classic
Flip-Flop Small Boat
GP Catamaran Ceramic Mainsheet Systems
Protexit™ Exit Blocks
Through-Deck
Wire High-Strength
Dinghy Vang
Small Boat Deck Organizers
Midrange Classic
Midrange Deck Organizers
Zircon Blocks
Element Blocks
Black Magic Air Blocks
Cruising ESP Blocks
Megayacht Blocks
Stainless Steel Blocks
Black Magic Air Runners
FlatWinder Powered Blocks
Mastbase Blocks
Over-the-Top
Crossover Blocks
Big Boat Deck Organizers
Cam Cleats & Kits
Cam Cleat Accessories
Cam Cleat Bases
Stand-Up Bases
Deck Organizers
Spinnaker Pole Cars
Soft Attachments
Fixed Padeyes
Removable Padeyes
Bolt-Down Fairleads
Grand Prix Jib Leads
Halyard Tensioners
Tiller Extensions
Peter's Desk Drawer
Dinghy Jib Leads
Crossbow Pivoting Self-Tacking Jib Traveler
13 mm Micro
22 mm Small Boat
27 mm Midrange
32 mm Big Boat
Windward Sheeting
42 mm Mini-Maxi
T-Track Genoa Lead
Access Rail System
13 mm AA Battcar System
22 mm A Battcar System
27 mm B Battcar System
32 mm C Battcar System
18 mm Switch Battcar System
26 mm Switch Battcar System
26 mm Trysail Switch
32 mm Switch Battcar System
32 mm Trysail Switch
40 mm Switch Battcar System
40 mm Trysail Switch System
Furling Mainsail Outhaul Systems
Single Line Reefing
Harken Vang-Master
Carbo Racing Foil
Small Boat Furling
Small Boat Underdeck
Reflex Furling
MKIV Jib Reefing & Furling
MKIV Underdeck Jib Reefing & Furling
Furling Accessories
Powered Furling
MKIV Ocean Furling
SnubbAir (Not a Winch)
Grand Prix Winches
Air Winches
Circuit Breakers
Analog Switches
Digital System Switch
Aluminum, Chrome & Bronze Winch Handles
Carbo OneTouch Locking Winch Handle
Service Kits
CLR Mooring Winches
Electric Captive Reel Winches
Hydraulic Captive Reel Winches
UniPower Radial
Single-Acting Integral Backstay Adjuster
Single-Acting Cylinders
Locking Cylinders
Double-Pull Cylinders
Grand Prix Cylinders
Hydraulic Cylinder Rod End Blocks
Hydraulic Cylinder End Fittings
Control Valves
Control Manifolds
Control Panels
Compact Control Panel
Rotary Pumps
Hydraulic Pump Handles
Power Systems
Repair Kits
Ball Bearings
Block Spare Parts
Traveler Cars
Furling Spare Parts
Winch Spare Parts
Winch Service Kits
Blockheads Gear
Promo & Gifts
Marine Grip
Blue Performance
Jeep/Truck tops
Garage storage
One-design Covers
Boat accessories
Canvas bags
By Type of Sailing
Dinghy / One-Design
Offshore Racing
Coastal / Day Cruising
Bluewater Cruising
Megayachts / Custom
Service Guide
Tech/Service
deck layouts
Data Sheets (SDS)
How to choose
System diagrams
Calculators
Reeving diagrams
Traveler Purchase Selection Guide
How to Choose
Testimonials
Hoister Videos
Request a Quote
Request Samples
Fabric details
Cover Styles
Canvas Videos
Contract Services
Materials and Components
Our Equipment
Contract Cut-and-Sew Project Spotlight
- Harken at the front
- Safety & Rescue
Support / One-design deck layouts
Lightning Deck Layout

Adjustable Ball Bearing Lead Car
Upgrading to an adjustable lead car system allows you to change your lead under sail without having to tack to unload the car. The Micro CB traveler cars are very small and lightweight, but strong—perfect for the Lightning.

Belowdeck Vang System
This split boom vang lets you easily adjust the vang from both sides while hiking. The 24:1 purchase uses lightweight Carbo blocks for the power needed to control sail shape without adding weight to the boat. The cascading system uses small high-tech line to help keep everything clean above deck.

If you would like to link to or reprint this article please contact [email protected]
Class History
With over 15,000 boats,the Lightning has 60 years of tradition behind it. This competitive 19-foot trailerable centerboarder is one of the most competitive one-design classes today. But whether you're interested in serious racing or just want to go for a ride, the Lightning gives you what you're looking for. Some great sailors have been 'struck by Lightning': Ted Turner, Dennis Conner, Ken Read, Bill Shore, and Greg Fisher to name a few.
Links International Lightning Class McLube™ Harken Canvas
Boat Specifications
Length: 19 ft (5.8 m) Beam: 6 ft 6 in (2 m) Displacement: 700 lb (318 kg) Sail Area (main & jib): 177 sq ft (16.4 sq m) Spinnaker: 300 sq ft (28 sq m)

Related products

29mm Block — Swivel, Becket

44mm Through-Deck Dinghy Block

13mm Low-Beam Track — .6 m

29mm Cheek Block

29mm Clew Block

29mm Double Block — Swivel

29mm Triple Block — Swivel

40mm Traveler Block

57mm Ratchamatic® Block — Swivel

29mm Double Upright Lead Bullet Block

13mm Car — Pivoting Shackle

Standard Cam-Matic® Cleat - 150

Standard Cam Base — Swivel

Standard X-Treme Angle Fairlead

25mm Wire Block — Shackle
Product categories.
- United States
- New Zealand
- United Kingdom
Harken US Offices will be closed Monday, September 2 . Any orders placed after 12 p.m. Friday, August 30 will be processed upon re-opening on Tuesday, September 3.
(Adobe Acrobat Reader required - |
- - Build logs for subjects built 1901 - Present Day

- Remember me Not recommended on shared computers
Forgot your password?
Lightning Sailboat by Woody S - from Dumas plans
By Woody S March 19, 2022 in - Build logs for subjects built 1901 - Present Day
- Reply to this topic
- Start new topic
Recommended Posts
I have been inspired by Andrew J's Lightning experience building first a Kit and then from scratch.
My children learned to sail in the 1960's on Lightning #5138. I would like to create a model of that sailboat. I have built scratch models of 1850's schooners before. But on this project I decided to take some shortcuts and start with the Dumas plans. The fun will be in the changes in rigging and paint to match the 1960's boat. The parts of the boat that won't be visible will not get much attention. Sorry purists.
Anyway here is a photo of the real boat. And a photo of progress to date. The only changes so far have been to add some interior ribs. The floorboards and seats will be the focus of the interior.
I would love to hear from anyone who can help me find the scale hardware. Also tips on the rigging aand finishes would be most appeciated.
Thanks, Woody

- yvesvidal , ccoyle , Matt D and 2 others

Link to comment
Share on other sites, roger pellett.
A nice suit of sails, beautifully set! 1960’s- I assume that this was still a Woody.
Thanks Roger.
Yes this was a Skaneateles built boat. We sailed it on Sacondaga Reservoir near Schenectady , NY
I just found a nice looking model of #392 on the Gallery here. It looks like he raised the seat level as did I. He also made a nice mast step. I wish I knew where he got the hardware.

A very nice looking sailing dinghy, Woody!
I have been looking at pictures of old Lightnings near # 5138 to try and remember what my cockpit looked like. This morning I mocked up some seats and floorboards. The kit had solid wood for the seats and floorboards, which was not my Skaneatlas design. Also I see that I am going to have to cut away more of the ribs under the deck . I am planning to stain the centerboard trunk mahogany because that is what it was. The ribs were spruce and I am thinking of spruce floorboards as well. Too much dark mahogany for me. My color scheme will be a white deckand bottom and royal blue topsides.

- yvesvidal , GrandpaPhil , KeithAug and 1 other
Peter Rumgay
Wow, my father and l built Lighting 7759 in 1966 in our basement. We both shared a great love of sailing
and ship model building. At 91 my father remembered he still had the blue prints of the Lighting and asked me
to built him a model of our boat. I hope you have a much fun building your Lighting as l did because it brought
back such great memories. Cheers, Peter Rumgay
That is interesting. The Lightning was designed by Sparkman & Stevens with home building in mind. But my hat is off to you for doing it.
Do you have a picture of the model or the boat ?
The Lightning class superceded the Star class here in Noroton Bay, CT in the 1940's and I learned to sail as a crew.
Best, Woody
That mock up looks pretty good!
l haven't worked out how to send pictures to MSW yet. I can send you pictures of my model if you
sent me an e-mail [email protected]. My turnbuckles came from a. J. Fisher models with some
modification.Blocks came Cornwall model fittings (England) the corell line of ship model kits. The
stainless wire rigging and halyards which make the model look so good came from Cornwall models
as well. Mast & Boom track is made thin brass rod. I too purchase the Dumas kit but only used it as
guide to build my lighting as the rib sizes were wrong. The block sizes on mine are out , make sure you
scale them properly . You model is really coming along and going to look great.
Wow ! That is so helpful. I can't wait to rsearch those fittings and rigging. I was wondering about the mast track. I was thinking my mast was slotted for the bolt rope of the sail. (easier to do 🙂 ) but I am probably wrong.
PLease do email pictures of your model. Email [email protected]. I just emailed you and hope it goes through. I am looking forward to seeing the details of your boat.
Did receive you e-mail and sent pictures that l Hope help. Lightings of that era had mast
tracks and slides very hard to reproduce at that scale and beyond my skills, that's why l
went thin brass rod with very tiny rings to hold sail.
Cheers Peter

I received your email, but unfortunately no pictures were attached. Maybe it is because I have a PC and you have Apple, but probably it is something else. I don't understand why you can't attach your picture files to your messages here. On the bottom it says " choose files".
Anyway I am in the process of gluing on the deck tonight. (picture)
Your model will be authentic inasmuch as you took the time to build the real frames, and planked it. Mine will not, but I hope that the casual observer will not be able to see the lack of interior detail. If I had had your plans i might have done it. I spent a lot of time trying to turn the Dumas Bass wood centerboard trunk into mahoghany, whereas you probaly made yours out of real mahogany from the start. Anyway I will make a mahoghany rudder.
I am thinking that I will paint the deck before putting on the cockpit coaming and splash boards.
- GrandpaPhil and yvesvidal
Today I worked on the floorboard . Next I will have to make the forward and aft seats and figure out how they were supported. The picture on the left is of a Lightning sailboat of a similar vintage. I can see some more modifications for me to copy that. I wish I could figure out how to rotate these pictures.

- wefalck , Paul Le Wol , GrandpaPhil and 2 others
Looking very classy!

For one I would make the frames out of bass wood instead of the oversize balsa provided. I cut out a lot of the balsa frames but would have liked to do more. The cockpit trim called for on the plans is not correct and is going to take a lot of work to make and fit although I was able to utiilze the mahogany from the kit.
I decided to cut the centerboard slot in the bottom plank before gluing it on. From here on I will have to use research to go forward with cockpit trim , mast step, chainplates, and rigging. This will take happy time.
- Andrew J. , GrandpaPhil , yvesvidal and 2 others

Wonderful job on the seats and floor boards! I hope to make mine look as good when I get to them.

Beautiful job on this boat. I have a kit built version put together after I bought my full scale lighting, a Skaneateles built boat #7592. I sold it 10 years ago, it underwent full restoration and still races competitively on the East Coast and at the Mid-Winters in Tampa every year.
current dry dock USS Arizona
- 4 weeks later...
Thank you Dion and Andrew for your kind remarks.
Especially, coming from Andrew who built his beautiful Lightning hull from scratch . I use the picture of his model for reference. I also got a lot of good info from Peter Rumgays lovely boat.
I am now into the hard part of working without any plans I have scoured the internet trying to find out exactly where the Centerboard spool and reel are located. And how are the jack stays attached to the jumper struts ? I have ordered rigging fittings, stainless steel, working turnbuckles and even a boom vang. It looks like I will have to make brass tangs and chainplates. But it is all good fun. I scrapped the Dumas rudder and centerboard. I am going to make my tiller the same as it was on #5138, split and reinforced with brass. I am going to put the rub rails on last
Cheers, Woody

- Andrew J. , yvesvidal , GrandpaPhil and 2 others
- 1 month later...
I have finally finished painting the hull. It took many trys before I got the mirror finish on the topsides. I finally used auto body primer and paint. (many coats).
Putting the rub rails on last was a mistake because the glue got everywhere and I had to sand down and redo.
Now I have the fun of installing the centerboard and its mechanism. Then the mast and rigging.
If anyone knows where I can find realistic jib sheets and main sheet lines ( eg ;braided dacron ) Please let me know.
Thanks , Woody

- GrandpaPhil , Paul Le Wol , berhard and 6 others
Beautiful job! It looks like the real thing.
That is absolutely stunning! I would love to see details about how you made the centerboard drum. That's something I've been puzzling over for quite some time now. And the rudder hardware looks especially excellent I must say!
Roger, Thank you very much for your comment. At this point I need a lot of encouragement.
Andrew, where is your finished model ? I have printed the pictures of the amazing hull that you made from the original plans. Have you gone further?
Thank you for your comments. I turned the drum and spool from cherry wood and then drilled the lightening holes. There is not a lot of room under the deck for the mechanism. I think the pintles and gudgeons on the rudder came from modlers central in Australia.

She is a beauty! Are there are areas where the deck is "rough" to provide non skid surface? Had this situation on an Islander 36 model many years ago and could not figure a way to do this to scale for a while. Finally came up with using powdered glass in the fiberglass molds where these areas were to be. The positives that came out of the mold were a perfect replication. I am sure a similar treatment could work on the positive versus the mold if you need to have such an area.
Again, your workmanship is great!
PLEASE take 30 SECONDS and sign up for the epic Nelson/Trafalgar project if you would like to see it made into a TV series. Click on http://trafalgar.tv There is no cost other than the 30 seconds of your time. THANK YOU
well done, looks great, keep up the good work. Love to sail a lighting again.
cheers. Peter Rumgay
Unfortunately it's been quite some time since I made any progress. I really have to be in the right head space to work on it, and I don't want to work on it just because I feel like I have to. Seeing your progress is a great inspiration though, so my motivation might be coming back soon. We shall see! I don't have access to a lathe or any kind of fancy tools like that, so if there's any chance you might be up to creating another one of those centerboard drums for me, I would be happy to pay you for your time and skill. Please feel free to private message me if that's something you would be willing to do.
Thank you for telling me about your method of achieving a realistic non-skid deck on your model.
Peter Rumgay used cotton cloth and paint on his beautiful model Lightning and it looks great . It is in keeping with the way Lightnings of that era were actually done.
I have been thinking about mixing some fine salt with paint. In the end I will probably just wet sand the deck and move on.
I think that I know what you mean about inspiration and competing interests. I am packing now to spend the Summer in Hood River, OR where I will see family and hopefully do some kiteboarding.
I am happy to turn you a drum/spool when I get back in September. The hard part was getting the specifications. The turning takes about an hour. I owe you big time for all the info I got from your blog. I will just have to get your address which I can do when I get back.
Best Wishes, Woody

On 6/11/2022 at 10:47 PM, Woody S said: It took many trys before I got the mirror finish on the topsides.
It certainly worked, looks beautiful.
Current Build:-
Cangarda (Steam Yacht) - Scale 1:24
Previous Builds:-
Schooner Germania (Nova) - Scale 1:36
https://modelshipworld.com/topic/19848-schooner-germania-nova-by-keithaug-scale-136-1908-2011/
Schooner Altair by KeithAug - Scale 1:32 - 1931
http://modelshipworld.com/index.php/topic/12515-schooner-altair-by-keithaug-scale-132-1931/?p=378702
J Class Endeavour by KeithAug - Amati - Scale 1:35 - 1989 after restoration.
http://modelshipworld.com/index.php/topic/10752-j-class-endeavour-by-keithaug-amati-scale-135-1989-after-restoration/?p=325029
Other Topics
Nautical Adventures
http://modelshipworld.com/index.php/topic/13727-nautical-adventures/?p=422846
- 3 months later...
The model of "Firefly" Lightning #5138 is in the final stages. I have been working hard on her since returning from Hood River, OR.
I still need to add the tiller extension and do a better job of coiling the lines, improving the boom vang, and then making a stand .
I thank all of you for your help along the way. I wish I had used the scale ribs as did Andrew instead of the Dumas kit plans. And the mahogany from the kit was not a good choice. Peter's model looks much better in cherry
I had a devil of a time figuring out the rigging. And I had to make many parts several times, because they kept breaking or getting lost on the floor. I could not find scale cleats and had to carve them out of wood. My craftsmanship did not do justice to the many small parts. But it was an enjoyable puzzle, and for me the boat looks very much like Firefly #5138.
Best wishes, Woody

- Paul Le Wol , ccoyle , Andrew J. and 4 others
I feel like I should find a new adjective, but "absolutely stunning" is always the first thing that pops into my head when I see what you've created here. Looking forward to seeing what you do for a stand. I'm thinking of trying something with plexiglass or lexan, kind of like the display stand I got for my Lego Millennium Falcon, so it looks like it's just floating there.
I really appreciate the compliment from Andrew. I have not shown the model boat to my friends here, and it is nice to get feed back. I must say that I could do a better job on the next one. Building without plans is difficult.
I just ordered a display case from BlueJacket. I condidered plexiglass. It is less expensive and more contemporary. Contemporary models look very good under plexiglass. But in the end I chose cherry wood to match the other models that I have made. The measurements include the centerbosrd halfway down
The stand and cradle will be as simple as possible. I am working on the design. (Andrew , I have not forgotten your drum and spindle)
Oh, I did not try and make the deck non skid. Too many possible problems.

- Paul Le Wol , VTHokiEE , gsdpic and 6 others
Join the conversation
You can post now and register later. If you have an account, sign in now to post with your account.

× Pasted as rich text. Paste as plain text instead
Only 75 emoji are allowed.
× Your link has been automatically embedded. Display as a link instead
× Your previous content has been restored. Clear editor
× You cannot paste images directly. Upload or insert images from URL.
- Insert image from URL
- Submit Reply
Recently Browsing 0 members
- No registered users viewing this page.
Modelshipworld - Advancing Ship Modeling through Research
SSL Secured
Your security is important for us so this Website is SSL-Secured
NRG Mailing Address
Nautical Research Guild 237 South Lincoln Street Westmont IL, 60559-1917
Model Ship World ® and the MSW logo are Registered Trademarks, and belong to the Nautical Research Guild (United States Patent and Trademark Office: No. 6,929,264 & No. 6,929,274, registered Dec. 20, 2022)
Helpful links.
- Articles Database
- NRG Home Page
- NRG Online Store
- Important: Our Guidelines
- Terms of Use
- Buildlog Index
About the NRG
If you enjoy building ship models that are historically accurate as well as beautiful, then The Nautical Research Guild (NRG) is just right for you.
The Guild is a non-profit educational organization whose mission is to “Advance Ship Modeling Through Research”. We provide support to our members in their efforts to raise the quality of their model ships.
The Nautical Research Guild has published our world-renowned quarterly magazine, The Nautical Research Journal, since 1955. The pages of the Journal are full of articles by accomplished ship modelers who show you how they create those exquisite details on their models, and by maritime historians who show you the correct details to build. The Journal is available in both print and digital editions. Go to the NRG web site (www.thenrg.org) to download a complimentary digital copy of the Journal. The NRG also publishes plan sets, books and compilations of back issues of the Journal and the former Ships in Scale and Model Ship Builder magazines.
Our Emblem ®
Nautical Research Guild ® and the NRG logo are Registered Trademarks, and belong to the Nautical Research Guild (United States Patent and Trademark Office: No. 6,999,236 & No. 6,999,237, registered March 14, 2023)
- Existing user? Sign In
- Latest Posts
- All unread content since my last vist
- Unread topics I have posted in
- Create New...
- Search forums
Follow along with the video below to see how to install our site as a web app on your home screen.
Note: This feature may not be available in some browsers.
- If you log in, the ads disappear in the forum and gallery. If you need help logging in or getting registered, send request to: [email protected]
- Airboat Talk
Blue Lightning Belt Drives?
- Thread starter Waterthunder
- Start date Jan 7, 2008
Southern Airboat Gallery Archives

Waterthunder
Well-known member.
- Jan 7, 2008
I have only seen one of these drives have they built any in the 2.68 ratio yet and how have they been holding up. Has anybody put anything over 500HP to them yet! I suggested someone use one because they insisted on side by side seating and the stick and driver be on the left of the boat but I couldn't recommend it because I haven't heard anything about them yet!

Seen your boat today. They said there waiting on your motor. :lol: The boat and rigging looks great though.
BATTLE READY
I called WW about getting my blades redone on my signature series prop and in conversation I asked about the Blue Lightning in 2.68 and I was told it is not available and when I asked why I was told there has not been enough interest in the 2.68 to made it cost effective to make. Dave I just looked on the WW site, and in the installation instructions, it says GTO put one of your motors on a boat with the new biue lightning drive, It does not say which hp motor that was used. When you find out the details let us know. Rob
I know of 5 or 6 people that would have bought one already if they were available. I will try a 2.68 when their offered!
Dave, reread my above post I added to it. Rob
I think they ran a 2.38 with a four blade it really wasn't the right ratio and prop combo for the motor! I think it was a 500HP if not it was a 550HP!

no 268 there 238 it will handle well over 500 hp tore mine down after 140 hrs not a flaw, and it took 1 hr & 15 mins to disasemble an reinstall it was so simple a cave man could do it i run hard with a 450hp motor with a big 3 blabe sirious prop 82 inch any body that knows me knows ill go to the bad any time i got a chance
Silent Prop
As soon as my quarter jar gets full I'm gonna buy one ..... I was hoping for a 2.5 to one, but like most WW stuff they don't seem to be interested in doing what people want. Only what they think people should have. olf
OLF we are talking about engineers here. David W is a very sharp man and it took a very long time over multiple discussions for him to understand why I love the 2.68. Not that either of us were right or wrong he looks at everything with an engineers mentality I look at everything from a practical mentality. He being an engineer only wants to turn the prop where it makes the most efficient thrust which any good engineer wants to see. I want to make the most thrust at the rpm my boat runs at the most, hence were his latest project is headed now he is trying to get the best of both Worlds. And he deserves credit for trying to improve something that everybody will resist any improvement or something new with.
well i still dont buy the 268 theory its just for sound and before i get jumped yes i have tryed it drove a 3to 1 and a 268 t0 1dont like the feeiln of like my trucks transmission is slippin , and if ya have the hp you can turn the big props with the 238 an save gas
I understand clearly what you're saying, Dave ..... and I'm not for one minute saying that I don't want one because they're beautifully engineered and a very high high precision piece. All I'm saying is that if I wanted to be in the belt drive business and I had had several requests for a 2.5 or a 2.68 drive, I'd take a deposit, shut down the CNC machine and make the damn thing! It's the whole reason that the Japanese now own the American car market. They're willing to build what people Want !!

The ONLY reason Harley Davidson builds Sportsters is that people want them. They sure aren't up to any typical Harley standard but they sell enough along to heep the LOGO in public view. There was a time when they either were going to or did stop production of them. But a few folks still were and are willing to ask for them so they keep putting them out there. Today (2007-2008) it is a decent seller when all the other lines are sagging in sales. Scotty :wink:
Exactly, Bear. If you want to make stuff, you make what people want and you make it the best you know how, or you plan on spending the last years of your life being a greeter at Wal-Nuts! It's a very simple theory. America needed an automobile that the common man could afford, so Henry Ford found a way to make that car. olf

hey ken it is always nice to see some say it like it is.
Thanks, Sam .... life can be so simple when people cut out all of the Bull Sh*t and just do what is begging to be done. olf
well i get your drift but has any one made the request, its the old supply and demand im sure if a boat builder approached ww and ask 4 a couple off hundred they would consider it but i dont think thats the case merly conjecture i have no inside imfo on ww just a long time happy customer, not trying to start any thing just know im partial to 238 gear tryed em all it just suits my combo an driving stile but i dont race if so that would be a defferant story
Let me be clear here, I am not Dissing a single word Dave said. I am more reinforcing the idea of they will sell if they make them cause obviously folks want them. Scotty :wink:
I bet more people want 2.68's then they have sold 2.38's! I have only seen one or two instances out of 30 or more instances where people preferred the way a 2.68 ran to a 2.38.
Plum, you know I like you so all I'm saying is that I see Mr. Wine leaving a lot of money laying on the table just because he's unwilling to be a little more flexible. In actual fact, the current Lightning drive will work for me (I think) and not have to change much of my riggin except for the two rear legs of the engine stand, and then I can use three of those new "R" blades. I've got three "Q"s on it now. olf edited for blade type ..
[email protected]
At This time, the Blue Lightning Drive is only offered in a 2.3 to 1 Ratio. Up until last January, the 12 units that were made were proto-type. This was to work out any problems they may have. Now they are in Production and working excellent. The 2.3 by Century Drives and Water Walker, And the 2.37 Gear by Panther, and the 2.38 by Stinger are the most used Ratios on the market. These Ratios are the most economical on the market with the prop designs being used today. This is the ratio that works on affordable engines like the 4.3 V6. 330 HP 350 V8, 355 HP ZZ4, affordable engines that are in the lower HP range. With these ratios and engines, you can run an affordable 2 blade Maximus, Serious, or Sen. Super Wide Prop on a 14 ft boat and go where most other boats go and most of the time, use less fuel. On the other hand, if you can afford a 3 or 4 blade prop and 500 plus HP, Then a 2.68 ratio is fine. It,s based on what is affordable for over 80 % of the market. It's just not cost effective for David Wine to set-up CNC's to cut out the 2.68 ratio and have the belts made only to sell a few units each year. Now, if someone thinks these 59 Lb Drives will sell in the 2.68 ratio and wants to order 100 each. Give David a call. Thanks, Chuck
| |||||||||||||||||||||||||||||||||||||||||||||||||||||||||||||||||||||||||||||||||||||||||||||||||||||||||||||||||||||||||||||||||||||||||||||||||||||||||||||||||||||||||||||||||||||||||||||||||||||||||||||||||||||||||||||||||||||||||||||||||||||||||||||||


IMAGES
VIDEO
COMMENTS
My high performance sailing dinghies include the state of the art Merlin Rocket HAZARDOUS series and the HADRON singlehander series, including the HADRON H2 carbon composite singlehander. My small yacht designs have been developed for ease of use, light weight and excellent performance. All but the largest are easy to tow behind a 2 litre vehicle.
The Lightning is an American sailing dinghy that was designed by Olin Stephens of Sparkman & Stephens, as a one-design racer and first built in 1938. [1] [2] [3]An accepted World Sailing class, the boat is one of the most popular one-design sailing classes in the United States and is also raced in several other countries. [1] [3]The design was developed into a smaller boat, as a trainer for ...
BLUE LIGHTNING is a sleek and sophisticated 22ft trailer-sailer with exceptional performance and comfortable accommodation . BLUE LIGHTNING is one of a series of sports trailer-sailer designs ranging from 5.5 metres to 9 metres LOA. My design portfolio also includes high performance sailing dinghies. BLUE LIGHTNING is capable of speeds in excess of 20 knots (yes, we've been there!), yet has 3 ...
Lightning preowned sailboats for sale by owner. Lightning used sailboats for sale by owner. Home. Register & Post. View All Sailboats. Search. Avoid Fraud. ... 21' Paceship Blue Jacket Trailered, New Hampshire Asking $ 44.6' pearson countess Saint Petersburg, Florida Asking $65,000. 46' cal 246 deltaville, Virginia
The Blue Jay's spacious cockpit has room for three or more kids or adults. Photo by Jamie Bloomquist . To a Blue Jay sailor, the 19-foot Lightning might seem like a big and elegant yacht. The Lightning is a more elaborate boat to build because, prior to being offered in fiberglass, it was meticulously planked with top-quality softwood.
Designer and builder Keith Callaghan and his daughter Erin sail BLUE LIGHTNING off the Essex coast (UK) in August 1999. On a 2 sail reach the boat achieved 1...
Blue Lightning reaches down the River Stour at 8 knots. Her lack of wake demonstrates how cleanly she goes through the water. BLUE LIGHTNING was designed as a fast yet easily sailed coastal cruiser. She is rigged for single handed sailing, with a self tacking, reefing foresail, and slab reefing on the mainsail.
Why Buy a Lightning. The Ultimate One-Design Sailboat. Sean Fidler - USA 14969. The Lightning combines a perfect balance of sail / tuning adjustments with boat / crew size. At only 700 lbs., Lightnings are light enough to trailer and launch easily. They are also small enough to be sailed easily with 3 people.
Allen Boat Company Allen Boats, Spars, Trailers and The Very Best Racing Equipment! Builder of the Lightning, Highlander, Jet-14 and Blue Jay. Allen Boat Company; 200 Cornwall Ave. Buffalo NY 14215, USA; Phone: (716) 842-0800; Fax: (716) 842-0113; Email - [email protected]; International Lightning Class Association.
In salt water this needs a minimum area of 0.1m². In fresh water, European standards call for the grounding terminal to be up to 0.25m². A grounding terminal must be submerged under all operating conditions. An external lead or iron keel on monohull sailing boats can serve as a grounding terminal.
40 to 50 indicates a heavy bluewater boat; over 50 indicates an extremely heavy bluewater boat. Comfort ratio = D ÷ (.65 x (.7 LWL + .3 LOA) x Beam^1.33), where displacement is expressed in pounds, and length is expressed in feet. Capsize Screening Formula (CSF): Designed to determine if a boat has blue water capability.
Class History With over 15,000 boats,the Lightning has 60 years of tradition behind it. This competitive 19-foot trailerable centerboarder is one of the most competitive one-design classes today. But whether you're interested in serious racing or just want to go for a ride, the Lightning gives you what you're looking for. Some great sailors have been 'struck by Lightning': Ted Turner, Dennis ...
BLUE SKIES is a smaller version of Blue Lightning .The design achieved 3rd place in the Practical Boat Owner Magazine trailer-sailer design competition. (see December 1999 PBO for 2 page description of the design). She retains all the features of the larger boat, in a smaller package.
31' Mariner Ketch - Major Restoration & Repower - New Rigging & Sails Tenants Harbor Maine, Maine Asking $45,000
I have been inspired by Andrew J's Lightning experience building first a Kit and then from scratch. My children learned to sail in the 1960's on Lightning #5138. I would like to create a model of that sailboat. I have built scratch models of 1850's schooners before.
Building started in October and BLUE LIGHTNING was launched (with incomplete interior) in August 1995. In the last 20 years, my sports trailer-sailer and dinghy designs have been sold to owners in several continents. I am designing Merlin Rockets again, and have 3 new singlehanders Heatwave , HAZE 4000 and HADRON and two dayboats - Highlight ...
Lightning used sailboats for sale by owner. Home. Register & Post. View All Sailboats. Search. ... 21' Paceship Blue Jacket Trailered, New Hampshire Asking $ 44.6' pearson countess Saint Petersburg, Florida ... 19' Flying Scot Flying Scot 19 Sailboat Lake Fairview Marina Orlando, Florida Asking $29,495. 22' Catalina Yachts Capri 22
At This time, the Blue Lightning Drive is only offered in a 2.3 to 1 Ratio. Up until last January, the 12 units that were made were proto-type. This was to work out any problems they may have. Now they are in Production and working excellent. The 2.3 by Century Drives and Water Walker, And the 2.37 Gear by Panther, and
Lightning used sailboats for sale by owner. Home. Register & Post. View All Sailboats. Search. Avoid Fraud. ... 21' Paceship Blue Jacket Trailered, New Hampshire Asking $ 40' Islander Islander 40 Minnesott Beach, North Carolina Asking $30,000. 46' cal 246 deltaville, Virginia Asking $68,000.
LIGHTNING TUNING GUIDE. Proper boat speed depends mostly on constant and consistent adjustments to your rig and sails. The following measurements are those we have found to be the fastest settings for your new North Sails. We have included information on both the tuning of the M-5 and the MF-2 design sails. The M-5 is a more backstay sensitive ...
BLUESTORM is a slightly larger version of BLUE LIGHTNING , at 7 metres LOA.With her vertical stem, she uses her full length when sailing, and should be a match for sportsboats like the Hunter 707. Though she has only 70% of the sail area, she has the same sail area to displacement ratio (24) and a much lower displacement/length ratio (84 vs 126).
1938. Lightning is a 5.8 m monohull sailboat designed by Sparkman & Stephens and built by Nickels Boat Works, Inc., Skaneateles Boat & Canoe Co., Helms - Jack A. Helms Co., Siddons & Sindle, Lippincott Boat Works, J.J. Taylor and Sons Ltd., Lockley Newport Boats, Eichenlaub Boat Co., Mobjack Manufacturing Corp., Clark Boat Company, Allen Boat ...